Advertisement
Quick Links
Advertisement

Related Manuals for GE ZGU660


Summary of Contents for GE ZGU660
- Page 1 Monogram.™ Use and Care & Installation Guide for ZGU660 ZGU661 Downdraft 36″ Gas Cooktop...
- Page 2 Monogram cooktop’s superior blend of form and function will delight you for years to come. The ZGU660 and the ZGU661 Monogram cooktops were designed to provide the flexibility to blend in with your kitchen cabinetry. Its sleek design can be beautifully integrated into the kitchen.
- Page 3 It is intended to help you operate and maintain your new cooktop properly. Keep it handy for answers to your questions. If you don’t understand something or need more help, call: ® GE Answer Center 800.626.2000 24 hours a day, 7 days a week Write down the model and serial numbers.
- Page 4 IMPORTANT SAFETY INSTRUCTIONS Read all instructions before using this appliance. IMPORTANT SAFETY NOTICE WARNING—TO REDUCE THE RISK OF FIRE, ELECTRIC SHOCK, OR INJURY TO • The California Safe Drinking Water and Toxic PERSONS, OBSERVE THE FOLLOWING: Enforcement Act requires the Governor of California to publish a list of substances known A.
- Page 5 • Do not clean the cooktop with flammable or • To minimize the possibility of burns, ignition of volatile cleaning fluids. flammable materials and spillage, turn cookware handles toward the side or center of the cooktop • Do not clean the cooktop when the appliance without extending over adjacent burner or vent area.
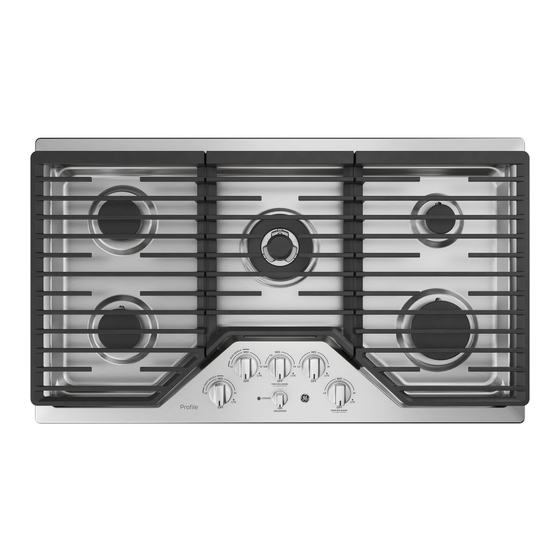
- Page 6 SAVE THESE INSTRUCTIONS FEATURES OF YOUR COOKTOP Models ZGU660 and ZGU661 1. Vent 6. Fan Speed Control 2. Vent Filters (behind the grille) 7. Vent Control 3.
- Page 7 Electric Ignition Auto Relight All of the burners on this cooktop are equipped with The burners on this cooktop relight automatically electric igniters that eliminate the need for standing if the flame goes out. This helps prevent the pilot lights. inconvenience of having to manually relight a burner.
- Page 8 USING YOUR COOKTOP Electric Ignition Your surface burners are lighted by electric ignition, Surface burners in use when an electrical power eliminating the need for standing pilot lights with failure occurs will continue to operate normally. constantly burning flames. In case of a power outage, you can light the surface burners on your cooktop with a match.
- Page 9 Cookware Aluminum: Medium-weight cookware is Heatproof Glass Ceramic: Can be used for recommended because it heats quickly and evenly. either surface or oven cooking. It conducts heat Most foods brown evenly in an aluminum skillet. very slowly and cools very slowly. Check cookware Use saucepans with tight-fitting lids for cooking with manufacturer’s directions to be sure it can be used minimum amounts of water.
- Page 10 COOKTOP VENT SYSTEM The built-in vent system helps remove cooking vapors, odors and smoke from foods prepared on the cooktop. Continuous use of the vent system helps keep the kitchen comfortable and less humid, reducing cooking odors and soiling moisture that normally creates a frequent need for cleaning.
- Page 11 CARE AND CLEANING Proper care and cleaning are important so your cooktop will give you efficient and satisfactory service. Follow these directions carefully in caring for it. Before cleaning any part of your cooktop, be sure all burners are off and DISCONNECT ELECTRICAL POWER TO THE COOKTOP at the fuse box or circuit breaker panel, or pull the cooktop power plug, located beneath the cooktop and inside the cabinets.
- Page 12 CARE AND CLEANING (continued) Burner Assembly The burner assemblies should be wiped clean often. Turn all controls OFF before removing burner parts. The electrode of the spark igniter is exposed Burner Grate when the top of the burner is removed. Be careful not to push in any surface unit controls while the top of a burner is removed.
- Page 13 INSTALLATION INSTRUCTIONS BEFORE YOU BEGIN IMPORTANT SAFETY INSTRUCTIONS The cooktop has been design certified by the Read these instructions completely and American Gas Association. As with any appliance carefully. using gas and generating heat, there are certain IMPORTANT–OBSERVE ALL GOVERNING safety precautions you should follow.
- Page 14 INSTALLATION INSTRUCTIONS (continued) STEP 1 STEP 2 PREPARING THE COUNTERTOP PREPARING FOR INSTALLATION 36″ min ″ Not less than 1 ⁄ ″ 13″ 25″ ⁄ ″ ⁄ 30″ 18″ 8″ min ″ min. ″ min. ″ ⁄ ⁄ Not less than 2 ⁄...
- Page 15 STEP 4 Cut hole in the cabinet wall or floor as appropriate for your installation. Make sure PROVIDE ADEQUATE GAS SUPPLY the exhaust duct is located between wall studs or This cooktop is designed to operate on the floor joists. natural gas at 4″...
- Page 16 INSTALLATION INSTRUCTIONS (continued) STEP 7 STEP 6 INSTALL THE DOWNDRAFT UNIT INSTALLING THE COOKTOP Remove the Remove all packaging material from the cooktop. Position the cooktop over the cut-out opening downdraft unit from the and carefully lower it into place, making sure that the power cord is dropped into the cabinet.
- Page 17 STEP 7 (continued) Appropriate flare union adapters are required at each end of the flexible connector. INSTALLING THE COOKTOP Turn on the gas; check for leaks using a NOTE: If the cooktop is installed in a 36 inch liquid leak detector at all joints in the system base cabinet, the mounting brackets cannot be (the pressure test nipple is adjacent to the gas used because of the interference with the sides...
- Page 18 Should not exceed 75 ft when the burner * Equivalent lengths of duct pieces are based is lit. Turn the on actual tests conducted by GE Evaluation knob to OFF Engineering and reflect requirements for good position; repeat venting performance with any downdraft cooktop.
- Page 19 STEP 12 CHECK OPERATION OF DOWNDRAFT To raise the vent, turn the VENT knob to RAISE. Hold the knob at the RAISE position until the vent is fully extended. The vent will automatically stop when it is fully extended or when the VENT knob is released.
- Page 20 If you do not have all the above listed components, and cams. or if you are in any doubt, please contact the nearest GE Service and Parts Center. USE ONLY APPROVED PIPE DOPE RESISTANT TO LP GAS. Total input rating after conversion: •...
- Page 21 CONVERTING TO LP GAS or Converting Back to Natural Gas from LP CONVERT THE SURFACE BURNERS CONVERT THE PRESSURE REGULATOR WARNING: Do not remove the pressure Top Grate regulator from the cooktop. 1. Locate the pressure regulator under the rear of the cooktop.
- Page 22 CONVERTING TO LP GAS or Converting Back to Natural Gas from LP CHECK FOR LEAKS CHECK QUALITY OF FLAMES The combustion quality of burner flames needs When all connections have been made, make to be determined visually. sure all cooktop controls are in the OFF position and turn on the main gas supply valve.
- Page 23 • The vent must be fully extended before fan will work. NOT WORK • Fan control knob must be turned in clockwise direction to turn fan on. If you need more help…call toll free: ® GE Answer Center 800.626.2000 consumer information service...
- Page 24 NOTES...
- Page 25 NOTES...
- Page 26 We’ll Be There With the purchase of your new Monogram appliance, receive the assurance that if you ever need information or assistance from GE, we’ll be there. All you have to do is call—toll-free! GE Answer Center® 800.626.2000 Whatever your question about any Monogram major appliance, GE Answer ®...
- Page 27 To know what your legal rights are in your state, consult your local or state consumer affairs office or your state’s Attorney General. Warrantor: General Electric Company If further help is needed concerning this warranty, write: Manager—Consumer Affairs, GE Appliances, Louisville, KY 40225...
- Page 28 Pub. No. 49-8715 Part No. 183D5580P003 10-95 CG Monogram. Printed in Mexico General Electric Company Louisville, KY 40225...
Need help?
Do you have a question about the ZGU660 and is the answer not in the manual?
Questions and answers