
Related Manuals for Sapling SDLG Series


Summary of Contents for Sapling SDLG Series
- Page 1 Installation Manual V1.1 SDLG Messaging Clock The Sapling Company, Inc. P. (+1) 215.322.6063 670 Louis Drive F. (+1) 215.322.8498 Warminster, PA 18974 www.sapling-inc.com...
-
Page 2: Table Of Contents
The Sapling Company, Inc. P. (+1) 215.322.6063 1633 Republic Road F. (+1) 215.322.8498 Huntingdon Valley, PA 19006 www.sapling-inc.com SDLG Series Wireless Messaging Clocks Table of Contents Table of Contents Important Safety Instructions Identify Your Clock Wireless System Setup Clock Programming... - Page 3 The Sapling Company, Inc. P. (+1) 215.322.6063 1633 Republic Road F. (+1) 215.322.8498 Huntingdon Valley, PA 19006 www.sapling-inc.com Important Safety Instructions DANGER WARNING SHOCK HAZARD FIRE HAZARD • Keep the electricity to this device turned • Always follow your national and regional OFF until the clock installation electrical codes or ordinances.
- Page 4 The Sapling Company, Inc. P. (+1) 215.322.6063 670 Louis Drive F. (+1) 215.322.8498 Warminster, PA 18974 www.sapling-inc.com Wireless System Setup VERY IMPORTANT: INSTALL, POWER, AND SET YOUR MASTER CLOCK OR REPEATER BEFORE POWERING THE MESSAGE DISPLAYS. A Wireless Master Clock and any Repeaters must be installed, powered, and set up BEFORE you attempt to set up a message display system.
- Page 5 For doing so, there is a need for the USB Programming Cable (D-USB485-INTF-1), which is an optional accessory provided along with the USB programming software. Sapling can also provide an optional service of programming the SDLG Message Clocks with the consumer’s desired messages, as well as the other settings BEFORE clocks are shipped out. This eliminates...
- Page 6 The Sapling Company, Inc. P. (+1) 215.322.6063 670 Louis Drive F. (+1) 215.322.8498 Warminster, PA 18974 www.sapling-inc.com Clock Programming Using the USB Programming Cable Follow the below instructions ONLY IF the default messages and settings need to be changed. If not, skip to the clock installation instructions section of this manual.
- Page 7 The Sapling Company, Inc. P. (+1) 215.322.6063 670 Louis Drive F. (+1) 215.322.8498 Warminster, PA 18974 www.sapling-inc.com Clock Programming Using the USB Programming Cable f. If under the “Universal Serial Bus Controllers” tab, there is a line stating “USB Serial Converter,” it means that the computer has automatically recognized the USB programming cable.
- Page 8 The Sapling Company, Inc. P. (+1) 215.322.6063 670 Louis Drive F. (+1) 215.322.8498 Warminster, PA 18974 www.sapling-inc.com Clock Programming Using the USB Programming Cable m. Open the “USB Serial Converter” by double clicking it, and a new window should appear.
- Page 9 The Sapling Company, Inc. P. (+1) 215.322.6063 670 Louis Drive F. (+1) 215.322.8498 Warminster, PA 18974 www.sapling-inc.com Clock Programming Using the USB Programming Cable Step Two: Allowing data communication from the computer to the clock – The digital clock has jumper switches located on its main electrical board (shown in Image H).
- Page 10 The Sapling Company, Inc. P. (+1) 215.322.6063 670 Louis Drive F. (+1) 215.322.8498 Warminster, PA 18974 www.sapling-inc.com Clock Programming Using the USB Programming Cable Step Three: Connecting the USB Programming Cable to the clock - The USB Programming Cable has two ends.
- Page 11 The Sapling Company, Inc. The Sapling Company, Inc. P. (+1) 215.322.6063 P. (+1) 215.322.6063 670 Louis Drive 670 Louis Drive F. (+1) 215.322.8498 F. (+1) 215.322.8498 Warminster, PA 18974 Warminster, PA 18974 www.sapling-inc.com www.sapling-inc.com Clock Programming Using the USB Programming Cable If your clock is 110/ 230 VAC, follow Step Four (A).
- Page 12 24 VAC/VDC power source as shown in Image L. If the ordered clocks are powered at 24 VAC/ VDC, follow the diagram in Image E below: Male Power Connector for power *Sapling clocks can be powered at 24 VAC or 24 VDC Image L Female Power Connector...
- Page 13 The Sapling Company, Inc. P. (+1) 215.322.6063 670 Louis Drive F. (+1) 215.322.8498 Warminster, PA 18974 www.sapling-inc.com Clock Programming Using the USB Programming Cable Step Five: Installing the USB Programming software on the user computer – In order to program the clock, there is a need to install the clock programming software, which is also provided on the CD.
- Page 14 The Sapling Company, Inc. P. (+1) 215.322.6063 670 Louis Drive F. (+1) 215.322.8498 Warminster, PA 18974 www.sapling-inc.com Clock Programming Using the USB Programming Cable At this stage, the USB programming cable has been configured and is ready to be used.
- Page 15 The Sapling Company, Inc. P. (+1) 215.322.6063 670 Louis Drive F. (+1) 215.322.8498 Warminster, PA 18974 www.sapling-inc.com Clock Programming - Task Bar Located on the task bar of the sbdconfig software, there are five options to choose from: Serial Port, Read Clock, Load Clock, Configurations, and Version.
- Page 16 The Sapling Company, Inc. P. (+1) 215.322.6063 670 Louis Drive F. (+1) 215.322.8498 Warminster, PA 18974 www.sapling-inc.com Clock Programming - Task Bar Read Clock • If a user has a previously configured clock and connects it to a computer, this option will read and upload the settings to the “SBDconfig-MSG”...
- Page 17 The Sapling Company, Inc. P. (+1) 215.322.6063 670 Louis Drive F. (+1) 215.322.8498 Warminster, PA 18974 www.sapling-inc.com Clock Programming - Configuring Messages 1. Message Number - The activation number for each message. For example, when Input 1 is activated on the Input Box, the text entered for Message 1 is displayed.
- Page 18 The Sapling Company, Inc. P. (+1) 215.322.6063 670 Louis Drive F. (+1) 215.322.8498 Warminster, PA 18974 www.sapling-inc.com Clock Programming - Display Settings Clicking on the Display Settings tab will allow a user to program the following settings: 1. Displ ay Format - Allows the user to select how the time is displayed on the clock. There are two options: 12 hour format (3:00AM/3:00PM) or 24 hour format (3:00/15:00).
- Page 19 The Sapling Company, Inc. P. (+1) 215.322.6063 670 Louis Drive F. (+1) 215.322.8498 Warminster, PA 18974 www.sapling-inc.com Clock Programming - Brightness Schedule 1. Date Column - Allows the user to select dates where changes to the brightness schedule are active. If a date is not selected, the actions in the adjustment columns will not be applied to the clock.
- Page 20 The Sapling Company, Inc. P. (+1) 215.322.6063 670 Louis Drive F. (+1) 215.322.8498 Warminster, PA 18974 www.sapling-inc.com Clock Programming - Clock Settings Clicking on the Clock Settings tab will allow a user to program the following settings: 1. Clock Name - This field allows a user to assign the clock a unique name, such as its location in a facility.
- Page 21 RS485 Data Rate: This option determines how often data (time and date) is sent to the clock(s) or other Sapling devices, such as Wireless Repeaters, Converter Boxes, or other Master Clocks. Relay 1 Output: Not available for this clock model.
- Page 22 The Sapling Company, Inc. P. (+1) 215.322.6063 670 Louis Drive F. (+1) 215.322.8498 Warminster, PA 18974 www.sapling-inc.com Clock Programming - Elapsed Timer A user may set up and configure the Elapsed Timer control panel through sbdconfig. For detailed instructions on the many functions and uses of the Elapsed Timer, refer to the Elapsed Timer Manual.
- Page 23 The Sapling Company, Inc. P. (+1) 215.322.6063 670 Louis Drive F. (+1) 215.322.8498 Warminster, PA 18974 www.sapling-inc.com Clock Programming - Inputs The “Inputs” tab allows a user to program the clock to perform a certain function through a switch or relay contact closure from an outside device such as Code Blue, Nurses Call, etc.
- Page 24 The Sapling Company, Inc. P. (+1) 215.322.6063 670 Louis Drive F. (+1) 215.322.8498 Warminster, PA 18974 www.sapling-inc.com Clock Programming - Inputs Code Blue: Code Blue is a special-purpose count up designed for use in hospitals and other medical facilities. This function overrides the control panel LED settings.
-
Page 25: Daylight Saving Time (Dst)
The Sapling Company, Inc. P. (+1) 215.322.6063 670 Louis Drive F. (+1) 215.322.8498 Warminster, PA 18974 www.sapling-inc.com Clock Programming - Daylight Saving Time (DST) The DST Tab allows a user to configure the clock for automatic Daylight Saving Time changes. -
Page 26: Wall Mount Installation
CONFIGURE THE MESSAGE DISPLAY BEFORE MOUNTING THE DISPLAY TO A WALL OR CEILING A Sapling Master Clock and any Repeaters must be installed, powered, and set up BEFORE you attempt to set up a wireless clock system. If the Master Clock and Repeaters are not properly installed and powered, the secondary clocks will not synchronize. - Page 27 The Sapling Company, Inc. P. (+1) 215.322.6063 670 Louis Drive F. (+1) 215.322.8498 Warminster, PA 18974 www.sapling-inc.com Wall Mount Installation 1) If you are installing a new gang box in the wall, 2) Run power wiring to the gang box.
- Page 28 The Sapling Company, Inc. P. (+1) 215.322.6063 670 Louis Drive F. (+1) 215.322.8498 Warminster, PA 18974 www.sapling-inc.com Wall Mount Installation 5A) If you do not wish to attach the housing to a 5B) Identify the keyholes towards the top of the gang box, place the mounting piece on the wall.
- Page 29 The Sapling Company, Inc. P. (+1) 215.322.6063 670 Louis Drive F. (+1) 215.322.8498 Warminster, PA 18974 www.sapling-inc.com Wall Mount Installation 5E) Use a pencil to trace the holes beneath each 5F) Repeat step 5D, then pass another pair of #8 keyhole onto the wall.
- Page 30 The Sapling Company, Inc. P. (+1) 215.322.6063 670 Louis Drive F. (+1) 215.322.8498 Warminster, PA 18974 www.sapling-inc.com Wall Mount Installation 7) Detach the filter from the clock display board by 8) Attach the power wires to the ports as pressing inward on the red tabs.
- Page 31 The Sapling Company, Inc. P. (+1) 215.322.6063 670 Louis Drive F. (+1) 215.322.8498 Warminster, PA 18974 www.sapling-inc.com Wall Mount Installation 11) Remove the plastic cover from the display board. 12) Place the filter over the display board. You should hear a snapping noise as the latches drop into place.
-
Page 32: Flag Mount Installation
CONFIGURE THE MESSAGE DISPLAY BEFORE MOUNTING THE DISPLAY TO A WALL OR CEILING A Sapling Master Clock and any Repeaters must be installed, powered, and set up BEFORE you attempt to set up a wireless clock system. If the Master Clock and Repeaters are not properly installed and powered, the secondary clocks will not synchronize. - Page 33 The Sapling Company, Inc. P. (+1) 215.322.6063 670 Louis Drive F. (+1) 215.322.8498 Warminster, PA 18974 www.sapling-inc.com Flag Mount Installation M3.5-1.0x10 screw (black) Internal-tooth washer #6-32x1 screw Adapter tab screws Included in Wiring Kit (D-PK-3-24-S or D-PK-3-110-S) - 2 kits included...
- Page 34 The Sapling Company, Inc. P. (+1) 215.322.6063 670 Louis Drive F. (+1) 215.322.8498 Warminster, PA 18974 www.sapling-inc.com Flag Mount Installation 1) Install the double gang box in the wall or ceiling. 2) Run power wiring to the gang box. If you are installing the gang box in the wall, leave at least eleven inches between the top of the gang box and the ceiling.
- Page 35 The Sapling Company, Inc. P. (+1) 215.322.6063 670 Louis Drive F. (+1) 215.322.8498 Warminster, PA 18974 www.sapling-inc.com Flag Mount Installation Steps 5 and 6 only apply to metal mounting poles. If you have an ABS mounting pole, skip to step 7 5) Remove the mounting pole end cap and the plastic ring from one of the holes.
- Page 36 The Sapling Company, Inc. P. (+1) 215.322.6063 670 Louis Drive F. (+1) 215.322.8498 Warminster, PA 18974 www.sapling-inc.com Flag Mount Installation 7) Remove the mounting plate and drill the four 8) Reattach the mounting plate, this time using all holes that were just traced. Insert the four wall four long, silver #6-32x1 screws, then insert the anchors into the holes.
- Page 37 The Sapling Company, Inc. P. (+1) 215.322.6063 670 Louis Drive F. (+1) 215.322.8498 Warminster, PA 18974 www.sapling-inc.com Flag Mount Installation 11) Detach the frame from the front of the clock 12) Insert the four #8-32x7/16 screws through the housing by pulling the bottom and top edges away internal-tooth washers, then through the adapter, from the housing.
- Page 38 The Sapling Company, Inc. P. (+1) 215.322.6063 670 Louis Drive F. (+1) 215.322.8498 Warminster, PA 18974 www.sapling-inc.com Flag Mount Installation 15) Attach the power wires to the ports as 16) Use the 6-19x1/2 screws to attach the display shown below.
- Page 39 The Sapling Company, Inc. P. (+1) 215.322.6063 670 Louis Drive F. (+1) 215.322.8498 Warminster, PA 18974 www.sapling-inc.com Flag Mount Installation 19) Place the housing frame onto the housing. You should hear a snapping noise as the latches drop into place.
-
Page 40: Double Mount Installation
CONFIGURE THE MESSAGE DISPLAY BEFORE MOUNTING THE DISPLAY TO A WALL OR CEILING A Sapling Master Clock and any Repeaters must be installed, powered, and set up BEFORE you attempt to set up a wireless clock system. If the Master Clock and Repeaters are not properly installed and powered, the secondary clocks will not synchronize. - Page 41 The Sapling Company, Inc. P. (+1) 215.322.6063 670 Louis Drive F. (+1) 215.322.8498 Warminster, PA 18974 www.sapling-inc.com Double Mount Installation M3.5-1.0x10 screw (black) Internal-tooth washer #6-32x1 screw Adapter tab screws Included in Wiring Kit (D-PK-3-110-S or D-PK-3-24-S) - 2 kits included...
- Page 42 The Sapling Company, Inc. P. (+1) 215.322.6063 670 Louis Drive F. (+1) 215.322.8498 Warminster, PA 18974 www.sapling-inc.com Double Mount Installation 2) Run power wiring to the gang box. 1) Install the double gang box in the wall or ceiling. If you are installing the gang box in the wall, leave at least eleven inches between the top of the gang box and the ceiling.
- Page 43 The Sapling Company, Inc. P. (+1) 215.322.6063 670 Louis Drive F. (+1) 215.322.8498 Warminster, PA 18974 www.sapling-inc.com Double Mount Installation 5) Remove the mounting plate and drill the four 6) Reattach the mounting plate, this time using all holes that were just traced. Insert the four wall four long, silver #6-32x1 screws, then insert the anchors into the holes.
- Page 44 The Sapling Company, Inc. P. (+1) 215.322.6063 670 Louis Drive F. (+1) 215.322.8498 Warminster, PA 18974 www.sapling-inc.com Double Mount Installation 9) Detach the frame from the front of each clock 10) Insert the four #8-32x7/16 screws through the housing by pulling the bottom and top edges away internal-tooth washers, then through each adapter, from the housing.
- Page 45 The Sapling Company, Inc. P. (+1) 215.322.6063 670 Louis Drive F. (+1) 215.322.8498 Warminster, PA 18974 www.sapling-inc.com Double Mount Installation 14) Attach the power wires to the port as 15) Use the 6-19x1/2 screws to attach a display shown below.
- Page 46 The Sapling Company, Inc. P. (+1) 215.322.6063 670 Louis Drive F. (+1) 215.322.8498 Warminster, PA 18974 www.sapling-inc.com Double Mount Installation 18) Place a housing frame onto each housing. You should hear a snapping noise as the latches drop into place.
-
Page 47: Adjustable Jumper Settings
The Sapling Company, Inc. P. (+1) 215.322.6063 670 Louis Drive F. (+1) 215.322.8498 Warminster, PA 18974 www.sapling-inc.com Adjustable Jumper Settings Every version of the digital clock contains a set of jumpers which can be moved to change a particular setting. The functions and positions of each jumper are described below:... -
Page 48: Temperature Sensor Installation
The Sapling Company, Inc. P. (+1) 215.322.6063 670 Louis Drive F. (+1) 215.322.8498 Warminster, PA 18974 www.sapling-inc.com Temperature Sensor Installation (IMPORTANT: Detach clock from power source before installing new circuitry. DO NOT add new circuitry while the clock is operating) -
Page 49: Reading The Display
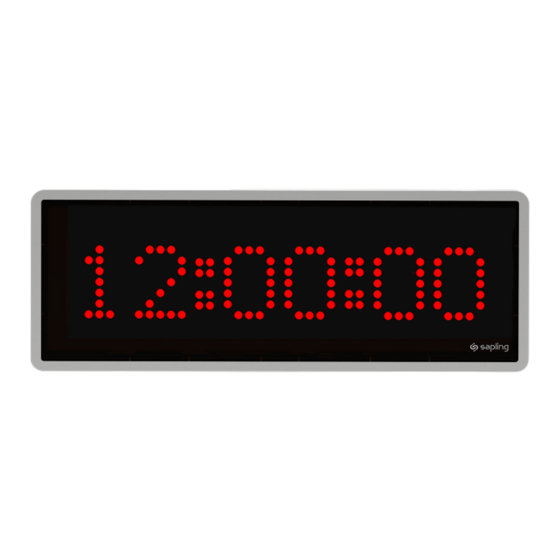
The Sapling Company, Inc. P. (+1) 215.322.6063 670 Louis Drive F. (+1) 215.322.8498 Warminster, PA 18974 www.sapling-inc.com Reading the Display The digital clock is designed to display time in either a 12-hour or 24-hour format. When the display is set to the 12-hour format, a circular light will appear in the top left corner of the display to indicate PM, or disappear to indicate AM. -
Page 50: Frequently Asked Questions
The Sapling Company, Inc. P. (+1) 215.322.6063 670 Louis Drive F. (+1) 215.322.8498 Warminster, PA 18974 www.sapling-inc.com Frequently Asked Questions What happens to the clock if a power failure occurs? If a power failure occurs, the display will shut off but the clock will continue to keep time with its internal quartz oscillator. -
Page 51: Troubleshooting
The Sapling Company, Inc. P. (+1) 215.322.6063 670 Louis Drive F. (+1) 215.322.8498 Warminster, PA 18974 www.sapling-inc.com Troubleshooting How can I determine that the clock is receiving a signal? if the clock is not receiving a signal, then the colons on the clock will blink on and off, unless configured by the user not to do so. -
Page 52: Warranty
Sapling Limited Warranty and Disclaimer The Sapling Company, Inc. warrants only that at the time of delivery and for a period of 24 calendar months after delivery or the period stated in this invoice, if different, the Goods shall be free of defects in workmanship and materials, PROVIDED that this warranty shall not apply: To damage caused by Buyer’s or any third party’s act, default or misuse of the Goods or by failure to follow... -
Page 53: Fcc Statements
The Sapling Company, Inc. P. (+1) 215.322.6063 670 Louis Drive F. (+1) 215.322.8498 Warminster, PA 18974 www.sapling-inc.com FCC Statements The Federal Communications Commission (FCC) wants you to know: This equipment has been tested and found to comply with the limits for a Class B digital device, pursuant to Part 15 of the FCC rules.
Need help?
Do you have a question about the SDLG Series and is the answer not in the manual?
Questions and answers