Table of Contents
Advertisement
Advertisement
Table of Contents

Related Manuals for Maxi-Cosi Coral XP


Summary of Contents for Maxi-Cosi Coral XP
- Page 1 Coral XP Infant Car Seat KEEP INSTRUCTIONS FOR FUTURE USE. Read all instructions before using this child restraint. 4358-7873A 4.6.20 Failure to follow the warnings on the labels and in the instruction manual can result in serious injury or death to your child.
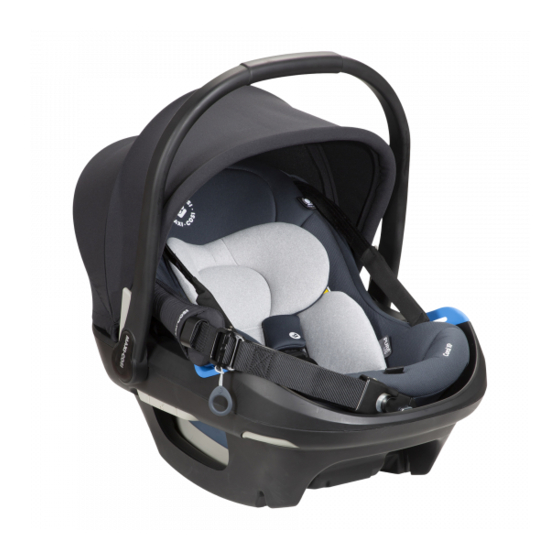
- Page 2 Overview Quick Navigation Welcome to the Maxi-Cosi family and thank you for choosing REAR-FACING this car seat, also known as a child restraint! 4-22 lb (1.8-10 kg) and 29 in. (73.6 cm) or less in height To help you get started using your child’s new car seat, PAGE 6 here are the 4 main tasks you’ll need to complete:...
-
Page 3: Table Of Contents
Contents Rear-Facing Use With Base ......41 LATCH: Lower Anchor Belt Install With Base ....Getting Started Vehicle Belt Install with Base ........Parts of Car Seat ............Installing Outer Carrier to Installed Base ..55 Accessory Use ............Rear-Facing Use Requirements ......... -
Page 4: Parts Of Car Seat
Parts of Car Seat Back of Inner Carrier Inner Carrier Retractable Carry Canopy Carry Handle Handles Adjustment Button Base & Harness Crossbody Stroller Level Line Adjustment Strap Release (when Strap Handle installed Outer Carrier without the base) Carry Top & Front of Base Handle Vehicle Belt Vehicle... -
Page 5: Accessory Use
Accessory Use Front of Inner Carrier Head For wash and care instructions, see page 70. Pillow Harness Head Pillow Covers Body Pillow When using the head pillow, Chest Clip make sure it does not cover your Buckle infant’s face in any way. Buckle Cover Harness You must use the head pillow... -
Page 6: Rear-Facing Use Requirements
Rear-Facing Use Requirements Harness Covers The harness covers help provide comfort to your child’s neck. If the harness covers will not allow proper positioning of the chest clip or Measure your child’s weight and height (do not guess) before using this car seat. interfere with getting a tight enough harness fit, remove and do not use. -
Page 7: Preparing Car Seat For Child Fit
School-Aged Children Preparing Car Seat for Child Fit Once they have outgrown their forward-facing car seat, children should use a belt-positioning booster seat until the vehicle’s lap and shoulder seat belt fi ts properly. This Remove Outer is often when they have reached at least 4 feet 9 inches Carrier From Base in height and are 8 to 12 years old. - Page 8 Place Child in Loosen Harness Inner Carrier Straps • Locate the harness Your child’s bottom release lever through and back should be fl at the opening in the pad. against the inner carrier. • Push and hold down the harness release lever.
-
Page 9: Checking Your Child's Fit
Checking Your Child’s Fit Securing Child in Inner Carrier Head Position Place Child in The top of your child’s head Inner Carrier must be at least 1 in. • Your child’s bottom (2.5 cm) below the top and back should be of the inner carrier. - Page 10 Check Tightness Buckle Harness • Unfasten the harness • Push the buckle covers. tongues into the buckle until you hear • Try to veritcally pinch them “click”. the harness strap at your child’s shoulder • Pull up on the harness between your index straps to make sure finger and thumb as...
-
Page 11: Changing Harness Strap Position
Changing Harness Strap Position Finished! Your child is now secured in the Remove Inner inner carrier. Carrier from Outer Carrier Check your child’s fi t often and make any needed adjustments to • From the front of the the inner carrier as they grow. outer carrier, squeeze one of the inner car- To Remove Child from... - Page 12 Remove Harness Attach Harness Strap Loops From Strap Loops to Splitter Plate Splitter Plate • The sewn ends of the harness strap loops must face towards you. • Do not twist the harness strap or the harness adjustment From Front of strap.
-
Page 13: Outer Carrier & Base: Removing & Installing
Outer Carrier & Base: Outer Carrier Use with Removing & Installing Inner Carrier Used For: Removing Outer • Attaching to compatible Carrier From Base strollers. • From the back of the • Attaching to the base when outer carrier, slide the the base is installed in the base release handle up. -
Page 14: Inner Carrier & Outer Carrier: Removing & Installing
• Lift the inner carrier out of stroller adapter. the outer carrier. Coral XP inner carrier stroller adapter is sold separately. Visit maxi-cosi.com for more information. Installing Inner Carrier Do not install the inner carrier in the vehicle to Outer Carrier without installing it to the outer carrier. - Page 15 With Your Thumb, Place Crossbody Pull Down Locking Strap Over Lever to Expand Your Shoulder to Attachment Check For Fit Openings • Attach to the hubs. • Release the locking lever to secure the strap. • Pull on the strap to check if it is locked into place.
- Page 16 Adjusting Length of Crossbody Strap Removing Crossbody Strap To Shorten Locate Attachment • Place inner carrier on a Hubs at Top and stable flat surface. Bottom of Inner Carrier • Locate the pull ring on the Crossbody Strap. • Pull the ring up to shorten. To Lengthen With Your Thumb, •...
-
Page 17: Adjusting Base
Adjusting Base WARNINGS The base has multiple Read ALL instructions before using child restraint as a positions to help achieve the carrier. correct recline angle. NEVER use carrier unless child is properly secured. • The adjustment handle is Use only as a carrier by children weighing 4-22 pounds (1.8- at the back of the base. -
Page 18: Load Leg
Load Leg Release Lever for Vehicle Belt Lockoff & The load leg is stored under the base. This is an optional LATCH: Lower Anchor Belts feature. This base has a release lever The base install is equally safe that has two functions; one with or without the use of the for LATCH: Lower Anchor and load leg. -
Page 19: Tightness Indicators
Tightness Indicators For LATCH: Lower Anchor Belt with Base Install | Page 43 • You must Lift the Release Lever in This base has indicators that order for the LATCH: Lower Anchor show when the LATCH: Lower belts to loosen. Anchor or vehicle belt have •... -
Page 20: Latch: Lower Anchor Use
LATCH: Lower Anchor Use Removing Connectors from Storage Location • Press in red button. Push connector into storage location. • Then pull it and the belt out. Your vehicle’s features may be considerably different than those pictured here. Storing Lower Anchor Belt The lower anchors of LATCH (Lower Anchors and Tethers When using the vehicle belt for CHildren) is a universal system for installing car seats... -
Page 21: Vehicle Belt Use
Vehicle Belt Use You Must Review Your Vehicle Owner’s Manual Your vehicle owner’s manual will let you know which vehicle belts and seating positions car seats can be installed in. Check How This Car Seat Will Be Locked Your vehicle’s features may be considerably different than those pictured here. - Page 22 Types of Retractors Lockoff When used correctly, Switchable Retractor this base’s Lockoff will (most vehicles have this type) lock the vehicle belt. This retractor can be switched to a locking mode. You must have the retractor in the locking mode to Please go to the vehicle belt with base installation use the seat belt with this car seat.
- Page 23 If the latch plate slides up and down the vehicle belt, it is a Emergency Locking sliding latch plate. See Step 5, “Check Latch Retractor Plates”. Sliding latch plates easily slip between the lap and shoulder portions of the belt. If the retractor does not lock, it is most likely an Emer- gency Locking Retractor.
-
Page 24: Rear-Facing Use With Base
Rear-Facing Use with Base Never install a rear-facing child 4-22 lb (1.8-10 kg) and restraint in the front seat of a vehicle 29 in. (73.6 cm) or less in height equipped with an active frontal airbag. Check the vehicle belt or the LATCH: lower anchor belt before each use. -
Page 25: Latch: Lower Anchor Belt Install With Base
LATCH: Lower Anchor Belt Install Check Base Angle with Base If the angle indicator is not correct, adjust the base. Before you begin installing the base into your Adjust Base vehicle, did you check: • The adjustment handle Your child’s weight and height? See page 7. is at the back of the base. - Page 26 Lift Release Lever Push Release Lever Down You must Lift the Release Lever in order You must Push the for the LATCH: Lower Release Lever Down Anchor belts to loosen. in order for the LATCH: Lower Anchor belts to tighten. Release LATCH: Lower Anchor Connectors from...
- Page 27 • Lift the front of the base while You can also check the tightness by: holding the load leg in place as shown to lock it into position. • Holding the base ONLY at • It must be perpendicular to the the belt path with your non- vehicle floor.
-
Page 28: Vehicle Belt Install With Base
Vehicle Belt Install with Base Check Base Angle If the angle indicator is not correct, adjust the Before you begin installing the base into your base. vehicle, did you check: Adjust Base • The adjustment handle Your child’s weight and height? See page 7. is at the back of the base. - Page 29 Lift Release Lever Push Down on Base While Tightening Belt You must tighten the vehicle belt BEFORE closing the Lockoff. Check Tightness Indicators Check if Your Vehicle Belts Will Work The red will turn With This Car Seat completely green when tightened Review pages 35-40 and your vehicle owner’s manual to fi...
- Page 30 • Lift the front of the base while You can also check the tightness by: holding the load leg in place as shown to lock it into position. • Holding the base ONLY at the belt path with your non- •...
-
Page 31: Installing Outer Carrier To Installed Base
Installing Outer Carrier to Carry Handle Must Be Locked and in Installed Base Position 1 or Position 2 Illustrations show the base installed with the LATCH: Lower Anchor belt; however, the same steps apply for a vehicle belt install. Install Outer Carrier to Base Recheck Angle Pull up on the front two... -
Page 32: Rear-Facing Use Without Base
Rear-Facing Use Without Base Vehicle Belt Install Without Base 4-22 lb (1.8-10 kg) and Before you begin installing the seat into your 29 in. (73.6 cm) or less in height vehicle, did you check: Your child’s weight and height? See page 7. Your child’s fi... - Page 33 Route Vehicle Lap Place Outer Carrier or Lap Portion of into Vehicle Rear- Lap/Shoulder Belt Facing Through Belt Guides Check Level Line on Both Sides of The level line on the side Shell of shell must be parallel Buckle the vehicle belt. with the ground.
- Page 34 Recheck Level Line Tighten Belt Redo the installation Pull the shoulder belt or if level line is not par- the free end of the lap allel with the ground. belt to tighten. Carry Handle Must Be Locked and in Position 1 or Check Belt Tightness Position 2 •...
-
Page 35: Removing Harness System
Removing Harness System You must partially remove the harness system in order to remove the pad. Turn Inner Carrier To remove accessories, see pages 4-5. Over and Remove Harness Strap Loops Remove Inner From Splitter Plate Carrier from Outer Carrier Loosen Harness From Front of Straps... -
Page 36: Removing Seat Pad
Removing Seat Pad Unthread Chest Clip You must partially remove the harness system in order to remove the pad. See pages 63-65. Pull Seat Pad off of Bottom of Inner Carrier Unthread Buckle Pull harness adjustment strap, harness strap, and Do not unbuckle. - Page 37 Pull Metal Retainers Pull Seat Pad Down and Out of Around and Off of Slot in Inner Carrier Retractable Carry Handle Guide Pull Metal Retainers Pull Retractable Out of Slot in Shell Carry Handles Out of Pad Pull Retractable Carry Handle Out of Seat Pad Slot Finished!
-
Page 38: Removing & Installing Canopy
Cleaning Parts of Car Seat Removing & Installing Canopy Cleaning Seat Pad, Head & Body Pillows, & Removing Canopy Buckle & Harness Covers Machine wash separately with cold water on a gentle Pull Canopy Hub cycle. Make sure the harness covers are closed so the Off of Outer Carrier fastening strips are not exposed. -
Page 39: Installing Seat Pad
Installing Seat Pad Pull Harness Pull Carry Handles Straps Through Through Slots in Slots in Seat Pad Seat Pad Pull Buckle Through Buckle Slot in Seat Pad Push Top of Retractable Carry Handles Through Slots at Top & Sides of Seat Pad Do not twist the Pull Harness retractable carry... - Page 40 Push Retractable Pull Seat Pad Down Carry Handles’ Around Bottom of Metal Retainers Inner Carrier & Down Through Slots Around Carry in Inner Carrier Handle Guide Push Retractable Carry Handles’ Metal Retainers Up into Slots in Inner Carrier To install accessories, see pages 4-5. Pull Seat Pad Around Top of Inner Carrier...
-
Page 41: Installing Harness System
Installing Harness System Make Harness Strap Even The sewn ends of the If you have not removed the harness strap harness strap loops completely from the inner carrier, skip to step 4. must face each other. Thread Harness Strap Thread Buckle and With the sewn end of Chest Clip the harness strap loop... - Page 42 Aircraft Attach Harness Strap Loops to Splitter Plate This restraint is certified for aircraft use. • The sewn ends of the harness strap loops Install the car seat in a window seat to avoid blocking the aisle. If the aircraft lap belt is too short, ask the flight must face towards attendant for a belt extender.
-
Page 43: Replacement And Expiration Of Car Seat
Replacement & Expiration Replacement After a Moderate to Severe Crash of Car Seat You must replace this car seat if it has been in a moderate to severe car crash. Do not risk your child’s safety. This car seat is intended to protect a child in a single To keep your child as safe as possible, crash. -
Page 44: Child Restraint Use
Child Restraint Use Installation in Vehicle Never take your child out of the child restraint while Check the vehicle belt or LATCH: lower anchor belt the vehicle is moving. before each use. Use only if the belt can be tightened properly and locked securely in place. -
Page 45: Registration And Safety Notices
Registration and Safety Notices Children are safer when properly restrained in rear seating positions Please complete the postage-paid registration card that than in the front seating positions. came with your child restraint, and send it to us. According to accident statistics, children in rear seat- Child restraints could be recalled for safety reasons. -
Page 46: Troubleshooting
Example of model number, line code, and Troubleshooting manufacture date. 1. If the car seat’s buckle or harness release lever sticks or you cannot get the straps tight enough around your child: Do not lubricate. Check around the harness release lever for dropped food, sticky spilled drinks, dirt, leaves, etc. -
Page 47: Warranty
Please note: Our product warranty only applies when To make a claim under this warranty contact our Con- purchased from an authorized Maxi-Cosi retailer. The sumer Care Department by phone at 1-800-951-4113; origin of products not purchased through these authorized or text us at 1-812-652-2525. -
Page 48: Replacement Parts List
1-800-451-4113 or text: 1-812-652-2525. Text: 1-812-652-2525 If you already know which parts you need, you may complete your order with a credit card Website: maxi-cosi.com by calling us at 1-800-451-4113. Hours of Operation: We accept Visa or MasterCard.
Need help?
Do you have a question about the Coral XP and is the answer not in the manual?
Questions and answers