Advertisement
Quick Links
Advertisement

Subscribe to Our Youtube Channel
Related Manuals for InWin Explorer


Summary of Contents for InWin Explorer
- Page 1 User Manual...
- Page 2 Product Video Information Product Video Information EXPLORER Product Video EXPLORER Assemble Guide Video EXPLORER Installation Guide Video...
- Page 3 P C c a s e ! A s s e m b l e the 10-piece modular structure of EXPLORER to co mp l e t e t he m i n i to we r .
-
Page 4: Specifications
405 x 300 x 225 mm (L x W x H) 15.9 x 11.8 x 8.8” Net Weight 3.75 kg / 8.26 lbs. Gross Weight 5 kg / 11 lbs. * InWin's products comply with RoHS regulations. * Specifications may vary based on different regions. - Page 5 Specifications Specifications InWin Luna AL120 Fans Model Luna AL120 Quantity Included Single Pack Triple Pack Model Number IW-FN-AL120-1PK IW-FN-AL120-3PK Colors Black Fan Size 120 x 120 x 25 mm Materials PC, PBT Rated Voltage DC 12V Rated Power 3.96W Rated Current 0.33A...
-
Page 6: Package Content
Package Content Package Content... - Page 7 Fans Package Contents Fans Package Contents Luna AL120 Fans ARGB One-Click Controller Fan Screws...
-
Page 8: Accessories Bag
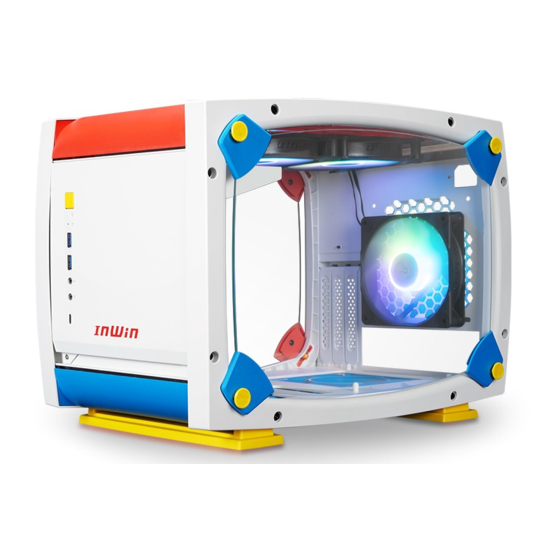
Accessories Bag Accessories Bag S-1 Hexagon Head Screws S-2 Rubber Stands S-2 Screws S-3 Power Cord Screws 3.5” HDD Screws 2.5” HDD Screws Cable Ties Power Cord Power Supply Holder... - Page 9 Case Structure Case Structure I/O Panel Tempered Glass Side Panels Anti-Dust Filter Shock-Proof Stand Swappable SECC Front Panel Swappable ABS Front Panel...
- Page 10 Case Structure Case Structure 2.5”/3.5” Drive Mounting Area Power Supply Mounting Area Top Fans/Radiator Mounting Area Rear Fan Mounting Area Motherboard Mounting Area CPU Cooler Installation Cut-Out Hole PCI-E Expansion Slots...
- Page 11 Installation Guide Installation Guide * Please follow the related chapters to assemble. * Please only use original provided accessories to avoid damage to the product. Opening the Chassis Parts Required: Hexagon Motherboard Installation Head Screws...
- Page 12 Parts Required: Hexagon Expansion Card Installation Head Screws Connection Cables I/O Wires Black(P_LED) 1 2 Black (HDD) Black(P_LED) 3 4 Black (HDD) Black(P_SW) 5 6 NC Black(P_SW) 7 8 NC Key 9 10 NC HD Audio Header...
- Page 13 USB 3.0 Header USB 3.1 Type-C Header Fan/Liquid Cooling Radiator Installation Parts Required: Included Luna AL120 Fans Fan Installation Instructions: https://youtu.be/_S_LLcqe0KI...
- Page 14 Parts Required: 2.5”/ 3.5” 2.5”/ 3.5” Drive Bays Installation HDD Screws You can choose to either install 2 x 2.5” SSDs or 1 x 3.5” HDD on the selected area. Parts Required: Hexagon Power Supply Installation Head Screws 7.1 Uninstall the Power Supply Holder by unscrewing the two screws. 7.2 Screw your power supply to the bracket, connect the power cord to your power supply and install the bracket back to the chassis.
- Page 15 Installation Complete Parts Required: Cable Ties...
-
Page 16: Warranty
Warranty ■ * For more detailed warranty information, please visit the InWin retail website at www.in-win.com. * The actual product is subject to change without prior notice. In Win Development Inc. reserves the right to make final modifications. - Page 17 Copyright © 2021 In Win Development Inc. All Rights Reserved.
Need help?
Do you have a question about the Explorer and is the answer not in the manual?
Questions and answers