Table of Contents
Advertisement
Quick Links
4K/UHD
HDMI to HDBaseT
AT-UHD-CAT-4
The Atlona AT-UHD-CAT-4 is a 4K/UHD HDMI to HDBaseT distribution amplifier featuring pass-
through HDMI input connections, four HDBaseT outputs and display control capability. Each
output transmits AV and control signals up to 230 ft. (70 m) @ 1080p and 130 ft. (40 m) @ 4K/
UHD. Features include 4K/UHD @ 60 Hz with 4:2:0 color subsampling, HDCP 2.2 compliance,
EDID management, and PoE for powering remote receivers. A wide variety of consumer
displays may be controlled by the UHD-CAT-4 using CEC*. Designed for commercial distribution
applications, the UHD-CAT-4 is control system-friendly and integrates with any TCP/IP, RS-232,
or IR control system and features a 1U, half-rack width enclosure with external, international
power supply. Compatible Atlona receiver: AT-UHD-EX-70C-RX.
Package Contents
1 x AT-UHD-CAT-4
1 x IR emitter (AT-IR-CS-TX)
3 x 5-pin captive screw connector
2 x Mounting Plates
1 x Rack Ear (long)
1 x Rack Ear (short)
4 x Screws (MAS-MF03+04D1 for Mounting Plate)
4 x Screws (MAS-MF04+06D for Rack Ear)
1 x 48 V / 2.08 A power supply
1 x AC cord
1 x Installation guide
IMPORTANT: Visit http://www.atlona.com/product/AT-UHD-CAT-4 for the latest firmware
updates and User Manual.
Distribution Amplifier
™
1
Installation Guide
AT-UHD-CAT-4
Advertisement
Table of Contents

Related Manuals for Panduit Atlona UHD-CAT-4


Summary of Contents for Panduit Atlona UHD-CAT-4
- Page 1 Installation Guide AT-UHD-CAT-4 4K/UHD HDMI to HDBaseT Distribution Amplifier ™ AT-UHD-CAT-4 The Atlona AT-UHD-CAT-4 is a 4K/UHD HDMI to HDBaseT distribution amplifier featuring pass- through HDMI input connections, four HDBaseT outputs and display control capability. Each output transmits AV and control signals up to 230 ft. (70 m) @ 1080p and 130 ft. (40 m) @ 4K/ UHD.
-
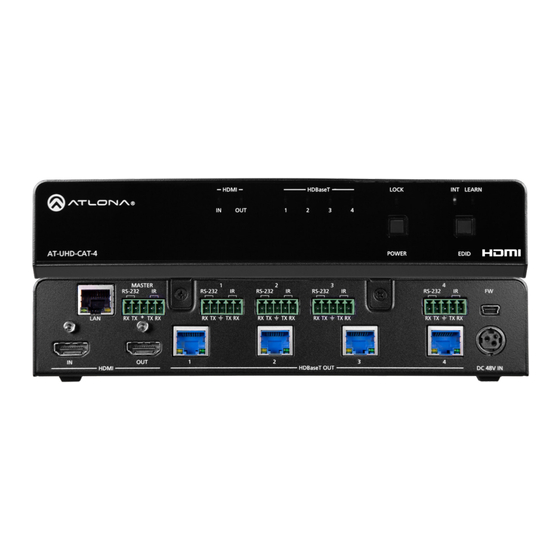
Page 2: Front Panel Descriptions
Installation Guide AT-UHD-CAT-4 Front Panel Descriptions HDMI HDBaseT LOCK INT LEARN AT-UHD-CAT-4 POWER EDID MASTER RS-232 RS-232 RS-232 RS-232 RS-232 HDMI Indicators LEARN Displays the status of the HDMI IN and This LED indicator will flash when a HDMI OUT ports. When connected downstream EDID is being read into HDMI HDBaseT OUT... -
Page 3: Rear Panel Descriptions
Installation Guide HDMI HDBaseT LOCK INT LEARN AT-UHD-CAT-4 Rear Panel Descriptions AT-UHD-CAT-4 POWER EDID MASTER RS-232 RS-232 RS-232 RS-232 RS-232 HDMI HDBaseT OUT DC 48V HDBaseT OUT Connect an Ethernet cable from this port Connect Ethernet cables from these ports to the network. - Page 4 Installation Guide AT-UHD-CAT-4 RS-232 The AT-UHD-CAT-4 provides five RS-232 ports. The RS-232/IR MASTER port is used to control the AT-UHD-CAT-4 using a control system or other DTE equipment. RS-232/IR 1 through RS- 232/IR 4 ports are used in conjunction with the HDBaseT OUT 1 through HDBaseT OUT 4 ports.
-
Page 5: Installation
Installation Guide AT-UHD-CAT-4 Installation Connect an HDMI cable from a UHD/HD source to the HDMI IN port. Connect an HDMI cable from the HDMI OUT port to a display (sink) device. Connect up to four Ethernet cables from the HDBaseT OUT ports to compatible PoE- capable receivers. -
Page 6: Connection Diagram
Installation Guide AT-UHD-CAT-4 Connection Diagram Display LE AR IN T se T W ER A T- D -C A T- AT-UHD-CAT-4 Laptop -R X X -7 D -E A T- W ER LI N AT-UHD-EX-70C-RX -R X X -7 D -E A T- W ER LI N... -
Page 7: Accessing The Web Gui
Installation Guide AT-UHD-CAT-4 Accessing the web GUI The AT-UHD-CAT-4 includes a built-in web GUI, which allows easy management and control of all features. Follow the instructions below to access the web GUI. Make sure that an Ethernet cable is connected between the LAN port on the AT-UHD-CAT-4 and the network. -
Page 8: Mounting Instructions
Installation Guide AT-UHD-CAT-4 Mounting Instructions The AT-UHD-CAT-4 can be mounted in different ways, based on the number of units that are being installed. The AT-UHD-CAT-4 can be mounted in a rack or on/under any flat surface. Single-unit rack installation Attach the included small rack ear to one side of the AT-UHD-CAT-4, using the included screws. - Page 9 Installation Guide AT-UHD-CAT-4 Dual-unit rack installation Turn both units upside-down on a flat surface, next to each other, as shown. Position the included mounting plates over the holes on the bottom of the enclosure. When attaching mounting plates, the countersink bevels on the mounting plate should face upward.
- Page 10 Installation Guide AT-UHD-CAT-4 Flat surface Turn the unit upside down on a flat surface. Position the included mounting plates over the pre-drilled holes on the bottom of the enclosure. When attaching mounting plates, the countersink bevels on the mounting plates should face upward.
-
Page 11: Troubleshooting
Installation Guide AT-UHD-CAT-4 Troubleshooting Problem Solution What is the default static • 192.168.1.254. However, by default the AT-UHD-CAT-4 IP address of the AT-UHD- comes with DHCP enabled. To use the static IP address, CAT-4? see the instructions on page 6. How do I determine the IP •... - Page 12 Installation Guide AT-UHD-CAT-4 English Declaration of Conformity The English version can be found under the resources tab at: https://atlona.com/product/at-uhd-cat-4/. Chinese Declaration of Conformity 中国RoHS合格声明 由SKU列出於: https://atlona.com/about-us/china-rohs/. The terms HDMI, HDMI High-Definition Multimedia Interface, and the HDMI Logo are trademarks or registered trademarks of HDMI licensing Administrator, Inc.
Need help?
Do you have a question about the Atlona UHD-CAT-4 and is the answer not in the manual?
Questions and answers