Table of Contents
Advertisement
Quick Links
4K/HDR
HDMI to HDBaseT
AT-HDR-CAT-2
The Atlona AT-HDR-CAT-2 is a high dynamic range (HDR) distribution amplifier with one HDMI
input and two HDBaseT™ outputs Each output transmits 4K/UHD video @ 60 Hz with 4:4:4
chroma sampling plus support for HDR formats, multi-channel audio, control signals, and
power up to 130 feet (40 meters) or 1080p up to 230 feet (70 meters) over Category 6/6A cable.
The HDR-CAT-2 features sophisticated integration capabilities designed for commercial AV
distribution applications including HDMI pass-through, audio de-embedding, EDID management,
CEC display control, RS-232 and IR control extension, remote power for receivers, and HDBaseT
link testing. It offers compatibility with any TCP/IP or RS-232 control system and is housed in a
low-profile enclosure with external universal power supply. The HDR-CAT-2 is ideal for sending
HDR and 4K/60 4:4:4 content to AT-HDR-EX-70C-RX receivers.
Package Contents
1 x AT-HDR-CAT-2
4 x 5-pin captive screw connectors
1 x 2-pin captive screw connector
1 x 48 V / 1.25 A power supply
1 x AC cord
1 x Pair rack mount ears
4 x Feet w/ rubber grips
IMPORTANT: Visit https://www.atlona.com/product/at-hdr-cat-2 for the latest firmware
updates and User Manual.
1x2 Distribution Amplifier
™
1
Installation Guide
AT-HDR-CAT-2
®
Advertisement
Table of Contents

Subscribe to Our Youtube Channel
Related Manuals for Panduit ATLONA AT-HDR-CAT-2


Summary of Contents for Panduit ATLONA AT-HDR-CAT-2
- Page 1 1x2 Distribution Amplifier ™ AT-HDR-CAT-2 The Atlona AT-HDR-CAT-2 is a high dynamic range (HDR) distribution amplifier with one HDMI ® input and two HDBaseT™ outputs Each output transmits 4K/UHD video @ 60 Hz with 4:4:4 chroma sampling plus support for HDR formats, multi-channel audio, control signals, and power up to 130 feet (40 meters) or 1080p up to 230 feet (70 meters) over Category 6/6A cable.
-
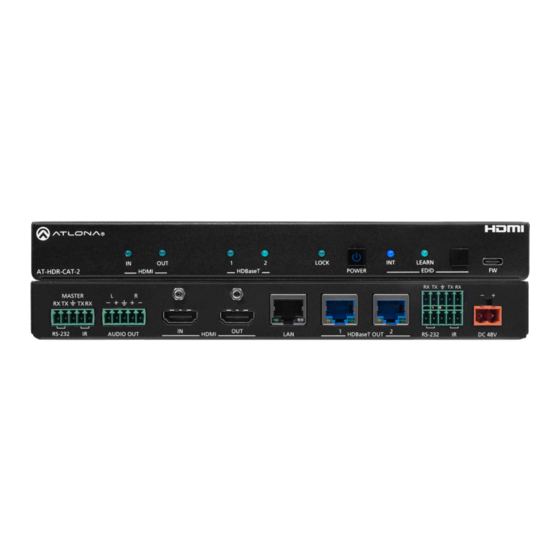
Page 2: Front Panel Descriptions
Installation Guide AT-HDR-CAT-2 Front Panel Descriptions LOCK LEARN AT-HDR-CAT-2 HDMI HDBaseT POWER EDID MASTER RX TX HDMI Indicators Displays the status of the HDMI IN and This LED indicator will be blue when the RS-232 AUDIO OUT HDMI HDBaseT OUT RS-232 DC 48V HDMI OUT ports. -
Page 3: Rear Panel Descriptions
Installation Guide AT-HDR-CAT-2 Rear Panel Descriptions LOCK LEARN AT-HDR-CAT-2 HDMI HDBaseT POWER EDID MASTER RX TX RS-232 AUDIO OUT HDMI HDBaseT OUT RS-232 DC 48V RS-232 / IR (MASTER) Connect a control system or other DTE Connect an Ethernet cable from this port device to this port to control the AT-HDR- to the network. - Page 4 Installation Guide AT-HDR-CAT-2 Power Locate the included orange captive-screw block, and loosen the screws to allow room to insert the copper wiring. Wire the included power supply to the block, as shown below. Do not use high-torque LOCK LEARN devices, when securing the wires to the captive-screw terminal block, as this may damage POWER EDID the screws and/or block.
-
Page 5: Installation
Installation Guide AT-HDR-CAT-2 Installation Connect an HDMI cable from a source to the HDMI IN port. Connect an HDMI cable from the HDMI OUT port to a local display. Connect up to two Ethernet cables from the HDBaseT OUT ports to compatible PoE- capable receivers. - Page 6 Installation Guide AT-HDR-CAT-2 IP Configuration The AT-HDR-CAT-2 is shipped with DHCP enabled. Once connected to a network, the DHCP server (if available), will automatically assign an IP address to the unit. If the AT-HDR-CAT-2 is unable to detect a DHCP server within 15 seconds, then the unit will use a self-assigned IP address within the range of 169.254.xxx.xxx/16.
-
Page 7: Accessing The Built-In Web Server
Installation Guide AT-HDR-CAT-2 Accessing the built-in Web Server The AT-HDR-CAT-2 includes a built-in web server, which allows easy management and control of all features. Follow the instructions below to access the web server. Make sure that an Ethernet cable is connected between the LAN port on the AT-HDR-CAT-2 and the network. -
Page 8: Warranty
Installation Guide AT-HDR-CAT-2 Warranty To view the product warranty, use the following link or QR code: https://atlona.com/warranty/. English Declaration of Conformity The English version can be found under the resources tab at: https://atlona.com/product/at-hdr-cat-2/. Chinese Declaration of Conformity 中国RoHS合格声明 由SKU列出於: https://atlona.com/about-us/china-rohs/. ®...
Need help?
Do you have a question about the ATLONA AT-HDR-CAT-2 and is the answer not in the manual?
Questions and answers