Advertisement
Quick Links
Advertisement

Related Manuals for Labgear S601b


Summary of Contents for Labgear S601b
- Page 1 S601b Multiplatform Meter and Analyser User Guide...
-
Page 2: Table Of Contents
S601b - Contents Contents Safety warnings and important information ................ 2 Introduction, Key Features,Pack Contents & Battery Charging .......... 3 Product Overview ......................... 4 7-8.1 Connections & Main Menu ....................5 DVB-S2 Setup and Installations ..................6-7 DVB-T2 Setup and Installations .................... 8 DVB-C Setup and Installations .................... - Page 3 Thank you for choosing the Labgear S601b, a comprehensive instrument for analysing setting up and testing all types of satellite and terrestrial signal receiver and distribution systems, pre-load- ed with masses of data and tools to make your job simpler and quicker. The S601b has been modified Before you start please take time to read through this instruction leaflet which we hope will help you get the most out of your meter.
-
Page 4: Product Overview
S601b - Product Overview 6 Product Overview 10 11 No Description Function No Description Function LNB In Connect to satellite antenna cable Switch AV mode: AV Normal/AV IN/AV AV-S OUT (In AV out mode, speaker is off) ANT IN Connect to antenna of DVB-T/T2 signal... -
Page 5: Spectrum
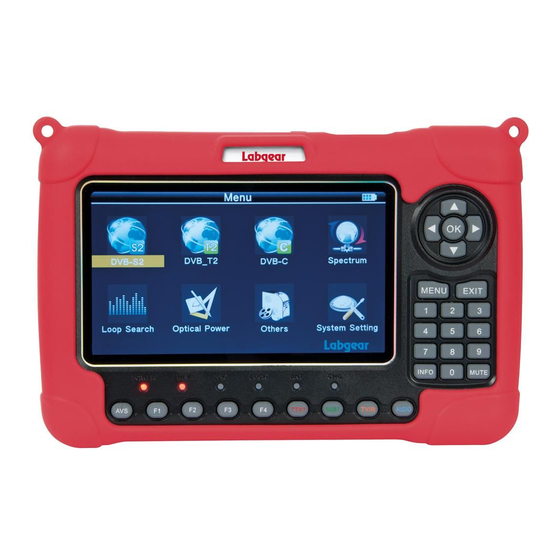
S601b - Product Overview & Main Menu 7 Connections USB Device Charger/PSU Connection CCTV In Connection TV Antenna AV In Connection Optical Connection HDMI/AV Out to display Satellite LNB Connection 8 Main Menu Make the required connections as above, switch the power... - Page 6 S601b - DVB-S2 Setup/Installations 8.1.1 Satellite Press u to enter the Satellite List and scroll q to find the satellite you want and press OK. 8.1.2 Local Frequency Scroll down to Local Frequency press u to enter the LNB List and scroll q to find the LNB type you want and press OK.
- Page 7 S601b - DVB-S2 Quick Search 8.1.11 Quick Search In the Satellite Find menu when Satellite is selected if you press OK the screen to the right opens, press OK again to start quick search.If you have set the Longitude and Latitude in Angle Calculation, the angle of LNB, the orientation and elevation of antenna will all be displayed on the screen.
- Page 8 S601b - DVB-T2 Setup/Installations 8.2 DVB-T2 In the Main Menu select DVB-T2, Press OK to enter Scan Setup. Scroll down to adjust the settings below: 8.2.1 Country Setting Use the t u keys to select country. 8.2.2 Channel No. Use the t u keys to change channel number.
- Page 9 S601b - DVB-C Setup/Installations • Constellation: Press the Blue key to view the TV constellation. 8.3 DVB-C In the Main Menu select DVB-C, Press OK to enter Scan Setup. Scroll down to adjust the settings below: 8.3.1 Country Setting Use the t u keys to select country.
- Page 10 S601b - Spectrum • S/Q: Press the Orange key to enlarge signal strength and quality readings. • Constellation: Press the Blue key to view the satellite constellation. 8.4 Spectrum • Satellite-Spectrum • Terrestrial-Spectrum • Cable-Spectrum 8.4.1 Satellte Spectrum Use the t u keys to change Center Frequency; Press OK to enter Spectrum press the Red key to change bandwidth;...
- Page 11 S601b - Loop Search & Others Menu 8.5 Loop Search Select Loop Search, then press OK in Loop Search. 8 TPs will be shown. Press OK then use the t u keys to select a TP to monitor and then press OK. The meter will then scan continuously through the 8 TPs.
- Page 12 S601b - Others - Program Info & EPG • To Lock channels use the pq keys to select a channel, press the Green key icon will appear. Press the Green key again to unlock. • To Delete channels use the pq keys to select a channel, press the Orange key, use the pq keys to select “Delete Select”...
- Page 13 S601b - Media & Satellite Setting 8.7.4 Media Playback - Video, Music and Photos To playback media files you will need to connect a USB device holding the media files you want to play to the USB socket. • Movie - select the movie from the Main Menu Press the Green key to change the folder file view to show a detailed list, press Green again to return to the folder view.
- Page 14 S601b - Auto Scan & SAT/TP Manager • Mode: D, Drive to Satellite - Move the cursor to GO, then press OK the motor will go to the auto calculated position. • Mode: E, Recalculate E1 Direction: Use the t u keys to change direction from West to East.
- Page 15 S601b - Compass & System Setting • Scan Sat Press the Blue key to enter the Automatic SAT scan menu. In Sat/Tp Manager press u key to enter the Tp list. • Edit Tp: Press the Red key to edit TP .
- Page 16 S601b - Upgrades & Factory Reset • Upgrade: Copy the upgrade file to a USB memory device and insert the USB device in to the meter’s USB socket. Select upgrade and press OK. Use the arrow keys to navigate through the folders on the USB device to find the upgrade file and press OK.
-
Page 17: Troubleshooting
S601b - Troubleshooting Problem Possible Causes Action Power switch is off or battey is Check to make sure power is on. No display light up Charge meter with PSU/Charger No sound or picture, Check AV IN/HDMI cable connec- AV IN/HDMI cable connected,... -
Page 18: Specifications
S601b - Specifications Transmission Standards DVB-S2/S, DVBT/T2, DVB-C Satellite Input/Demodulation Connector Type F Type Input Frequency 950 to 2150 MHz Signal Input Level - 65 to -25 dBm Band Switch Control 22KHz LNB Supply 13V/18V, IMax 400mA Demodulation Type QPSK,8PSK,16APSK Symbol Rate 2<Rs<45Mband(SCPC/MCPC) - Page 19 S601b - Specifications Audio/Video Processing MPEG-2 MP@HL, MPEG-1 Decoding,MPEG‐4 ASP@L5 HD resolution, Video decompression H.265 HEVC MPEG-H, H.264 MP&HP@L4,HW JPEG decoding Resolving rate PAL-25 frame@720*576,NTSC-30 frame@720*480 Signal compatibility Support conversion for different video formats Video Format 4:3,16:9,By Pan & Scan and Letter Box conversion...
- Page 20 For further information or any queries please contact Technical Support: www.labgear.co.uk/support aste electrical and electronic products should not be disposed of with household waste. Please recycle where facilities exist. Check with your Local Authority for recycling advice. © Labgear 2020 V1.2...
Need help?
Do you have a question about the S601b and is the answer not in the manual?
Questions and answers