Table of Contents
Advertisement
Quick Links
POWER AMPLIFIER
TABLE OF CONTENTS
Front
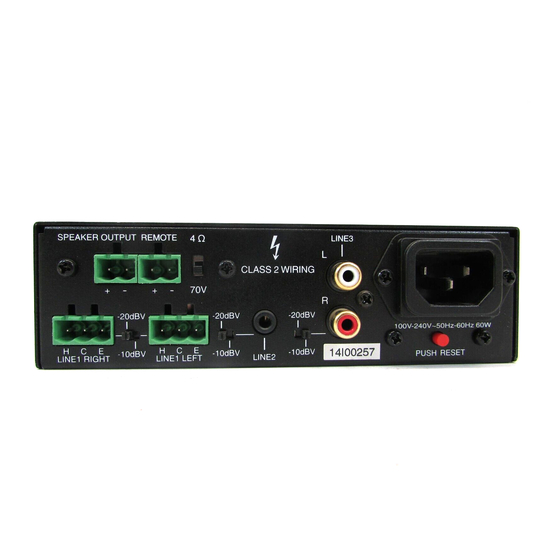
Rear
Thank you for purchasing TOA's Power Amplifier.
Please carefully follow the instructions in this manual to ensure long, trouble-free use of your equipment.
P2
P4
P6
P6
P6
P6
P7
P9
13. APPENDIX
P9
P10
P10
P10
TOA Canada Corporation
OPERATING INSTRUCTIONS
AV-60S-AM
P11
P11
P11
P11
P11
P12
P13
P14
P15
Advertisement
Table of Contents

Related Manuals for Toa AV-60S-AM


Summary of Contents for Toa AV-60S-AM
-
Page 1: Table Of Contents
6.2. Input Connections 6.3. Speaker Connections 6.4. Remote Volume Connection 6.5. AC Power Connections Thank you for purchasing TOA's Power Amplifier. Please carefully follow the instructions in this manual to ensure long, trouble-free use of your equipment. TOA Canada Corporation... -
Page 2: Important Safety Instructions
1. IMPORTANT SAFETY INSTRUCTIONS • Read these instructions. • Keep these instructions. • Heed all warnings. • Follow all instructions. • Do not use this apparatus near water. • Clean only with dry cloth. • Install in accordance with the manufacturer's instructions. •... - Page 3 INSTRUCTIONS ESSENTIELLES POOR LA S CURIT É É • Lire ces instructions. • Conserver ces instructions. • Respecter toutes les instructions. • Suiver toutes les instructions. • Ne pas utiliser cet appareil près de l'eau. • Nettoyer avec un chiffon sec. •...
-
Page 4: Safety Precautions
• Should the following irregularity be found during use, immediately switch off the power, disconnect the power supply plug from the AC outlet and contact your nearest TOA dealer. Make no further attempt to operate the unit in this condition as this may cause fire or electric shock. - Page 5 CAUTION Indicates a potentially hazardous situation which, if mishandled, could result in moderate or minor personal injury, and/or property damage. When Installing the Unit • Never plug in nor remove the power supply plug with wet hands, as doing so may cause electric shock. •...
-
Page 6: General Descriptions
3. GENERAL DESCRIPTION The AV-60S-AM is a single channel digital amplifier for speech and general announcement. This compact amplifier is equipped switching power supply circuit inside, Energy Star 3.0 certified and PLENUM rated (UL 2043 tested) for the installation into air handling space without external AC adaptor. The rated output power is 60W at 70V or 4 Ohms. - Page 7 ⑨ ⑧ ⑬ ⑫ ⑭ ⑪ This figure represents the AV-60S-AM 8. Breaker 10. Speaker output terminal Cuts off the AC power supply from the AC outlet if Connects to speakers. the power current exceeds the allowable value. Removable terminal block (2P).
- Page 8 14. Line 3 input terminals 10K Ohms, unbalanced, RCA jack. Connect a sound source equipment such as a CD player. 15. Remote volume control 10K Ohms, removable terminal block (2P). Use it as a remote volume control. 16. Output selector switch Move the switch downwards to set 70V output;...
-
Page 9: Connections
6. CONNECTIONS 6.1. Removable Terminal Plug Connection Notes • Avoid soldering cable conductor, as contact resistance may increase when the cable is tightened and the solder is crushed, possibly resulting in an excessive rise in joint temperatures. • Use cables of AWG 12 – 24. [Cable end treatment] 2-core shielded cable Solid cable and stranded cable... -
Page 10: Speaker Connections
6.3. Speaker Connections Class 2 wiring may be used. 6.4. Remote Volume Connection When a remove volume control is needed, wiring a 10K Ohms potentiometer to the 2-pin Remote Volume Control Jack as shown below. Attenuating the value of the potentiometer will reduce the audio level. This attenuation works for the audio signal after adjusted by its master volume control. -
Page 11: Operation
7. OPERATION After completing all audio and control connections, connect the power supply, and check the power indicator. Note: When the heat sink temperature exceeds 130°C (266 °F), the protection circuit begins to operate to disconnect the output from the circuit. The disconnected output is automatically restored as soon as the temperature returns to the normal operating range. -
Page 12: Block Diagram
10. BLOCK DIAGRAM... -
Page 13: Dimentional Diagram P13
11. DIMENSIONAL DIAGRAM... -
Page 14: Specifications
12. SPECIFICATIONS Model No. AV-60S-AM Power Source 100V to 240V AC, 50Hz/60Hz Rated Output 60W @ 4 Ohms, 60W @ 70V Rated Output Less than 85W @ 70V, Less than 110W @ 4 Ohms Power Consumption Idle Less than 10W @ 70V, Less than 7W @ 4 Ohms... - Page 15 13. Ensure that the conduit nut from step 10 (Fig.4) firmly secures the conduit EMT adapter plate. 14. Use the 10 screws you removed in step 3 to secure the top cover of the AV-60S-AM back onto its main chassis.
- Page 16 AC Receptacle Fig.1 Remove two screws Fig.2 Remove side screws Terminal block Ground wire nut Ground wire nut Terminal block EMT adaptor plate Conduit nut Hot terminal Neutral terminal Neutral terminal Hot terminal TOA Canada Corporation...
Need help?
Do you have a question about the AV-60S-AM and is the answer not in the manual?
Questions and answers