Advertisement
Quick Links
Installation Instructions
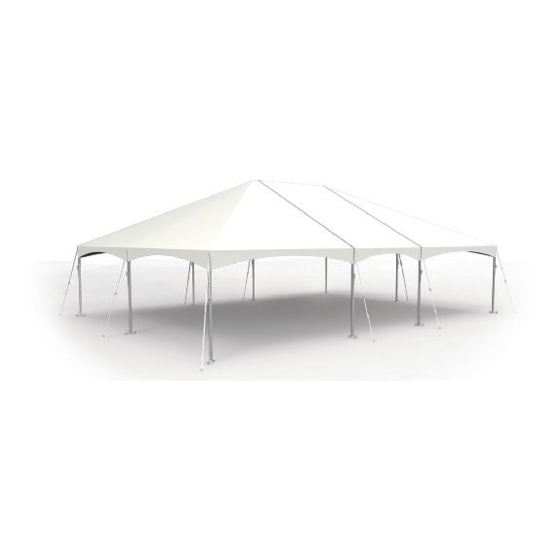
F3 Frame Tent
20 x 30' Hip Frame Shown
Please read all assembly / installation instructions before the installation or removal of this product.
7701 Highway 41 N
Evansville, IN 47725
Phone: 812-867-2421
Fax: 812-867-1429
1-800-544-4445
email: tents@anchorinc.com
www.anchorinc.com
EC5729
F3 121
Advertisement

Subscribe to Our Youtube Channel
Related Manuals for Anchor F3


Summary of Contents for Anchor F3
- Page 1 Installation Instructions F3 Frame Tent 20 x 30’ Hip Frame Shown Please read all assembly / installation instructions before the installation or removal of this product. 7701 Highway 41 N Evansville, IN 47725 Phone: 812-867-2421 Fax: 812-867-1429 1-800-544-4445 email: tents@anchorinc.com www.anchorinc.com...
- Page 2 Table of Contents PAGE NO. DESCRIPTION General Notes, Safety Notes Frame terminology, Clearance Dimensions Hip Frame Component list, illustrations Hip Layout and Begin connections Installation cross web for 30’ frame Completion of top Hip frame members Installation of hip and mid fabric Frame Lifts, Stakes and Guys Tensioning &...
-
Page 3: General Notes
General Notes: • The installation manual describes in a methodical manner the assembly and erection of the Anchor frame tent. Please read all instructions before the installation or removal of this product. • Installer must determine the number of persons and the proper equipment required for each installation. - Page 4 F3 FRAME TERMINOLOGY 30’ RIDGE HIP END BRACE FRAME (OPTIONAL) RIDGE INT/INT EAVE/ RIDGE PURLIN EAVE/ RIDGE PURLIN 7’ 8’ RAFTER RIDGE 10’ HIP/INT BASEPLATE INT. UPRIGHT CORNER GABLE END GABLE END GABLE END CORNER RIDGE INT. FRAME (LEFT) 30’ RIDGE...
- Page 5 COMPONENT LIST - HIP FRAME QUANTITIES Description 20’ x 20’ 20’ x 30’ 20’ x 40’ 30’ x 30’ 30’ x 45’ 30’ x 60’ 15’ MID 15’ MID Ridge Hip/ Intermediate Ridge Intermediate/ Intermediate Ridge Hip/Hip Intermediate Corner Adjustable Baseplate 7’...
- Page 6 STEP 1 Layout Components for Assembly - Hip Frame Layout components as INT. EAVE/ shown for your particular size RIDGE tent. Square tents will use PURLIN the Ridge Hip/Hip Weldment at Peak. RIDGE INT/INT EAVE/ RIDGE PURLIN RIDGE HIP/INT OPTIONAL RIDGE BRACE RAFTER 30’...
- Page 7 Installation Cross Web Cross web is installed by running ends After ends are attached, tension the of Cross web around Int. weldment and strap using the cam buckle. thru U-Bolt on outside of weldment. Attach ring back to hook. Installation Cross Web Figure 2b For 30’...
- Page 8 STEP 4 Connect next arch Connect rafters to Ridge weldment, then connect Eave/Ridge purlins. Continue in like manner at next Arch as required. Arch Optional Ridge Brace for 30’ frame not shown. Installation Cross Web Installed on 30’ Frame. Lifting Bar with Cradle could be used for help with lifting Ridge Purlins.
- Page 9 STEP 6 Installation of hip end fabric Unroll hip fabric and lay loosely beside frame, right side up. Connect snap of pull rope to ring at end of kedar. Feed kedar up into channel a few inches, then pull fabric up and over through channel in rafter extrusion using the pull rope.
- Page 10 STEP 8 Raise one side with Frame Lifts Place frame lifts as shown and attach to eave purlins. Attach uprights to base plates. Attach uprights to weldments on one side once the side is raised to the appropriate height. When one side has all uprights attached, move frame lifts to the other side, and raise frame until the end uprights can be attached.
- Page 11 STEP 10 Tension fabric to frame Rafter Tension tent to frame as shown at right. Pass left tension ring with web through right catenary ring. Eave Line Pass right tension ring with web through left catenary ring. Overlap both tension rings. Attach top web/ratchet hook to both rings.
- Page 12 COMPONENT LIST - GABLE END FRAME QUANTITIES Description 20’ x 20’ 20’ x 30’ 20’ x 45’* 30’ x 30’ 30’ x 45’ 30’ x 60’ 15’ MID 15’ MID Gable End Ridge Intermediate Ridge Intermediate/ Intermediate Gable End Upright Intermediate Intermediate Gable End...
- Page 13 STEP 1 Gable End - Layout Components for Assembly Layout components Figure 1 GABLE END as shown for your CORNER particular size tent. (LEFT) GABLE END UPRIGHT INT. GABLE END RIDGE INT. GABLE END RIDGE VERTICAL INT/INT GABLE END CORNER GABLE END (RIGHT) CORNER...
- Page 14 STEP 2 Begin connection of components Cont’d Once the Gable End Arch is completely assembled, Start on the Second Arch. Connect rafters to Ridge weldment, then connect Eave/Ridge purlins. Continue in like manner until all arches are assembled. STEP 3 Connect Arches Beginning at one of the gable ends, raise the Gable end Arch and then the Second Arch.
- Page 15 STEP 4 Install Fabric Install Gable Ends. Insert End of Kedar (at top of Gable End Fabric) into bottom of channel at End of frame. Using pull web loop, pull Gable end up until it is at the peak. Pull other half of Gable end up until both halves meet at center. See Lace detail below.
- Page 16 WARNING...
Need help?
Do you have a question about the F3 and is the answer not in the manual?
Questions and answers