Table of Contents
Advertisement
I.
运转前的注意事项 ...................................................................................................... 1
CAUTIONS BEFORE OPERATION ............................................................................ 1
II.
各部件的名称 .............................................................................................................. 2
CONFIGURATION OF THE MACHINE ...................................................................... 2
III.
机器规格 ...................................................................................................................... 3
MECHANICAL SPECIFICATIONS .............................................................................. 3
IV.
安装 .............................................................................................................................. 4
INSTALLATION .............................................................................................................. 4
1.
包装材料的拆卸 ........................................................................................................................... 4
REMOVING PACKING MATERIALS .......................................................................................... 4
2.
固定主机 ....................................................................................................................................... 4
SECURING THE MACHINE.......................................................................................................... 4
3.
线架的安装 ................................................................................................................................... 5
ASSEMBLING THE THREAD STAND AND ATTACHING IT ................................................. 5
4.
夹杆堆叠器的安装(选购品) ........................................................................................................ 5
INSTALLING CLAMP BAR STACKER (OPTIONAL) .............................................................. 5
5.
操作面板的安装 ........................................................................................................................... 6
INSTALLING OPERATION PANEL ............................................................................................. 6
6.
往油槽加油 ................................................................................................................................... 7
LUBRICATING THE OIL TANK .................................................................................................... 7
V.
缝纫机的准备 .............................................................................................................. 8
PREPARATION OF THE SEWING MACHINE ......................................................... 8
1.
缝纫机机头的使用 ....................................................................................................................... 8
HOW TO OPERATE THE SEWING MACHINE HEAD ............................................................ 8
(1) 使用机线 .................................................................................................................................................... 8
Thread used ....................................................................................................................................................... 8
(2) 上线的穿线方法 ........................................................................................................................................ 8
How to pass the needle thread ......................................................................................................................... 8
2.
底线的卷绕方法 ........................................................................................................................... 9
HOW TO WIND THE BOBBINS ................................................................................................... 9
(1) 放置梭芯 .................................................................................................................................................... 9
Place bobbin ...................................................................................................................................................... 9
(2) 开始绕底线方法 ...................................................................................................................................... 10
Winding the lower thread .............................................................................................................................. 10
3.
梭壳的穿线方法 ......................................................................................................................... 11
HOW TO THREAD THE BOBBIN CASE ................................................................................. 11
4.
梭壳的安装 ................................................................................................................................. 11
HOW TO INSTALL THE BOBBIN CASE ................................................................................. 11
5.
线张力器的取下方法 ................................................................................................................. 11
HOW TO ADJUST THE THREAD TENSION .......................................................................... 11
VI.
操作盘的使用方法 .................................................................................................... 12
HOW TO USE THE OPERATION PANEL ........................................................................ 12
1.
操作面板的基本操作 ................................................................................................................. 12
BASIC OPERATION OF THE OPERATION PANEL ............................................................... 12
(1) 操作面板各部件的名称 .......................................................................................................................... 12
Configuration of the operation panel ........................................................................................................... 12
(2) 通用的按钮 .............................................................................................................................................. 13
Buttons used in common ................................................................................................................................ 13
目 录
CONTENT
1
Advertisement
Table of Contents

Related Manuals for Jack JK-T5878-58G


Summary of Contents for Jack JK-T5878-58G
-
Page 1: Table Of Contents
目 录 CONTENT 运转前的注意事项 ...................... 1 CAUTIONS BEFORE OPERATION ................1 各部件的名称 ......................2 CONFIGURATION OF THE MACHINE ..............2 III. 机器规格 ........................3 MECHANICAL SPECIFICATIONS ................3 安装 ..........................4 ... - Page 2 (3) 基本操作 ..............................14 Basic operation ..............................14 基本画面的说明 ......................... 16 EXPLANATION OF THE BASIC SCREEN ................16 计数器的使用 ..........................18 USING THE COUNTER ....................... 18 (1) 计数器的设定方法 ..........................18 Setting procedure of the counter ........................18 (2) ...
- Page 3 USING THE INFORMATION ....................... 50 (1) 查看维修检查信息 ..........................51 Observing the maintenance inspection information ..................51 (2) 时钟显示信息 ............................52 Clock display information ..........................52 (3) 机器运转信息 ............................52 Operation information of the machine ......................52 (4) 控制结构图 .............................. 53 Control structure diagram ..........................
-
Page 4: 运转前的注意事项
I. 运转前的注意事项 CAUTIONS BEFORE OPERATION 运转前和每日开始工作前,请一定确认以下项目。 1.请确认是否向缝纫机加入了规定量的缝纫机油。 2.在没有向旋梭加油部加入机油的状态,请绝对不要运转缝纫机。 3.请确认空气压力表的读数是否为0.6MPa。 ※ (特别是中午午休等情况停止空气压缩机后,请一定进行确认。) 空气压力在规定值以下时,有发生零件碰撞等危险,请加以注意。 4.请确认缝纫机的上线、底线是否需要补充。 5.打开电源开关开始缝制时,请一定进行试缝之后再正式缝制产品。 Following items have to be checked every working day before the operation of the machine and before the start of work hours. 1. Ascertain that the sewing machine is filled with the predetermined amount of oil. 2.... -
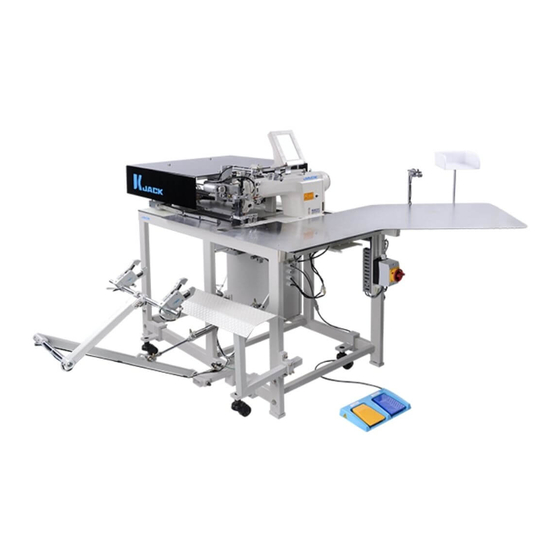
Page 5: 各部件的名称
II. 各部件的名称 CONFIGURATION OF THE MACHINE The T5878-58G consists mainly of the following units. 本缝纫机由以下10个部分构成: ○ ○ 1 Emergency stop switch 1 急停开关 ○ ○ 2 Center knife unit 2 中刀机构 ○ ○ 3 Operation panel 3 操作面板 ○ ○ 4 Sewing machine head 4 单针直驱缝纫机头... -
Page 6: 机器规格
III. 机器规格 T5878-58G 机器型号 500~4000rpm 转速 平缝:2.0 〜 3.4mm( 标准 2.5mm) 缝迹针距 缩缝:1.0 〜 1.5mm( 标准 1.0mm) 倒缝:1.0 〜 3.0mm( 标准 2.5mm) 可以变换缩缝、倒缝。 1~30 针( 标准 3 针 ) 加固缝针数 DB*1 11# 使用机针 缝纫宽度 1~50mm 15~260mm 缝纫长度 使用机线 缝纫机线 # 60( 推荐 ) 伺服马达驱动... -
Page 7: Installation
IV. 安装 INSTALLATION 1. 包装材料的拆卸 REMOVING PACKING MATERIALS 请取下固定大压脚的扎线带. Remove the string that has fixed the clamp. 从附件箱中取出脚踏板,将 脚踏板线连接上. Take out operational panel 请取下固定堆叠器的绳子和包装 from accessory case and then 材料,还原堆叠器位置. connect the line Remove the string and packing materials that have fixed the stacker. 2. -
Page 8: 线架的安装
3. 线架的安装 ASSEMBLING THE THREAD STAND AND ATTACHING IT 请按照左图所示那样,将线架插到主机机架上的圆孔中,调整 好位置以后,用两个内六角紧定螺钉固定。 Putting the thread stand in one of the two holes o n main unit frame and fix the thread stand with two hexagon without a head set screws as illustrated in the left-hand figure. -
Page 9: 操作面板的安装
5. 操作面板的安装 INSTALLING OPERATION PANEL ○ 如图所示,切断固定操作面板 A 的扎线带,然后除掉扎线带和包装材料。将操作面板按照如图所示固定到 正确位置。 As shown in the figure above,cut and remove the packing material that has fixed the installing operation panel on frame. 为了防止操作面板因静电而发生误动作,安装到操作盘座进行使用时,请不要变更操作盘座的位置。 To prevent malfunction due to static electricity, install operation panel on the panel base to use and do not change the position of the panel base. -
Page 10: 往油槽加油
6. 往油槽加油 LUBRICATING THE OIL TANK 注意 1.为了防止缝纫机的突然起动造成事故,加完油之前,请不要连接电源插头。 2.为了防止炎症、斑疹,油粘附到眼睛、身体上,加完油之后,请立即进行清洗。 3.误饮油之后,有可能发生泻肚、呕吐。请将油放到小孩拿不到的地方。 1. To prevent accidents caused by abrupt start of the sewing machine, do not connect the power plug until lubrication has been completed. 2. To prevent inflammation or rash, immediately wash the part when oil has stuck to your eyes or CAUTION body. -
Page 11: 缝纫机的准备
V. 缝纫机的准备 PREPARATION OF THE SEWING MACHINE 1. 缝纫机机头的使用 HOW TO OPERATE THE SEWING MACHINE HEAD (1) 使用机线 Thread used 上线请使用左捻线。 * 底线左捻线和右捻线均可以使用。 * Use the left hand twist thread for the needle thread * Right hand twist thread Either twist thread will do for the bobbin thread. *... -
Page 12: 底线的卷绕方法
2. 底线的卷绕方法 HOW TO WIND THE BOBBINS 注意 为了防止受伤,运转中请不要触摸。 To prevent damage, avoid contact with bobbins while the machine is in operation. CAUTION (1) 放置梭芯 Place bobbin ○ ○ 将梭芯 1 置于梭芯卷线轴 2 上。 ○ 按箭头所示的方向将线在梭芯 1 上 卷绕几次。 * 请确认各部分的机线没有松弛。 。... -
Page 13: 开始绕底线方法
(2) 开始绕底线方法 Winding the lower thread ○ 将梭芯放置完成后,按下缝制画面中的按钮 A ,显示绕 底线画面(画面 A) 。 ○ After complete the first step ,Press the button A in the sewing screen,Then the lower thread winding screen (screenA) is displayed. 确认线已经从针里面取出后,按下中间的按钮 开始绕底 线。 ○ 底线卷绕一旦完成,梭芯压臂柄 3 将自动返回。... -
Page 14: 梭壳的穿线方法
3. 梭壳的穿线方法 HOW TO THREAD THE BOBBIN CASE 手拿旋梭,在线右卷的状态下放入梭壳里。 把线放入梭壳穿线槽①。 然后把线从线张力弹簧下面穿过。 Bobbin case Hold in hand a bobbin in the way that it spins clockwise and put it into the bobbin case. ○ Pass the thread through slot 1 in the bobbin Bobbin case. -
Page 15: 操作盘的使用方法
VI. 操作盘的使用方法 HOW TO USE THE OPERATION PANEL 1. 操作面板的基本操作 BASIC OPERATION OF THE OPERATION PANEL (1) 操作面板各部件的名称 Configuration of the operation panel 符号 名称 说明 Symbol Name Description 触摸操作盘液晶显示部 TOUCH PANEL, LCD display section 进行数据输入画面和缝制画面的变换。 READY key 准备完了键 Change-over of the data input screen and the sewing screen is performed. -
Page 16: 通用的按钮
(2) 通用的按钮 Buttons used in common 在操作面板的各画面上通用操作的按钮如下所示。 Buttons that perform common operation in the respective screens of the operation panel are as described below. 图标 名称 说明 Description Pictograph Name 取消按钮 关闭凸起画面。 CANCEL botton 变更数据画面时,取消变更中的数据。 Pop-up screen is closed. In case of the data change screen, the data during changing can be cancelled. -
Page 17: 基本操作
(3) 基本操作 Basic operation 1) 打开电源开关 请首先打开电源开关。 欢迎画面显示后,复位凸起画面显示出来。请按复位按钮 ○ A 。 Turn ON the power switch. First, turn ON the power switch. Reset pop-up screen is displayed after displaying WELCOME screen. ○ Press RESET button 按了复位按钮之后,机头会移动,因此请注意安全。 When RESET button is pressed, the binder goes up. So, be careful. - Page 18 4) 操作中途停止装置时 ○ 缝制中按了中途停止开关 D 之后,可以让装置停止。 此时,错误画面被显示出来,通知停止开关被按。按了复位按 ○ 钮 E 之后,错误被解除,然后返回到输入画面。 To stop the device during operation When temporary stop switch ○ D is pressed during sewing, the device can be stopped. At this time, the error screenis displayed to inform that stop switch is ○...
-
Page 19: 基本画面的说明
2. 基本画面的说明 EXPLANATION OF THE BASIC SCREEN 符号 按钮名称 内容 新编制按钮 显示单独缝制图案新编制画面,可以新登记图案数据。 复制按钮 显示单独缝制复制原图案一览画面,可以复制图案数据。 绕梭芯按钮 按下按钮开始自动绕梭芯 显示出标记灯设定画面,进行标记灯照射位置的变换和标记灯设定 激光灯设定按钮 值的变更的设定。 穿线保护 按了按钮之后,机器调整到穿线状态。 穿线灯按钮 按一下穿线灯亮,再按一下穿线灯灭。 图案 No. 一览按钮 显示图案 No. 一览画面,可以选择图案数据。 缝纫尺寸设定按钮 设定缝制的长度。 显示缝制图案编辑画面。选择在输入画面上没有显示的详细缝制数据,可 显示缝制数据按钮 以进行编辑。 常用缝纫功能按钮 显示常用缝纫功能的按钮 缝制模式设定按键 选择缝制模式。 功能设定 开启/禁止某项功能 底线余量... - Page 20 Symbol Name of button Description NEW CREATION button Independent sewing pattern new creation screen is displayed and new register of the pattern data can be performed. Independent sewing copy source pattern list screen is displayed and the COPY button pattern can be copied. WIND BOBBIN button lower thread winding will start automatically while this button is pressed.
-
Page 21: 计数器的使用
3. 计数器的使用 USING THE COUNTER (1) 计数器的设定方法 Setting procedure of the counter 显示设定计数器画面 在输入画面按了模式变换键 之后,画面上计数器设定按钮 ○ A 显示出来。按了此按钮之后,"设定计数器画面(画面A)显 示出来。 Display the counter setting screen. Press MODE CHANGEOVER key from the input screen and ○ COUNTER SETTING button A is displayed on the screen. Press this button and "COUNTER SETTING screen (screen A) "... - Page 22 umber of pcs counter 【N 】 UP counter Every time one piece sewing is performed, the existing value is counter up. When the existing value is equal to the set value, the count- up screen is displayed. DOWN counter Every time one piece sewing is performed, the existing value is counted down.
-
Page 23: 计数的解除方法
变更计数器目标值 ○ 件数计数器时,按下按钮 之后,设定凸起画面(画面D)被 显示出来,可以设定计数器现在值。 Change the target value of counter In case of the number of pcs counter, press button ○ “Numerical setting pop-up screen (screen D)” is displayed. Then the target value of counter can be set. 在这里,请输入计数器目标值。向计数器目标值输入0之后,缝... -
Page 24: 底线余量计数器
4. 底线余量计数器 USING THE BOBBIN THREAD AMOUNT ADJUSTMENT COUNTER (1) 底线余量计数器的设定方法 Setting procedure of the bobbin thread remaining amount adjustment counter 显示设定计数器画面 在输入画面按了模式变换键 之后,在画面上显示出设定计数 ○ A 器按钮 。 按了此按钮之后,设定计数器画面(画面A)被显 示出来。 Display the counter setting screen Press MODE CHANGEOVER key from the input screen , ○... -
Page 25: 解除底线余量调整计数器的计数的方法
3) 设定底线余量调整值 ○ 按了调整底线余量调整值按钮 C 之后,设定底线余量调整值 画面(画面B)被显示出来。 Set the bobbin thread remaining amount adjustment value Press BOBBIN THREAD REMAINING AMOUNT ADJUSTMENT ○ VALUE SETTING button C and the bobbin thread remaining amount adjustment value setting screen (screen B) is displayed. 设定计数器画面(画面A) Counter setting screen(screenA) 这时,请输入底线余量调整值(50~57000)。... -
Page 26: 缝制图案的使用
5. 缝制图案的使用 USING THE SEWING PATTERN (1) 选择图案 Performing the selection of pattern 显示输入画面 显示出输入画面之后,便可以选择图案。 叫出图案一览画面 ○ 按了图案一览按钮 A 之后,图案一览画面被显示出来。 Display the input screen When the input screen is displayed, the selection of pattern can be selected. Call the pattern list screen ○... -
Page 27: 编制新图案
(2) 编制新图案 Performing the new creation of pattern 1) 显示输入输入画面 显示出输入画面之后,便可以编制新图案。 2) 叫出编制新缝制图案画面 ○ 按了编制新按钮 A 之后,编制新图案画面被显示出来。 Display the input screen When the input screen is displayed, the new creation of pattern can be performed. Call the sewing pattern new creation screen Press NEW CREATION button ○... -
Page 28: 复制图案
(3) 复制图案 Copying the pattern 可以把已经登记的图案复制到为登记的缝制图案里。因为禁止图案改写复制,所以想改写时,请事先 删除该图案。 → 有关图案的删除方法请参阅"VI-5.(4)删除图案"。 The pattern which has been already registered can be copied to the sewing pattern which has not registered yet. Copying of overwriting of pattern is prohibited. So, when you desire to overwrite, perform it after erasing the pattern once. - Page 29 选择复制原图案 ○ 请从图案一览按钮 B 中选择复制原图案。 ○ 接着,按了复制原图案No.输入按钮 C 之后,复制原图案No.输入画面(画面B)被显示出来。 Select the pattern of copy source ○ Select the pattern of copy source from PATTERN LIST button ○ Next, press COPY DESTINATION NO. INPUT button C and the copy destination input screen(screen B) is displayed.
-
Page 30: 删除图案
(4) 删除图案 Erasing the pattern 显示输入画面 显示出输入画面之后,便可以删除图案。 叫出图案一览画面 ○ 按了图案一览按钮 A 之后,图案一览画面被显示出 来。 Display the input screen When the input screen is displayed, it is possible to erase the pattern. Call the pattern list screen ○ A and the pattern No. list Press PATTERN LIST button screen (screen A) is displayed 选择删除的图案... -
Page 31: 变更缝制数据
6. 变更缝制数据 CHANGING THE SEWING DATA (1) 缝制数据的变更方法 Changing procedure of the sewing data 1) 显示输入画面 ○ 显示出输入画面之后,便可以变更缝制数据。经常使用的缝制数据已经显示输入画面的下方区域 B , ○ 并可以直接设定。 而且, 详细的缝制数据,按了 A 之后,也可以设定。 Display the input screen When the input screen is displayed it is possible to change the swing data. ○... -
Page 32: 缝制数据一览
(2) 缝制数据一览 在数据输入画面显示的项目 设定范围 初期值 项目 编辑单位 - - - 变换中刀选用/不选用 选择中刀选用/不选用 不选用 选用 - - - 变换夹杆堆叠器停止/动作 选择夹杆堆叠器的停止/动作 * 仅设定夹杆堆叠器安装时显示。 停止 动作 - - - 变换缝纫样式 选择缝纫样式 - - - 选择开始缝制缩缝/ 倒缝 选择开始缝制缩缝 / 倒缝 缩缝... -
Page 33: Sewing Data List
Sewing data list 1) Items that are displayed in the data input screen Setting range Initial Iterm value Edit unit - - - Center knife stop/motion change-over Stop/motion of center knife is selected. Stop Motion - - - Clamp bar stacker stop/motion change-over ... - Page 34 2) 在缝制数据一览画面显示的项目 设定范围 初期值 项目 编辑单位 2.5mm 平缝间距 1.0 ~ 3.4 设定平缝部分的缝制间距 0.1mm - - - 设定脚踏板动作模式 选择脚踏板动作模式 单步模式 连续模式 5 针 开始缝制缩缝针数 3 ~ 30 设定开始缝制缩缝针数。 1 针 * 仅选择缩缝时可以设定。 1.0mm 开始缝制缩缝间距 1.0 ~ 1.5 设定开始缝制缩缝间距。 0.1mm * 仅选择缩缝时可以设定。 3 针...
- Page 35 设定范围 初期值 项目 编辑单位 3 针 结束缝制倒缝针数 1 ~ 30 设定结束缝制倒缝针数。 1 针 * 仅选择倒缝时可以设定。 2.0mm 结束缝制倒缝间距 1.0 ~ 3.0 设定结束缝制倒缝间距。 0.1mm * 仅选择倒缝时可以设定。 2.0mm 0.5~2.5 转角针距 设定转角针距 10~200 90mm 标记光到机针距离 设定标记光到机针的距离。 -200~200 设置堆叠器位置 缝纫动作完成后,让大压脚移动设定距离,堆叠器动作 3300rpm 1900 ~ 缝纫机高速转速 4000 设定缝纫机头的转速。...
- Page 36 Items that are displayed in the sewing data list screen Setting range Initial Item value Edit unit 2.5mm Lockstitch pitch 1.0 ~ 3.4 Sewing pitch of lockstitch section is set. 0.1mm - - - Pedal operation mode change-over * Mode to be used for foot pedal is set. One step mode Continuous mode 5 stitch...
- Page 37 Setting range Initial Item value Edit unit 2.0mm 0.5~2.5 Needle pitch at sewing corner Set the needle pitch at sewing corner. 90mm 10~200 The distance between marking light and needle Set the distance between marking light and needle. Stacker position setting -200~200 After complete sewing ,big foot move to the designated spot and stacker action...
-
Page 38: 变更存储器开关数据
7. 变更存储器开关数据 CHANGING THE MEMORY SWITCH DATA (1) 存储器开关数据的变更方法 Changing procedure of the memory switch data 1) 显示存储器开关数据一览画面 ○ A 被显 按了模式变换键 之后,画面上存储器开关按钮 示。按此按钮之后, 存储器开关数据一览画面(画面 A)被显示出来。 Display the memory switch data list screen Press MODE CHANGE-OVER key and the memory switch ○... -
Page 39: 存储器开关数据一览
(2) 存储器开关数据一览 设定范围 初期值 项目 编辑单位 变换大压脚下降顺序 ‐ ‐ ‐ 选择大压脚的下降顺序。 先左面 先右面 左右同时 选择断线检测 - - - 选择有 / 无断线检测。 有断线检测 无断线检测 断线传感器延时启动 1~50mm 15mm 设定缝制多长缝纫距离后传感器开始检测 至开始缝制位置的空送速度 设定压脚至开始缝制位置的空送速度 大压脚返回速度 设定大压脚返回到后定位点的速度 30%~99% 中刀电机速度 设定中刀电机的速度 10~100 中刀下降时间 设定中刀下降时间 0.0~9.9 0.5S 堆叠器定时器1 从大压脚抬起到堆叠器开始夹布时间。... -
Page 40: Memory Switch Data List
Memory switch data list Setting range Initial value Item Edit unit ‐ ‐ ‐ Flap presser motion mode Motion order of flap presser is selected. Right/Left at From left From right the same time - - - Thread breakage detection With/without thread breakage detection is selected. -
Page 41: 断线报警
(3) 断线报警 Thread breakage alarm 当开启了断线检测功能时,如果缝纫过程中出现断线,机器停止动作,同时跳出断线报警画面(画面 A) 。 Opening threadbreakage detection ,when When thread breakage has occurred during machine running,the machine will stop working and “thread breakage alarm screen (screen A) is displayed at the samne time.” ○ 穿好线以后,按下后补针按钮 A ,大压脚往后拖布;按下 ○... -
Page 42: 设定选购项
8. 设定选购项 PERFORMING OPTIONAL SETTING (1) 选购项设定的变更方法 Changing procedure of the optional setting 显示设定选购项一览画面 ○ 在画面上按设定选购项按钮 A 之后, 设定选购项一览画面 (画面A)被显示出来。 Displaying the optional setting list screen Pressing MODE CHANGEOVER key , OPTIONAL SETTING ○ button A is displayed on the screen. Press this button and the optional setting list screen (screen A) is displayed. -
Page 43: 设定选购品一览
(2) 设定选购品一览 Optional setting list 设定选购品的安装状态之后,各选购品就可以动作。 项目 设定范围 初期值 编辑单位 - - - 设定安装 / 未安装夹杆堆积器 未安装 未安装 安装 - - - 设定安装/未安装对条对格装置 未安装 未安装 安装 - - - 设定安装/未安装角刀装置 未安装 未安装 安装 By setting the optional mounted state, it is possible to perform the respective optional operations. Setting range Initial value Item... -
Page 44: 管理数据输入画面
9. 管理数据输入画面 CUSTOMIZING THE DATA INPUT SCREEN 在数据输入画面上显示的按钮,可以根据用户的使用情况进行管理。 Buttons displayed in the data input screen can be customized in accordance with the customers’ using conditions. 显示输入画面的管理画面 ○ 按模式变换键 之后,在画面上输入画面的管理按钮 被显示出来。按此按钮之后,输入画面的管理画面被显示出来。 Display the customizing screen of the input screen Pressing MODE CHANGEOVER key , and CUSTOMIZE button ○... -
Page 45: 设定缝制画面的管理
10. 设定缝制画面的管理 PERFORMING THE CUSTOMIZING SETTING OF THE SEWING SCREEN 输入数据画面上显示的按钮,可以根据用户的使用情况进行管理。 Buttons displayed in the data input screen can be customized in accordance with the customers’ using conditions. 显示缝制画面的管理画面 ○ 按此按钮 A 之后,缝制画面的管理画面被显示出来。 Display the customizing screen of the sewing screen ○... -
Page 46: Test
11. 测试 TEST (1) 测试方法 Test method 显示测试画面 ○ 按了模式变换键之后,画面上测试按钮 被显示。按此按 钮之后,测试画面(画面 A)被显示出来。 ※ 此功能为维修人员使用,所以进入此功能时需要输入密码。服务密码请与生产 厂家联系。 Display test screen Pressing I/O TEST button ○ and the test screen (screen A) is displayed. * This function can only be used by maintainer,so, users need to enter a password to access, and you can get the... - Page 47 IO1 缝纫机头测试 按了缝纫机头测试按钮 之后,缝纫机头测试画面(画面 B)被显示。 ① ○ 按了按钮 之后,设定测试时中刀动作或不动作。 显示 内容 中刀动作 中刀不动作 ② ○ ○ 按 中的+、-键 、 设定 中与之相对应的机头电 机 转速 、 启动时间 、 停止时间 。 缝纫机头测试画面(画面 B) ③ ○ 按启动键 开始测试。 Sewing machine head test screen (screen B) ...
- Page 48 IO2 中刀电机测试 ① ○ 按了按钮 之后,设定测试时中刀放下或中刀不放下。 显示 内容 中刀放下 中刀不放下 ② ○ 在 中按 键设置中刀电机速度。 、 ③ ○ 按启动键 开始测试。 IO2 center motor test ① Press button ○ , and set whether to put down the center knife or not. Display Description To put down the center knife...
- Page 49 IO4 输出端口测试 ○ 在 中选择想要测试的输出端口(即电磁阀) 。 显示 内容 电磁阀动作 电磁阀不动作 IO4 output port test ○ Select the output port (magnetic valve) button you want to test. Display Description To actuate Not to actuate IO5 输入端口测试 ○ 在 中选择想要测试的输入端口(即传感器) ,如左图测试的是 传感器 JN34 显示...
-
Page 50: 显示输入/输出端口一览表
(2) 显示输入/输出端口一览表 Display the input/output port list 在输入测试画面(画面 A) ,按下按钮 A,显示输入端口一览 表。 Press button A in the input test screen, and then input list will displayed. 输入测试画面(画面 A) Input test screen (screen A) 同理, 在输出测试画面(画面 B) ,按下按钮 A,显示输出端口一览 表。 Press button A in the output test screen, and then output list will displayed. - Page 51 输入端口(传感器)一览表 JN14 上针位检测 JN17 脚踏板前进 JN18 脚踏板后退 JN25 检测针离开针板的位置 JN26 检测大压板前移动行程 JN27 检测大压板后移动行程 JN28 检测中刀位置 JN29 检测机头原点位置 JN30 检测中间位置 JN33 检测左边宽度 JN34 检测右边宽度 JN37 送布电机左位置检测 JN38 送布电机右位置检测 JN45 断线传感器 Input port (sensor) list Needle upper position detection JN14 Foot pedals forward JN17 Foot pedals backward JN18...
- Page 52 输出端口(电磁阀)一览表 EC01 控制中刀下降电磁阀 EC02 控制压脚上下电磁阀 EC03 固定切刀电磁阀 EC04 角刀切断电磁阀 EC05 三角刀电磁阀 EC06 控制吹气使布料平整电磁阀 EC07 对条对格中压布电磁阀 EC08 对条对格左压布电磁阀 EC09 对条对格右压布电磁阀 EC10 辅助堆叠器送料气缸上下动作电磁阀 EC11 辅助堆叠器送料气缸前后运动电磁阀 EC12 左大压板压下电磁阀 EC13 右大压板压下电磁阀 EC14 堆叠器抓取衣物电磁阀 EC15 堆叠器短气缸电磁阀 EC16 堆叠器长气缸电磁阀 EC17 吸气装置电磁阀 Output port ( ) list magnetic valve Center knife up/down EC01...
-
Page 53: 使用信息方法
12. 使用信息方法 USING THE INFORMATION 在信息功能中有以下5种功能。 There are five functions below, in the information function. 显示信息画面 在输入画面,按了信息键 之后,信息画面(画面 A)被显示出 来。 Display the information screen ○ Press INFORMATION key A of the switch seat section in the input screen and the information screen (screen A) is displayed. ○... -
Page 54: 查看维修检查信息
(1) 查看维修检查信息 Observing the maintenance inspection information 显示维修信息画面 请按显示信息画面的维修检查信息画面按钮 ○ A 。 Display the maintenance information screen Press MAINTENANCE INSPECTION INFORMATION SCREEN DISPLAY button ○ A of the information screen . 在维修检查信息画面上显示以下3种信息。 ·机针更换 ·清扫时间 ·机油更换时间 Three items of the information below are displayed in the maintenance inspection information screen. -
Page 55: 时钟显示信息
(2) 时钟显示信息 Clock display information 当显示的当前时间不准确时,可以通过时钟显示信息进行调整。 Date/Time can be adjusted when it is incorrect. 显示时钟信息画面 ○ 请按信息画面的时钟显示信息画面按钮 A 。 显示时间调整 画面(画面 A)。 Display the clock information screen ○ Pressing CLOCK DISPLAY INFORMATION button A in the infromation screen,and date/time adjustment screen (screenA) is displayed. -
Page 56: 控制结构图
在机器运转信息画面上显示着以下 3 种信息。 ○ B : 自动显示机器自运转以来的缝制总件数。 ○ C : 自动显示机器上电运转时间。 ○ D : 显示当前程序版本号。 Information on the following 3 items is displayed in the operation information screen. ○ B : This item automatically displays the tatol number of pieces. ○... -
Page 57: 使用通讯功能
13. 使用通讯功能 使用通讯功能,可以把其他缝纫机编制的缝制数据下载到此缝纫机。另外,还可以把上述数据加载到U 盘中。作为通讯的媒体,本机备有USB通讯接口。 Communication function can download the sewing data created with other sewing machine . In addition, the function can upload the aforementioned data to the USB. As the means of communication, USB are prepared. (1) 关于可以使用的数据 Handing possible data 数据名称... -
Page 58: 装入数据时
(4) 装入数据时 Take-in of the data 显示通讯画面 在输入画面,按了开关部的通讯键 之后,通讯画面(画面 A)被 显示出来。 选择通讯方法 通讯方法有以下 2 种: ○ U盘→液晶屏写入数据 ○ B 液晶屏→U盘写入数据 请选择希望的通讯方法按钮。 开始通讯 ○ 按了开始通讯按钮 C 之后,开始数据通讯。 Display the communication screen When COMMUNICATION key of switch seat section is pressed in the input screen, the communication screen (screen A) is displayed. -
Page 59: 更新操作面板程序
14. 更新操作面板程序 UPDATING PROGRAM OF OPERATION PANEL 显示程序更新画面 Display the screen of updating program . ○ 按参数变换键 之后,在画面上显示出程序更新按键 A 。按 了此按键之后,就会跳出通过 U 盘更新系统或更新用户应用程序的画 面。 Press MODE CHANGEOVER key and PROGRAM UPDATE button ○ A is displayed on the screen.When this button is pressed,the screen of updating program by USB is displayed. -
Page 60: 锁定复制和新建功能
16. 锁定复制和新建功能 LOCK COPY AND NEW FUCTION 按参数变换键 之后,在画面上显示出锁定复制和新建功能按键 ○ A 。按此按键可切换锁定或不锁定,锁定时,在主缝制画面上 ○ 的复制和新建按钮将如图 A 所示转变为 B 样式 显示 内容 不锁定 锁定 Press MODE CHANGEOVER key and LOCK COPY AND NEW ○ FUCTION button is displayed.Press this button ,you can set lock or unlock. -
Page 61: Maintenance
VII. 维修 MAINTENANCE 1. 检查 INSPECTION 为了保持本机的功能,请一定定期地实施以下的维修检查。如果不进行维修检查的话,就有可能发生机械 故障,因此请一定定期地实施维修。 Be sure to periodically execute the maintenance and inspection to keep the performance of this machine. Be sure to periodically execute the work since machine trouble may be caused unless the maintenance and inspection are performed. -
Page 62: 激光灯
2. 激光灯 MARKING LIGHT 1. 激光直接照射到眼睛之后,会造成视力障碍。请不要窥视激光出光孔。 警告 2. 接通电源的状态下,请绝对不要装卸激光灯。同时也不要使用于标记以外的用途。 1. If the laser light directly enters the eye, eyesight trouble may be caused. Do not look into the laser inlet/outlet. WARNING 2. Never perform installing/removing of the marking lamp with the power turning ON. In addition, do not use the light other than marking. -
Page 63: 维修视频
3. 维修视频 MAINTENANCE VIDEO 当机器发生故障时,可进入维修视频播放界面,观看机器自带的维修视频或者 U 盘里的视频。 When the machine has a failure, you can repair it by watching the maintenance video within the padel or the video in usb flash disk . ○ 按下参数变换键 之后,在画面上显示维修视频按键 A 。按了 此按键之后,就会跳出维修视频的画面。 Press MODE CHANGEOVER key and MAINTENANCE VIDEO button ○... - Page 64 视频播放画面各按键功能 播放/暂停按钮 按下时,视频播放;再按一下,视频暂 停 每按一下,视频后退 10s 快退按钮 每按一下,视频前进 10s 快进按钮 停止按钮 按下后,视频停止,如果按下播放键, 视频从头开始播 退出按钮 退出当前画面 3) The key function in the player screen Play /pause When pressed, video broadcast; Press button again, video pause Rewind button Each click, video back 10s Fast forward Each click, video fast forward 10s...
-
Page 65: 错误代码一览
4. 错误代码一览 错误 错误说明 原因 复位方法 代码 - - - - - - 数据写入成功,是否 重启系统 左右压脚与中刀的间距不 左右压脚可能会与左 如果确认没问题请按复位键继续, 够大 右中刀相撞 如果有问题,请关闭电源,更换合适 的中刀配件 指定图形不存在 登记的缝纫程序中没有 新建此编号程序 此编号的程序 机头中定位传感器异 机头不在正确位置上 检测传感器和机头移动电机信号线 常 后,按复位键 机头右定位点传感器 机头不在正确位置上 检测传感器和机头移动电机信号 异常 线后,按复位键 不能将数据写入 U 盘 检查 U 盘是否工作正常后重试 数据写入U盘错误... - Page 66 错误 错误说明 原因 复位方法 代码 停止开关 按了停止开关 复位后,可以重新启动 断线 1 、 线 张 力 调 节 不 好 穿好线以后用前后补针按钮可以让 2、过线部位有毛刺 布回到断线点,然后按下继续缝纫 按键,可以继续缝纫。如果需要结 束缝纫过程请按复位键 当前设置的缝纫宽度大于 左边大压脚会与机头 需要重新调整机械位置或者修改缝 两个大压脚之间的间距 上小压脚相撞 纫宽度参数 复位后,可以重新启动 当前设置的缝纫宽度大于 右边大压脚会与机头 需要重新调整机械位置或者修改缝 两个大压脚之间的间距 小压脚相撞 纫宽度参数 复位后,可以重新启动 - - - 对条对格装置左定位...
- Page 67 错误 错误说明 原因 复位方法 代码 缝纫长度设定错误 设定的缝纫长度值不符 关闭此画面重新设定长度值 合 不能复制 想要向已经登记的图案 按取消按钮 No.改写复制时 该号码已被使用 在新编制图案No选择 按取消按钮 已经登记的图案时 没有指定号码的数据 媒体和服务器里没有指 按取消按钮可以复位 定No.的数据 底线用完 底线余量计数器为0 1、更换底线; 2、按清除按钮,复位底线余量计数 器值 - - - - - - 确认删除吗...
-
Page 68: Error Code List
ERROR CODE LIST Description of error Reason How to recover Error code - - - - - - Copy file ok,Do you want to reset system? Clamp foot may The space between left and If there is no problem,press collided with center right clamp foot and center Reset-key to knife... - Page 69 Error Description of error Reason How to recover code Stop swich When stop swich is pressed. Possible to re-start after reset Thread breakage Possible to re-start after reset 、 Thread tension detection error adjustment is bad 2 、 Pass thread parts have the burr.
- Page 70 Error Description of error Reason How to recover code Length value setting width values do not Close the screen and set again error accord with sewing specifications. Copy disapproved When trying to perform Possible to recover with overwriting copy on the CANCEL button pattern No.
Need help?
Do you have a question about the JK-T5878-58G and is the answer not in the manual?
Questions and answers
Why is my michine is nt backtracking wen finished sew