Table of Contents
Advertisement
Quick Links
OWNER'S MANUAL
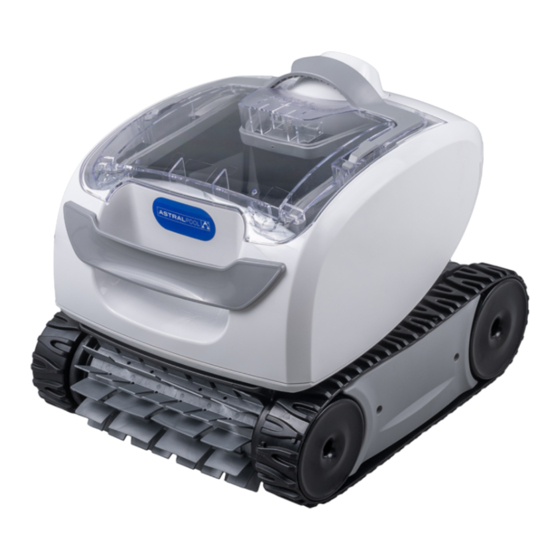
QG50
robotic pool cleaner
TYPE EC15-
-
WARNING
FOR YOUR SAFETY - For anything other than the routine cleaning and maintenance described in this manual,
this product must be serviced by a pool technician who is licensed and qualified in pool equipment by the
jurisdiction in which the product will be installed where such state or local requirements exist. In the event no
such state or local requirement exists, the maintainer must be a professional with sufficient experience in pool
equipment installation and maintenance so that all of the instructions in this manual can be followed exactly.
Improper installation and/or operation will void the warranty.
Advertisement
Table of Contents

Subscribe to Our Youtube Channel
Related Manuals for Astralpool QG50


Summary of Contents for Astralpool QG50
- Page 1 OWNER’S MANUAL QG50 robotic pool cleaner TYPE EC15- WARNING FOR YOUR SAFETY - For anything other than the routine cleaning and maintenance described in this manual, this product must be serviced by a pool technician who is licensed and qualified in pool equipment by the jurisdiction in which the product will be installed where such state or local requirements exist.
-
Page 2: Table Of Contents
QG50 robotic cleaner owner’s Manual Table of Contents Section 1. Important Safety Instructions ..3 Section 2. Cleaner Specifications ....5 Section 3. Assembly ........5 Contents ..................5 Assemble the Transport Caddy ...........5 Attach the Control Unit to the Caddy .......6 Connect to a Power Source ..........7... -
Page 3: Section 1. Important Safety Instructions
Section 1. Important Safety Instructions READ AND FOLLOW ALL INSTRUCTIONS Congratulations on purchasing the AstralPool Robotic Cleaner. Please read through the entire manual before installing your new robotic pool cleaner. Your cleaner must be installed and operated as specified. WARNING Failure to comply with the following warnings can increase risk of fire or electrocution which can result in property damage and serious injury, including loss of life. - Page 4 Ink from the pattern can also rub off during the installation process or when it comes into contact with objects in the pool. AstralPool Group Australia Pty Ltd is not responsible for, and the Limited Warranty does not cover, pattern removal, abrasion or markings on vinyl liners.
-
Page 5: Section 2. Cleaner Specifications
QG50 robotic cleaner QG50 robotic cleaner owner’s Manual owner’s Manual Section 2. Cleaner Specifications The general specifications for the cleaner are as follows: Control box 100-240 VAC, 50-60 Hz supply voltage Supply voltage 30 V DC Installed load 100 W max Cable length 16.5 M... -
Page 6: Attach The Control Unit To The Caddy
QG50 robotic cleaner owner’s Manual Insert the metal handle frame tubing into the base Slide the control unit base / caddy handle attachment with notch end at the top, then rotate so the bends down over the metal tubing until it snaps into place . -
Page 7: Connect To A Power Source
QG50 robotic cleaner owner’s Manual Press control unit onto the caddy hook until it snaps Unscrew the protective cap for the floating cable and locks into position. from the side of the control unit by turning counter- clockwise (Figure 10). -
Page 8: Section 4. General Cleaner Operation
Start at the cleaner head and untangle any coils in the cable before storing the cleaner. cleaner Control Unit The QG50 robotic cleaner includes a safety feature that automatically stops the cleaner if it is powered on but not submerged in water. For pools equipped cleaner... -
Page 9: Start / Stop Cleaning
QG50 robotic cleaner owner’s Manual Start / Stop Cleaning Hold the cleaner vertically over the pool surface to drain water before removing (Figure 16). Press Start/Stop button to begin or interrupt cleaner operation (Figure 14). Information Start/Stop Cleaner Operation Figure 14. Cleaner Control Unit... -
Page 10: Store The Cleaner When Not In Use
QG50 robotic cleaner owner’s Manual Grasp the handle and lift up to remove the filter Replace lid on the canister and then replace canister canister (Figure 18). back into the cleaner body. Plug the power cord back into the control unit and store the cleaner out of direct sunlight for next use. - Page 11 QG50 robotic cleaner owner’s Manual Recommended cleaner Control Unit cleaner Recommended entry point Figure 24. Hold Vertically to Drain Water WARNING: Do not use an extension cord Unplug power to the cleaner at the control unit (Figure 25). Figure 22. Optimal Entry Point in Pool...
-
Page 12: Replacing Wear Parts
QG50 robotic cleaner owner’s Manual Replacing Wear Parts Thread each tab into the slot provided and gently feed it through until the heel comes out at the other side of the slot (Figure 29). 5.2.1 Replacing Brushes The cleaner is fitted with a TPE brush in front. There are ‘’wear’’... -
Page 13: Section 6. Maintenance
If necessary, turn the one second local retailer to request a diagnostic wheels gently to seat track. interval. review or call AstralPool Technical Support 1300 186 875. 2 Flashes • Turn cleaner wheels to ensure they LED flashes are not jammed. -
Page 14: General Troubleshooting
Turn the tracks then disconnect the control unit and wait at least 20 seconds before reconnecting. If the problem persists, contact your local retailer to request a diagnostic review or call AstralPool Technical Support Cable is tangling in the pool... -
Page 15: Conformity
The manufacturer reserves the right to modify these specifications without notice. Although the cleaning robots have been tested in a large variety of swimming pools, AstralPool cannot be held responsible in the case of a non- perfect adaptation of the robot to a particular swimming pool. - Page 16 For full warranty terms and conditions and to register your warranty, visit www.astralpool.com.au/warranty and complete your details. Or scan the QR code to go directly to the registration page Record your cleaner details here for quick reference: Model No. : ____________________________________ Serial No.
Need help?
Do you have a question about the QG50 and is the answer not in the manual?
Questions and answers