Table of Contents
Advertisement
QUICK GUIDE
AlphaDisc™ Single
AlphaDisc™ Dual
AlphaDisc™ Trio
INTRODUCTION
Thank you for purchasing a AlphaDisc™ filter.
For filter operation and maintenance, please follow the instructions in this manual.
For additional information about the AlphaDisc™ filter, please scan the QR code or visit our website.
The AlphaDisc™ series of automatic self-cleaning filters, was designed for water filtration only, and
must be operated within the pressure limitation specifications.
Advertisement
Table of Contents

Subscribe to Our Youtube Channel
Related Manuals for Netafim AlphaDisc Series


Summary of Contents for Netafim AlphaDisc Series
- Page 1 QUICK GUIDE AlphaDisc™ Single AlphaDisc™ Dual AlphaDisc™ Trio INTRODUCTION Thank you for purchasing a AlphaDisc™ filter. For filter operation and maintenance, please follow the instructions in this manual. For additional information about the AlphaDisc™ filter, please scan the QR code or visit our website. The AlphaDisc™...
-
Page 2: Table Of Contents
Netafim™ assumes no responsibility with regard to the performance or use of these products. In no event shall Netafim™ be liable for any indirect, incidental, special or consequential damages. | AlphaDisc Filters quick user guide V1.0... -
Page 3: Alphadisc™ Series
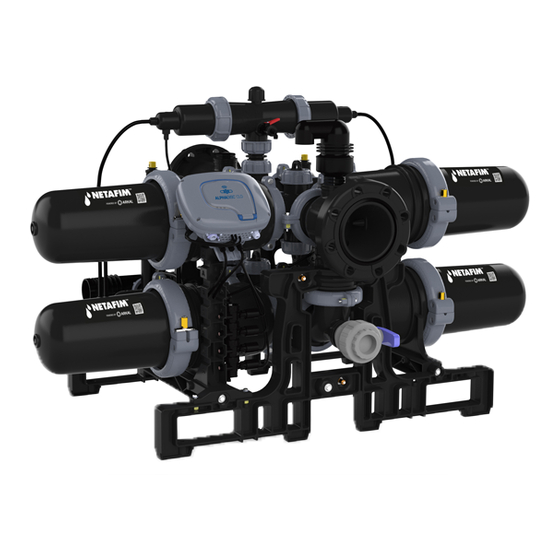
1. The AlphaDisc™ Series AlphaDisc™ 3” Inline Online Angle Reverse angle 2. The AlphaDisc™ XL Series AlphaDisc™ XL 4” Inline Online Angle Reverse angle | AlphaDisc Filters quick user guide V1.0... -
Page 4: Alphadisc™ Dual Series
3. The AlphaDisc™ Dual Series AlphaDisc™ Dual Series 4" AlphaDisc™ Dual 6" AlphaDisc™ XL Dual 4. The AlphaDisc™ Trio Series AlphaDisc™ Trio Series 6" AlphaDisc™ Trio 8" AlphaDisc™ XL Trio | AlphaDisc Filters quick user guide V1.0... -
Page 5: Dimensional Drawings
5. Dimensional Drawings AlphaDisc™ Single 3” In-line AlphaDisc™ Single 3” On-line AlphaDisc™ Single 3” Angle AlphaDisc™ Single 3” Reverse Angle | AlphaDisc Filters quick user guide V1.0... - Page 6 AlphaDisc™ Single XL 3” In-line AlphaDisc™ Single XL 3” On-line AlphaDisc™ Single XL 3” Angle AlphaDisc™ Single XL 3” Reverse Angle | AlphaDisc Filters quick user guide V1.0...
- Page 7 AlphaDisc™ Single XL 4” In-line AlphaDisc™ Single XL 4” On-line AlphaDisc™ Single XL 4” Angle AlphaDisc™ Single XL 4” Reverse Angle | AlphaDisc Filters quick user guide V1.0...
- Page 8 AlphaDisc™ Dual 4” AlphaDisc™ Dual XL 6” | AlphaDisc Filters quick user guide V1.0...
- Page 9 AlphaDisc™ Trio 6” AlphaDisc™ Trio XL 8” | AlphaDisc Filters quick user guide V1.0...
-
Page 10: Technical Specifications - Alphadisc
54 KG (118 LB) 115 KG (253 LB) 156 KG (344 LB) * CONSULT NETAFIM FOR OPTIMUM FLOW DEPENDING ON FILTRATION DEGREE AND WATER QUALITY. Electronic control (AlphaDisc™ BLE)* CONTROL POWER SUPPLY 4 X AA TYPE 1.5V BATTERIES / EXTERNAL 7-14V DC... - Page 11 FLOW RATE (130 MICRON) CLOGGING SINGLE 3" DUAL 4" TRIO 6" /H GPM M /H GPM M /H GPM >15 GOOD GOOD 5-15 AVERAGE AVERAGE 2.5-5 POOR POOR 1.5-2.5 VERY POOR VERY POOR Availability of disc type and micron size MICRON PP/PA (NYLON) 2"...
-
Page 12: Technical Specifications - Alphadisc™ Xl
58 KG (129 LB) 127 KG (279 LB) 182 KG (401 LB) * CONSULT NETAFIM FOR OPTIMUM FLOW DEPENDING ON FILTRATION DEGREE AND WATER QUALITY. Electronic control (AlphaDisc™ BLE)* CONTROL POWER SUPPLY 4 X AA TYPE 1.5V BATTERIES / EXTERNAL 7-14V DC... - Page 13 FLOW RATE (130 MICRON) CLOGGING XL SINGLE 3" XL DUAL 4" TRIO XL 6" TRIO XL 8" >15 GOOD 1,452 GOOD 5-15 AVERAGE 1,188 AVERAGE 2.5-5 POOR 1,056 POOR 1.5-2.5 VERY POOR VERY POOR Availability of disc type and micron size MICRON PP/PA (NYLON) 4"...
-
Page 14: Alphadisc™ Filtration Process
8. AlphaDisc™ Filtration Process 9. AlphaDisc™ Backwash Process | AlphaDisc Filters quick user guide V1.0... -
Page 15: Unpacking Single
10. Unpacking Single 1. Remove the 12 lockers, rotate each one clockwise using your fingers in the designated grooves. 2. Open the top of the carton box and remove the filter. Note: Inside the carton box you will find: • Multifunction tool •... - Page 16 3. Place the AlphaDisc™ on a flat surface to extract the product from the supporting bridges. 4. Prior to installation, cut the plastic strips and lift the supporting bridge to release the product. Repeat this procedure on the other side to release the product completely. Note: In the On-line configuration, the command filter is disconnected during shipment | AlphaDisc Filters quick user guide V1.0...
- Page 17 5. Install the command filter | AlphaDisc Filters quick user guide V1.0...
-
Page 18: Unpacking Battery Filter
11. Unpacking Battery Filter 1. Remove the plastic shrink wrap that covers the filter. 2. Place the AlphaDisc™ on a flat surface in its final installation position. 3. Disconnect the three screws and separate the horizontal beams. | AlphaDisc Filters quick user guide V1.0... - Page 19 4. Disconnect the vertical beams by releasing the bottom screws on each corner. | AlphaDisc Filters quick user guide V1.0...
- Page 20 Note: The command filter is disconnected during shipment. 5. Connect the command filter. | AlphaDisc Filters quick user guide V1.0...
- Page 21 Note: The air release valve is removed during shipment and needs to be reinstalled after the AlphaDisc™ is in its final position. 6. Remove the air release cap. | AlphaDisc Filters quick user guide V1.0...
- Page 22 7. Install the air release valve. | AlphaDisc Filters quick user guide V1.0...
-
Page 23: Alphadisc™ Multi-Tool
12. AlphaDisc™ Multi-Tool The multifunction tool is provided with each AlphaDisc™ unit. Below, is a summary of its various usage options: FINGER FILTER SERVICING UNIVERSAL CONNECTION NUT COMMAND FILTER COVER NUT SYSTEM CLAMP JOINING BOLTS (M8 BOLTS – EQ.13MM (1/2") SPANNER) MAIN CLAMP JOINING BOLTS (M10 BOLTS –... -
Page 24: Installation & Initial Operation
13. Installation & Initial Operation Prior to installation, flush the main line thoroughly to remove large objects that may damage the filter’s internal mechanism. 13.1. INLET AND OUTLET INSTALLATION Connect the inlet and outlet ports according to the installation configurations described below, keep the service clearance from both sides, as shown: Note: Ensure that the direction of the flow is aligned with the arrows marked on the filter housing. - Page 25 SINGLE ON-LINE BATTERY | AlphaDisc Filters quick user guide V1.0...
- Page 26 13.2 INITIAL OPERATION For initial operation or operation after maintenance, follow these steps: 1. Retighten the system's universal nuts. 2. Open the outlet valve. 3. Open the inlet valve slowly. 4. Make sure there are no leaks in the filter. 5.
- Page 27 Note: Check that the back pressure in the drain manifold during flushing does not exceed 0.5 bar (7.5 psi). If it does, disconnect the accelerator’s drain tubes to ensure optimal performance. See instructions below. The filter is supplied with disconnected drain tubes. SINGLE BATTERY | AlphaDisc Filters quick user guide V1.0...
-
Page 28: Control Schematic
14. Control Schematic 14.1 ALPHADISC™ BLE 14.2 ALPHADISC™ CLD NOVA PLUS ADI -X 2 SOLENOIDS PNID ADI -X VENT VENT 4'' OUT COMMAND 12 mm to Booster 8 mm to solenoids 4'' IN DRALN PART NAME/TITLE: UNLESS OTHERWISE SPECIFIED: UNLESS OTHERWISE SPECIFIED: SUPPLY DIMENSIONS ARE IN MILLIMETERS DIMENSIONS ARE IN MILLIMETERS... -
Page 29: Troubleshooting
15. Troubleshooting NO BACKWASH SYMPTOM POSSIBLE CAUSES REQUIRED ACTIONS CHECK THE IRRIGATION SYSTEM FLOW EXCEEDED HIGH FLOW RATE DROP DOWN RATE. CHECK THE IRRIGATION CONTROL- THE INLET PRESSURE. LER. NO HYDRAULIC COMMAND TRANSFER COMMAND FILTER IS BLOCKED. MANUALLY CLEAN THE COMMAND FILTER. CHECK THE ELECTRICAL SOURCE AND NO ELECTRICITY. - Page 30 NON-STOP BACKWASH SYMPTOM POSSIBLE CAUSES REQUIRED ACTIONS HIGH FLOW RATE EXCEEDS PLANNED CHECK THE IRRIGATION FLOW RATE. IRRIGATION CHECK THE INLET / OUTLET AND DP PRESSURE DURING FILTRATION MODE. THE FLUSHING PRESSURE IS BELOW THE CHECK THE DOWNSTREAM PRESSURE HIGH DP REMAINS AFTER A BACKWASH REQUIRED MINIMUM.
-
Page 31: Netafim Limited Warranty
Any alteration, modification, foreign attachment to or repair of the products, other than by Netafim or its authorized technical representatives. 9. In no event shall Netafim be liable to the Buyer or any third party for any damages to property, or for any intangible or economic loss, including loss of profits, loss of customers or damage to reputation, for any damages, including indirect, special, consequential damages, or punitive damage arising out of or in connection with this Warranty, or arising out of or in connection with the product's performance or failure to perform, even if it has been advised of the possibility of such damages.
Need help?
Do you have a question about the AlphaDisc Series and is the answer not in the manual?
Questions and answers