
Related Manuals for AstroJet 140


Summary of Contents for AstroJet 140
- Page 1 AstroJet PRINTER OPERATOR MANUAL ASTRO MACHINE CORP. 630 Lively Blvd. Elk Grove Village, IL 60007 Phone: (847) 364-6363 Fax: (847) 364-9898 www.astromachine.com...
- Page 2 To the best of our knowledge, that information is accurate in all respects. However, neither Astro Machine Corp. nor any of its agents or employees shall be responsible for any inaccuracies contained herein. AstroJet is a registered trademark of Astro Machine Corp. Windows is a registered trademark of Microsoft Corporation.
-
Page 3: Table Of Contents
TABLE OF CONTENTS Table of Contents Table of Contents SECTION 1 – Getting Acquainted Operator View Rear View Control Panel SECTION 2 – Install Printer Choose a Location Contents of Packaging Assemble Printer Install Side Guides Install Rear Media Support Install Rear Media Guide Connect Printer Install Inkjet Cartridges... -
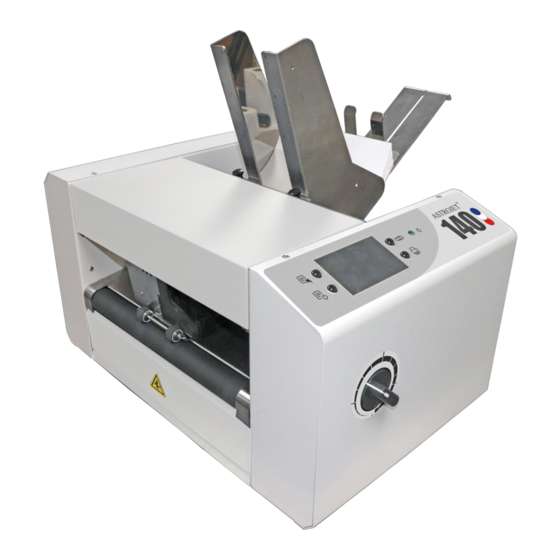
Page 5: Section 1 - Getting Acquainted
SECTION 1 GETTING ACQUAINTED SECTION 1 – Getting Acquainted Operator View PRINTER CONTROL KEYS – Used to operate often used Printer functions: Quick Menu, Power OFF/Reset, Transport ON/OFF, Feeder ON/OFF. MEDIA THICKNESS ADJUSTMENT KNOB – Used to set Printheads at proper height for printing on media. -
Page 6: Rear View
SECTION 1 GETTING ACQUAINTED Rear View SEPARATOR LOCKING KNOB – Lock and unlock Separators to adjust for different media thicknesses. SHEET SEPARATORS – Separates each piece of media as it is fed. USB 3.1 PORT – Connect USB cable to computer. (Also supports USB 2.0) ETHERNET PORT –... -
Page 7: Control Panel
SECTION 1 GETTING ACQUAINTED Control Panel QUICK MENU KEY – Allows quick access to often-used Printer functions without having to scroll through a number of screens. Test Feed/Reprint, Horizontal and Vertical Alignment, Printer Preferences, Purge Print, and Ink Status. Press to open. Press Quick Menu key again to exit screen. POWER OFF/RESTART/UTILITY KEY –... -
Page 8: Section 2 - Install Printer
Place Printer on a sturdy worktable or cabinet at least 12" (30.5 cm) from any walls. Protect Printer from excessive heat, dust, and moisture – avoid placing it in direct sunlight. Contents of Packaging AJ-140 Printer Power Cord Wi-Fi Antenna CD (Includes Printer Driver,... -
Page 9: Install Rear Media Support
SECTION 2 INSTALLING PRINTER Install Rear Media Support 1. Install Rear Media Support using three screws [A] (included) onto the Rear Center Plate (as shown). Install Rear Media Guide 1. Insert Adjusting Knob [A] through Rear Media Guide and Rear Media Support. Screw into rectangular washer [B]. -
Page 10: Connect Printer
SECTION 2 INSTALLING PRINTER Connect Printer Plugging in Printer Make sure Printer’s Main Power Switch is turned OFF. 1. Check that the Printer is set for the power to be used (115V or 220V) [A]. 2. Connect one end of power cord to rear receptacle on the Printer. - Page 11 SECTION 2 INSTALLING PRINTER Turning Power ON and OFF IMPORTANT! CLOSE ALL COVERS AND DOORS BEFORE STARTING OR POWERING DOWN THE PRINTER. Powering Up Printer: 1. Press the Main Power Switch located on the Feed End of the Printer. The Printer will start up. Powering Down Printer: WHENEVER POWERING DOWN PRINTER, ALWAYS: 1.
- Page 12 SECTION 2 INSTALLING PRINTER Using the Restart Button: 1. Close all covers. 2. Tap the Power Off/Restart Button on the Control Panel. The Shutdown Printer screen opens. Press the "Restart" button. 3. Wait for the Printer to stop processing. Watch the Touchscreen [A].
-
Page 13: Install Inkjet Cartridges
SECTION 2 INSTALLING PRINTER Install Inkjet Cartridges Printer has 4 Inkjet Cartridges. To install Cartridges: CAUTION For continued protection against possible fire, use only Ink Cartridges: Hewlett Packard, Model C8842A or with Ink Cartridges; each cartridge 40mL max. of ink; Flashpoint shall be >... -
Page 14: Set Up Feed
SECTION 2 INSTALLING PRINTER Set up Feed Printer has four Sheet Separators, two Side Guides, and a Rear Media Support and Guide. Adjust Sheet Separators individually: 1. Move Side Guides to access Separator locking screws. 2. Loosen locking screw(s) [A] (as shown) and raise Separator. - Page 15 SECTION 2 INSTALLING PRINTER 7. POSITIONING CARTRIDGE PRINTHEADS Adjust positioning of the Printhead Cartridge Assembly by loosening locking screw [D]. Slide the Assembly as needed to print on media being used. IMPORTANT! Raise the Printhead Cartridge Assembly so that the wheels are not touching the Exit Roller before adjusting positioning.
-
Page 16: Install Printer Driver
SECTION 2 INSTALLING PRINTER Install Printer Driver Download the latest Printer Driver from the Printer manufacturer's website. Make sure the USB or Network cables are connected to the Printer and your computer and that the Printer is turned on. If your Network requires a static IP address, see “Network Settings”. - Page 17 SECTION 2 INSTALLING PRINTER The Driver will load and the next screen opens to allow you to “Type a printer name”. Unless another printer has the same name on your system or network, ignore this step and click Next>. 6. Click Finish to complete the installation.
-
Page 18: Install Printer Update Utility
SECTION 2 INSTALLING PRINTER Install Printer Update Utility To implement Printer Firmware updates, you will need to install the Printer Update Utility software included with your Printer. Make sure the USB or Network cables are connected to the Printer and your computer and that the Printer is turned on. - Page 19 SECTION 2 INSTALLING PRINTER 6. The Printer Update Utility is installed. 7. The “Installation Complete” window opens. Click “Close” to exit.
-
Page 20: Section 3 - Operating Printer
(such as Microsoft Word). Other types of applications and database management software will work in a similar manner using the AstroJet 140 Driver. This Section further assumes that feed is set up and Printer is connected to your computer. - Page 21 SECTION 3 OPERATING PRINTER TOUCHSCREEN KEYBOARDS Use the Touchscreen Keyboards when entering or editing information in the entry boxes of features such as Network Settings. The appropriate keyboard opens when you tap on an Edit Box and/or tap within a data entry box on the Touchscreen. ...
- Page 22 SECTION 3 OPERATING PRINTER MAIN MENU Tap or press the icons to access features built into Printer and to customize Printer operation. Print Image: Find and set up new or current jobs and/or images for printing. Printer Set-up: Set Printer parameters to adjust the Printer to suit your needs.
- Page 23 SECTION 3 OPERATING PRINTER PRINT IMAGE Pressing the Print Image icon on the Main Menu opens the Print Image screen. Used to find and set up new or current jobs and/or images for printing. File Info: Displays current jobs/images in the Image Library including printing parameters.
- Page 24 SECTION 3 OPERATING PRINTER PRINT IMAGE – DELETE Job or image is being permanently deleted from the Print Image Library. PRINT IMAGE – SET-UP Pressing the Print icon on the Print Image screen opens the Print Image Set-up screen. Once a job is loaded, the image name and dpi it was sent at are displayed at the top of the screen.
- Page 25 SECTION 3 OPERATING PRINTER PRINTER SET-UP Pressing the Printer Set-up icon on the Main Menu opens the Printer Set-up screen. These features allow you to set Printer parameters to adjust the Printer to suit your needs. Ink Type: Displays the Ink Types loaded in the Ink Cartridge Holders.
- Page 26 SECTION 3 OPERATING PRINTER PRINTER PREFERENCES This menu is also available by pressing Quick Menu key on the Control Panel. Note that Tray Break also has an Edit icon. Tap or press the icon to open the Edit screen. Press ">>>>>"...
- Page 27 SECTION 3 OPERATING PRINTER TRAY BREAK SETTINGS Feeder Stop: Select and set the timer to pause/stop the Feeder at predesignated breaks during a print run. Enter time in seconds (1-60). On sensing the break mark, the feeder stops for x number of seconds. Conveyor Gap: Used when Printer is set up in line with other mailing equipment (conveyors, tabbers, etc.) When this feature is activated, Printer responds to the...
- Page 28 SECTION 3 OPERATING PRINTER HORIZONTAL ALIGNMENT Adjusts offset of individual Printheads (side-to-side) offset to fine tune horizontal positioning of the printout. Horizontal Alignment is also accessible by pressing the Quick Menu key on the Control Panel. Heads (1-4): Align individual Printheads (side-to-side) up to ±100.0 microns in 5.0 micron increments.
- Page 29 SECTION 3 OPERATING PRINTER INK ESTIMATOR This tool estimates the cost of ink for a particular print job. The Printer runs and simulates printing a preset number of pages. Set the job to print 1-49 pages (in the Print Driver) for the printer to make the estimate.
- Page 30 SECTION 3 OPERATING PRINTER DIAGNOSTICS Runs tests on Printer components and systems listed on the screen at variable speed. To run Test: Remove media from the Printer. Press Test to start the diagnostic cycle. Press again to stop. While Test is activated, run one piece of media through the Printer to test the Sensor function.
- Page 31 SECTION 3 OPERATING PRINTER WI-FI SET-UP Press the Network icon on the Tools screen to open the Network Settings screen. Make sure the Wi-Fi antenna (included) is connected to the Printer's Wi-Fi port. 1. Select WI-FI. 2. Select the desired Network from the list of Wi-Fi Networks.
-
Page 32: Power Button
SECTION 3 OPERATING PRINTER TOUCHSCREEN CALIBRATION Adjust the touch pressure (sensitivity) needed to activate functions on the Touchscreen. (Lower percentage = less pressure, more sensitive. Higher percentage = more pressure, less sensitive.) Follow instructions on the screen to perform the calibration. Time Remaining counts down the 15 seconds given to complete each step. -
Page 33: Quick Menu
SECTION 3 OPERATING PRINTER Quick Menu Allows quick access to often-used Printer functions without having to scroll through a number of screens. Open by pressing the Quick Menu key on the Control Panel. Press the Quick Menu key again to exit the screen. (See individual explanations of screens in “Using the Touchscreen”... -
Page 34: Printer Driver Properties
SECTION 3 OPERATING PRINTER Printer Driver Properties Printer Driver describes to the Printer how to print your job. It controls Printer operation and allows you to send fixed and variable text and graphics to the Printer. Within your data management software is a “Print” function. In that “Print”... - Page 35 SECTION 3 OPERATING PRINTER When Advanced Options window opens, there are Paper/Output and Document Options to set up, change, and adjust Printer. Paper/Output Paper Size: Select the size of media to be used. Copy Count: Sets the number of copies to print.
- Page 36 “Portrait”. Do not change them. Resolution: Sets resolution of print quality. Changing resolution to a higher number (e.g. 200 DPI to 600 DPI) increases image quality. NOTE: Higher resolutions reduce print speed options. AstroJet 140 Resolution Speeds Available Low, Medium,...
- Page 37 SECTION 3 OPERATING PRINTER Feed Delay: Can be used to put more space between pieces as they are printed. This gives first piece printed more time to dry before next piece is printed. Adjustment is made in 0.1-second increments.
-
Page 38: Section 4 - Maintenance
SECTION 4 MAINTENANCE SECTION 4 – Maintenance This section covers how to care for Ink Cartridges, clear paper jams, replace Sheet Separators, and perform routine maintenance on Printer. Inkjet Cartridge Replace Printer Inkjet Cartridges when out of ink, when print quality is poor, or when purging and cleaning have not helped image quality. - Page 39 SECTION 4 MAINTENANCE Replace Inkjet Cartridge: 1. Open Latch Lever. 2. [A] Lift the Cartridge straight up until it stops (about 1/4"). [B] Pivot the Cartridge just enough so the tab on the Cartridge clears, but still touches the edge of the Latch Lever. [C] Lift the Cartridge straight up and out of the Holder.
-
Page 40: Cleaning Printhead
SECTION 4 MAINTENANCE Storage Short-term Storage (less than 2 days or less than 1 day in a hot and dry environment.) Leave Cartridge in Printer for short periods of time, 1 day or less. Next time that Printer is used, Printhead may have to be cleaned and purged. Long-term Storage (more than 2 days or more than 1 day in a hot and dry environment) Keep Printhead in an area that is relatively free of dust and paper particles that is not too dry. -
Page 41: Purging Nozzles
SECTION 4 MAINTENANCE Purging Nozzles If the Printhead sits inactive for a period of time, ink may dry in the nozzles. Printing may not remove these “ink plugs” from the nozzles. White streaks appear in printed text or graphic. To improve print quality, these ink plugs need to be forced out or purged. -
Page 42: Cleaning
SECTION 4 MAINTENANCE Cleaning WARNING! PRINTER IS A PRECISION MACHINE THAT SHOULD BE CLEANED REGULARLY TO INSURE MANY YEARS OF SERVICE. BEFORE PERFORMING ANY MAINTENANCE DISCONNECT PRINTER FROM ITS POWER SOURCE! Printer must be cleaned regularly of accumulated paper dust and ink. Depending on types of media run, paper dust may accumulate within Printer and on Transport. -
Page 43: Section 5 - Troubleshooting Guide
SECTION 5 TROUBLESHOOTING SECTION 5 – Troubleshooting Guide Troubleshooting Guides are provided to assist in solving any problems that might occur with Printer or its software. We tried to make them as complete as possible. The best advice we can offer is to make sure that system is set up properly, plugged in, and has an adequate supply of ink before attempting to troubleshoot any problem. -
Page 44: Printer
SECTION 5 TROUBLESHOOTING Printer CONDITION PROBLEM SOLUTION Extra lines; losing data Database problem. Check data in database program. Improper output Wrong Interface settings. Check software or database on PC. (address information out of Static electricity. Turn Printer OFF and ON. order, misfeeding, etc.) Dirty Media Sensor. -
Page 45: Touchscreen Messages
SECTION 5 TROUBLESHOOTING Touchscreen Messages The Touchscreen will display messages to alert you to problems or to indicate a process is finished. SCREEN MESSAGE PROBLEM SOLUTION Paper jam. Clear media from feeder and/or print transport area. Media is curled or bent. Uncurl media. -
Page 46: Appendix A - Printer Specifications
APPENDIX A APPENDIX A – Printer Specifications PRINT TECHNOLOGY 4-Head Inkjet, proprietary High Capacity Inkjet Cartridges ADDRESS SPEED Up to 22,000/hour (#10 Envelopes) 1-High Quality 600 x 600 DPI (20 in./sec.; 100 ft./min.; 30.5 m/min.) PRINT QUALITY/SPEED) 2-Standard Quality 600 x 300 DPI (40 in./sec.; 200 ft./min.; 61 m/min.) (Dots Per Inch) 3-Letter Quality 600 x 200 DPI (60 in./sec.;... -
Page 47: Regulatory Compliance
APPENDIX A Regulatory Compliance FCC: "This device complies with Part 15 of the FCC Rules. Operation is subject to the following conditions: 1. This device may not cause harmful interference. 2. This device must accept any interference received including interference that may cause undesired operation."... -
Page 48: Appendix B - Supplies And Optional Hardware
The following supply items are available from your Astro Machine Distributor: Supplies IMPORTANT! AJ-140/AJ-160/AJ-180 Printers only work with the ink cartridges listed below. Other inks may become available; check with your local Astro dealer. NOTE: Not compatible with refills or other brands. -
Page 49: Index
INDEX Feed Set-Up ............. 10 Feeder ON/OFF Key ..........1, 3 Adjustment Knob, Media Thickness ......1 Firmware Updates............ 28 Alphanumeric Keyboard ........17 Fuse, Main Power ............2 Antenna, Wi-Fi ............6 Appendices Appendix A, Specifications ......... 42 Hardware, Optional ..........44 Appendix B, Supplies and Optional Hardware .. - Page 50 INDEX Power Indicator Light ..........1 Power OFF/Reset Key ..........1 Rear Media Guide ..........1, 5 Power OFF/Restart Key ..........3 Rear Media Guide Locking Knob ......2 Power Receptacle ............2 Rear Media Support ........... 5 Print Image Screen........... 19 Regulatory Compliance ...........
- Page 51 INDEX Vertical Alignment, Printhead ......24 Transport ON/OFF Key ......... 1, 3 Troubleshooting Inkjet Cartridges ..........39 Printer ..............40 Touchscreen Messages ........41 Update Utility, Install Printer ........14 Update, Firmware ............ 28 USB Disconnect Button ........... 28 USB Port ..............2, 6 Using Touchscreens ..........
- Page 53 © Copyright 2020 ASTRO MACHINE CORP. Elk Grove Village, IL 60007 05/20/2020 Part Number: 200-AJ140...
Need help?
Do you have a question about the 140 and is the answer not in the manual?
Questions and answers