Advertisement
Quick Links
Advertisement

Related Manuals for FlySky Paladin PL18 EV


Summary of Contents for FlySky Paladin PL18 EV
- Page 1 L18 EV PL18 EV Quick Start Guide...
- Page 2 RF signal emissions must be provided to end users and installers. Hereby, [Flysky Technology co., Ltd] declares the RF equipment [Paladin PL18 EV] to be in accordance with RED2014/53/EU. 3. The full text of the EU DoC is available at: www.flysky-cn. com.
-
Page 3: Front View
Front View [19] [20] [21] [22] [23] [24] [25] [10] [26] [27] [11] [28] [12] [29] [30] [13] [31] [14] [32] [15] [33] [16] [17] [34] [18] Antenna [11] SW1 Button [21] SWG 2 Position Switch 320*480px Screen [12] TR3 Button [22] VRE Knob SWF 2 Position Switch... - Page 4 Back View [40] [41] [42] [35] [36] [43] [37] [44] [45] [38] [46] [39] [47] [48] [31] TR6 Trim [40] Micro USB Port [32] TR8 Trim [41] Trainer Port [33] VRC Knob [42] Grip [34] Power Button [43] FRM301 Press to release FRM301 [35] Bluetooth Module Port [44]...
-
Page 5: Power Off
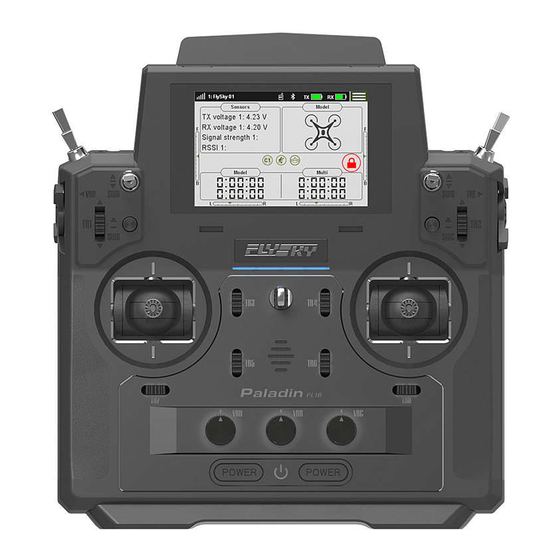
Power On Check to make sure that the battery is fully charged; Press both power buttons to turn on the transmitter. If any switches are not at their highest positions, the system will prompt: “Switch is not in the highest position”. - Page 6 Main Screen Introduction [10] [11] [12] [13] [14] Model Name Left Stick Left/Right Trim Rx Signal Lock/Unlock Sensor [10] Transmitter Power Voice [11] Function Menu Icon vibration [12] Channels Display Left Stick Up/Down Trim [13] Right Stick Up/Down Trim Model Type [14] Right Stick Left/Right Trim Indicates that the screen is...
-
Page 7: Function Setup
Gimbal Adjustment Instructions ① ⑧ ② ⑦ ③ ⑥ ④ ⑤ Function Setup By adjusting the tension screws on the back of the radio, gimbal stick can be either self-centering or non self-centering, as well as changing stick tension preference. Available option left &... - Page 8 Left gimbal as example Non Self-returning Use a Phillips screwdriver to adjust the screw ① counterclockwise until the gimbal reaches its center point. Adjust screw ④ counterclockwise to adjust the Frictional strength. If you need to adjust the strength of the return, adjust screw ②...
-
Page 9: Charging Modes
Charging Modes PL18EV can be charged in two ways: 1. Plug the standard USB cable into the charging port for charging 2. Use the wireless charging dock to charge it (as shown in the figure) Notes: • Please charge it within a safe value, (6h@5V Micro USB /7h@2A Wireless Charging )because overcharging may cause damage to... - Page 10 Language his transmitter has 2 languages available: Function Setup Touch the function menu icon to enter the function menu, touch [System Settings], then touch [Language Selection]. Touch your preferred language option and touch the back icon save and exit. RF Module Update If the following prompt is displayed on start up, the RF module needs to be updated.
- Page 11 Binding The transmitter and receiver have been pre-bound at the factory,however if you need to bind a new receiver or rebind the original receiver follow the steps below. -(Power ground) +(Positive power terminal) S(Signal Pin) S(Signal Pin) -(Power ground) Bind Button +(Positive power terminal)...
- Page 12 If after a firmware update is performed and the transmitter is unable to bind to the receiver, the receiver may need to be put into forced update times. Power on the receiver while pressing the BIND button approximately ten seconds until the LED flashes three times,release the BIND but- ton.
- Page 13 Failsafe Function This function protects the user by preventing the model from behaving unexpectedly if signal is lost. All 18 channels are displayed failsafe menu. If set to [OFF], the channel will remain at its last set position before losing signal. If a percentage is displayed, then that channel will move to that percentage when signal is lost.
-
Page 14: Specifications
Specifications Paladin (PL18 EV) Product Name PL18 EV Channels 2.4GHz Transmission Power < 20dBm (EU) 2.4GHz Protocol AFHDS 3 Low Voltage Alarm < 3.65V USB、Non-standard interface(USART)、 Data Port PHJACK(PPM) Charging Port Micro USB、wireless charging Antenna Type Dual Antenna Input Power 1S (3.7V)*4300mAh 6 h @ 5 V M i c r o U S B / 7 h @ 2 A W i r e l e s s Input Time... - Page 15 开始操作前请务必在 Flysky 官网下载并阅读 《免责声明 & 警告》 了解 安全注意事项, 并在 Flysky 官网下载阅读使用说明书。 Flysky 官网地址: www.flysky-cn.com 1. 发射机的天线必须距离所有人员或其他发射机至少 20 厘米的间 隔距离。 必须将天线安装说明和满足射频讯号辐射的发射机操作条件 提供给终端用户和安装人员。 特 此, 【Flysky Technology co., Ltd】声 明 无 线 电 设 备 【 Paladin(PL18 EV),FT18 EV】 符合 RED2014/53/EU. 3. 欧盟 DoC 声明全文可在以下互联网地址: www.flysky-cn.com 获 取。...
- Page 16 前视图: [19] [20] [21] [22] [23] [24] [25] [10] [26] [27] [11] [28] [12] [29] [30] [13] [31] [14] [32] [15] [33] [16] [17] [34] [18] 天线 [11] SWI 按键 [21] SWG 两档开关 320 * 480dots 显示屏 [12] TR3 按键 [22] VRE 拨杆...
- Page 17 后视图: [40] [41] [42] [35] [36] [43] [37] [44] [45] [38] [46] [39] [47] [48] [31] TR6 微调按键 [40] Micro USB 接口 [32] TR8 微调按键 [41] 教练接口 [33] VRC 旋钮 [42] 提手 [34] 电源键 [43] 按压弹出 FRM301 [35] 蓝牙模块接口 [44] 高频模块...
- Page 18 开机 检查系统状态,确保: 电池电量充足; 同时按住发射机两个电源键开 机。 开机警告! 当开机语音提示“开关不在 高 位 ” 或“Switch is not in the highest position” 同 时 发射机弹出提示界面时(红 色 表 示 对 应 控 件 位 置 需 调 整),请根据提示检查按键,开关,并按照发射机提示将其放在 正确位置。 关机 断开接收机电源; 同时长按发射机两个电源键,直至屏幕熄灭,表示关机。 发射机屏幕熄灭后,需等待 3s 后,方可完全关闭,期间请勿再次 开机。 关闭前,请务必先断开接收机电源,然后关闭发射机。如果强行...
- Page 19 主界面介绍 [10] [11] [12] [13] [14] 模型名称 左摇杆左右微调 接收机信号 解 / 上锁键 传感器 [10] 发射机电量 声音 [11] 功能菜单 振动 [12] 通道显示 左摇杆上下微调 [13] 右摇杆上下微调 模型类型 [14] 右摇杆左右微调 表示功能或此界面被锁定不 表示此功能或此界面可操作 可操作 表示此功能在禁用状态 表示此功能在开启状态 点击可使功能恢复初始值 点击可对功能进行设置 点击可进行开关等控件分配 点击可进行曲线类型设置...
- Page 20 总成座调节说明 ① ⑧ ② ⑦ ③ ⑥ ④ ⑤ 功能设置 用户可调节螺丝孔螺丝实现总成座回中与不回中切换、 调节摇杆弹力, 请参照以下步骤: 螺丝说明 ① . ⑤ 调节总成座摇杆是否回中 ② . ⑥ 调节总成座纵向摇杆弹力 ③ . ⑦ 调节总成座横向摇杆弹力 ④ . ⑧ 调节总成座纵向摇杆摩擦力...
- Page 21 以右边摇杆为例 不回中 - 回中 1. 请用十字螺丝刀逆时针调节①号螺丝使摇杆变为回中状态; 2. 逆时针调节④号螺丝调整摩擦力度 ; 3. 如还需调整回中力度,请操作②号螺丝调节回中力度,顺时针力 度加强,反之减弱。 回中 - 不回中 1. 请用十字螺丝刀顺时针调节①号螺丝使摇杆为不回中状态; 2. 顺时针调节④号螺丝加强摩擦力度; 3. 如还需调整回中力度,请操作②号螺丝调节回中力度, 顺时针力 度加强,反之减弱。 逆时针调节时行程为 3mm 左右,需凭手感调节力度,否 注意 则螺丝会脱落。...
- Page 22 充电方式 PL18EV 可通过两种方式对其进行充电: 1. 标准 USB 线插入充电口充电 2. 使用无线充电底座对其进行充电 (如图所示) 注: • 请 在 安 全 值 内(6h@5V Micro USB/7h@2A 无 线 充) 对 其 进 行 充电,过充可能会导致电池损坏; • 为延长电池使用寿命,长时间放 置请注意不要满电,应适当放电 后再进行放置,并且应定期充电 防止电池过放损坏; • 请使用本款接收机标配的充电头 对其进行充电,使用不当可能造 成电池损坏影响使用寿命。...
- Page 23 语言 本发射机可使用两种语言: 功能设置: 点击主界面 图标,进入功能菜单界面,选择进入 [ 系统设置 ] 功能,点击 [ 语言选择 ], 进入设置界面,可根据需要选择语言,设 置完成后,点击返回 ,保存设置并退出。 高频模块固件升级 当开机时弹出如下提示,则需要更新高频模块。 点击“是”,进入更新状态,点击“否”,退出更新界面,此时如 需升级高频头,请参照以下步骤: 更新步骤: 点击主界面 图标,进入功能菜单界面,选择进入 [ 高频设置 ] 功能,点击 [ 高频模块固件升级 ], 在弹出提示后,点击 [ 是 ],更新 完成后,自动退出更新界面。...
- Page 24 对码 本发射机和接收机在出厂前已对码成功。如果您需要对码时,请按 照如下步骤进行对码: -(电源地) +(电源正极) S(信号脚) S(信号脚) -(电源地) 对码按钮 +(电源正极) 发射机在更新完后,如无法与接收机对码,需强制更新 接收机。具体步骤如下: 1. 接 收 机 按 下 对 码 按 键 , 上 电 十 秒 钟 后 指 示 灯 三 闪 一 灭 , 松 开对 码按键; 2.
- Page 25 失控保护 该功能用于在接收机丢失信号或失控后,保护模型和操作人员的 安全。 失控保护菜单下显示 18 个通道的列表, 如果在通道后显示 [ 关闭 ], 表示模型在丢失信号后,该通道的舵机会继续保持失控前的位置继 续行驶。如果显示一个百分比,则表示模型在丢失信号后,该通道 的舵机会移动到百分比对应的位置,并保持在该位置继续行驶。 触发时间:可设置失控生效的时间。 功能设置: 点击主界面 图标,进入功能菜单界面,选择进入 [ 接收机设置 ] 功能,点击 [ 失控保护 ], 进入设置界面,可根据需要进行失控保护 的设置。 保护值设置方法: 点击选择所需设置通道,将通道对应控件(摇杆、按键、开关、滑杆) 移动至所需位置保持不动,点击返回 ,保存设置并退出。 当对应通道界面显示 图标时,表示该功能处于关闭状态, 设置无效。 失控保护功能需进入 [ 辅助通道 ] 功能为通道分配控件后,方可 进行对应通道的失控保护设置。...
- Page 26 规格参数 Paladin (PL18 EV) 产品型号 PL18 EV 通道个数 无线频率 2.4GHz 发射功率 < 20dBm 无线协议 AFHDS 3 低电压报警 < 3.65 V USB、Non-standard interface(USART)、 数据接口 PHJACK(PPM) 充电接口 Micro USB/ 无线充 天线类型 双天线 电池 1S (3.7V)*4300mAh(内置) 充电时间 6h@5V Micro USB/7h@2A 无线充 在线更新 外形尺寸 120*195*213 mm 机身重量...
- Page 27 FCC ID: N4ZFT1800 出版日期 :2020-08-17 Copyright ©2020 Flysky Technology co., ltd...
Need help?
Do you have a question about the Paladin PL18 EV and is the answer not in the manual?
Questions and answers
Bonjour Je n'arrive pas à blindé le respteur ftr10 sur pl 18 ev ce respteur est de mon ancienne radio pl18 flysky merci
To bind the FTR10 receiver to the FlySky PL18 EV transmitter, follow these steps:
1. Press and hold the bind key on the FTR10 receiver.
2. While holding the bind key, power on the receiver.
3. Continue holding the bind key for 10 seconds after powering on.
4. The receiver LED will flash three times and turn off, indicating it is in update (or bind) mode.
5. Use the PL18 EV transmitter to bind by selecting the appropriate receiver and starting the bind process through the transmitter’s menu.
Note: Ensure the transmitter is compatible with AFHDS3 protocol.
This answer is automatically generated