
Subscribe to Our Youtube Channel
Related Manuals for Euromaid EFS54FC-DGW


Summary of Contents for Euromaid EFS54FC-DGW
- Page 1 User Manual Description: 54cm Freestanding Gas Cooker MODEL NO. EFS54FC-DGW / EFS54FC-DGS euromaid.com.au PG 1 USER MANUAL...
-
Page 3: Table Of Contents
CONTENTS Conditions of use................... Safety precautions..................Other important safety information............Warnings for use of grill, oven, and appliance hob........Disposal of packaging ................. Installation, cleaning and servicing............Product description ..................First time use of the appliance..............Using the oven....................Using the grill....................Using the hotplate gas burners.............. -
Page 4: Safety Precautions
SAFETY PRECAUTIONS • This appliance is not intended for use by persons (including children) with reduced physical, sensory or mental capabilities, or lack of experience and knowledge, unless they have been given supervision or instruction concerning use of the appliance by a person responsible for their safety. •... -
Page 5: Warnings For Use Of Grill, Oven, And Appliance Hob
WARNINGS FOR USE OF OVEN & APPLIANCE HOB GRILL WARNINGS • DO NOT leave grill on unattended. • DO NOT cover the grill tray wire rack with foil. • Trying to grill food more than 25mm thick under grill can be a fire hazard. Trim excess fat from fatty meats, such as pork and lamb. -
Page 6: Installation, Cleaning And Servicing
INSTALLATION, CLEANING AND SERVICING An authorised person must install this appliance. (Certificate of Compliance to be retained). • Before using the appliance, ensure that all packing materials are removed from the appliance. • In order to avoid any potential hazard, the Installation Instructions must be followed. •... -
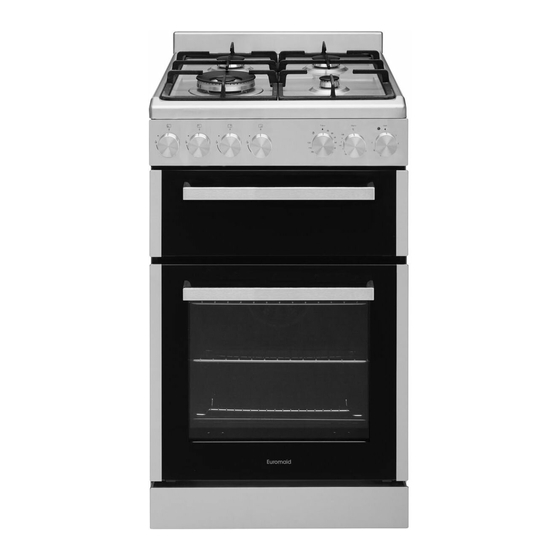
Page 7: Product Description
PRODUCT DESCRIPTIONS DESCRIPTION OF COOKER WITH SEPARATE GRILL AND FRONT CONTROLS 1. Cast iron pan support (trivet) incldes WOK trivet (not pictured) 2. Burner with removable cap, distributor x 4 3. Control panel 4. Grill door 5. Shelf 6. Oven tray 7. -
Page 8: First Time Use Of The Appliance
FIRST TIME USE OF THE APPLIANCE PREPARING YOUR APPLIANCE FOR THE FIRST TIME • Please wipe out the oven interior prior to operation with warm soapy water and polish dry with a soft clean cloth. • New appliances can have an odour during first operation from components manufactured with the aid of oils. -
Page 9: Using The Oven
USING THE OVEN Oven Safety Warnings • Always follow the instructions for putting the shelves and side racks into the oven, to avoid accidents. • Do not line the oven with foil, it will damage the enamel. • Do not place cookware or anything else on the bottom of conventional oven model as trapped heat will damage the oven •... - Page 10 Oven cooking guide The following is intended as a rough guide. It is often required to set oven 10-20 degrees above or below this guide to get the result you want. Also adjustments are needed for the cooking time to suit personal expectations.
- Page 11 UNDERSTANDING COOKING PROBLEMS Problem Causes What to do Uneven cooking Incorrect shelf position Select shelf that puts food in centre of oven Oven tray too large Remove oven tray. Use smaller trays or dishes Trays not in centre Put trays in centre Oven fan causing uneven browning or small Rotate food during cooking, or use cakes to lean over...
-
Page 12: Using The Grill
USING THE GRILL GRILL SAFETY WARNINGS • Always turn off the grill immediately after you have finished cooking and pull drawer out or remove grill tray otherwise fat left in the tray in the hot grill compartment will continue to smoke or could catch fire. •... -
Page 13: Using The Hotplate Gas Burners
USING THE GAS BURNER THE HOB CONTROL KNOBS The symbols on the control knobs mean the following: No gas flow Maximum gas flow Minimum gas flow All operating positions must be set between the maximum and minimum flow settings, and never between the maximum setting and the closed position. -
Page 14: Fitting Oven Accessories And Cleaning
FITTING OVEN ACCESSORIES AND CLEANING SAFETY WARNINGS ABOUT CLEANING • Always make sure that the cooker is turned off before cleaning. • Always clean cooker immediately after use. • Do not use steam cleaners. These may cause moisture build-up. • Do not use caustic- based cleaners. - Page 15 CLEANING THE GAS HOB • The trivets locate in the recessed area of the hob. • They can be removed for cleaning by carefully lifting them from the hob. • Clean by washing in warm soapy water. Dry thoroughly. • Take care when replacing the trivets as dropping them onto the hob may damage the enamelled surface.
- Page 16 CLEANING THE OVEN DOOR / HOW TO REMOVE THE OVEN DOOR For a more thorough clean, you can remove and disassemble the oven door. Proceed as follows: • Open the door to the full extent (fig. 1) • Open the lever A completely on the left and right hinges (fig. 2) •...
- Page 17 REPLACING THE OVEN LIGHT Ensure that the appliance is switched off before replacing the lamp to avoid the possibility of electric shock. • Disconnect the oven from the power supply at the fuse-box by means of the switch used to connect the appliance to the electrical mains or unplug the appliance if a gas model.
-
Page 18: Solving Problems
Remove shelf and insert as per Household fuse blown or power diagram Clock display off supply is off Check fuses, power supply NOTE: Only Euromaid Authorised service agents should carry out servicing otherwise warranty may be void. PG 18 USER MANUAL... -
Page 19: Installing Cooker - Power Connections
INSTALLING COOKER - POWER CONNECTIONS Electrical Connection The appliance is supplied fitted with a power cord and 3 pin plug. Install the cooker so that the plug is easily accessible. Plug the 3-pin plug into a properly earthed, 10A general purpose power outlet preferably on a separate dedicated circuit. -
Page 20: Installing The Gas Cooker
INSTALLING THE GAS COOKER Unpacking Do not fit the burner crowns, burner caps and trivets until after the cooker has been installed. Locating the cooker This appliance must be installed by an authorised person in accordance with this instruction manual, AS/NZS 5601 –... - Page 21 CONNECTION TO THE GAS SUPPLY The isolating manual shut-off valve connection point must be installed and accessible when the appliance is in position. Gas inlet is located at the top rear right hand side, 50mm from the edge. This appliance is suitable for connection with rigid pipe or flexible hose.
- Page 22 SAFETY WARNINGS ABOUT INSTALLATIONS • The cooker MUST BE installed and serviced only by an authorised person. • A certificate of compliance must be supplied by installer and is to be kept by the customer. • The packing materials must be removed before you install the cooker. •...
-
Page 23: Testing The Operation Of The Gas Cooker
TESTING THE OPERATION OF THE GAS COOKER Gas leakage and operation of the appliance must be tested by the installer before leaving. Check all burner flames are blue in colour, stable and completely ignite at both high and low flame settings with no appreciable yellow tipping, carbon deposition, lifting, floating, lighting back or objectionable odour. -
Page 24: Installing Your New Cooker
INSTALLING YOUR NEW COOKER • Determine position of cooker and ant-tilt plate. • Securely fix the anti-tilt plate to the floor with appropriate fasteners. • Slide the cooker into the anti-tilt plate to double check. And then slide out the cooker. •... -
Page 25: Technical Specifications
TECHNICAL SPECIFICATIONS Model EFS54FC-DGW / EFS54FC-DGS Oven capacity (L) Grill capacity (L) Voltage (v) 220-240 Frequency (Hz) 50-60 Power (W) 1700W Burner power (W) NG 39.88 MJ/h / LPG 38.88 MJ/h Product dimension (mm) 540*630*910 Package size (mm) 590*712*960 PG 25... -
Page 26: Manufacturer's Guarantee
In the case of Euromaid products used for personal, domestic or household purposes, a period of 2 years from the date the product is purchased as a brandnew product from a retailer located in Australia / New Zealand. - Page 27 MANUFACTURER GUARANTEE 4. How to make a claim. You may make a claim under this warranty through our website, contacting our customer care line or via email. Contact details for Glen Dimplex Australia and New Zealand can be found at the end of this document To make a valid claim under this warranty, you must: a) Lodge the claim with us as soon as possible and no later than 14 days after you first become aware of...
- Page 28 NOTES PG 28 USER MANUAL...
- Page 29 READ THE INSTRUCTION BOOKLET BEFORE INSTALLING AND USING THE APPLIANCE. The manufacturer will not be responsible for any damage to property or to persons caused by incorrect installation or improper use of the appliance. The manufacturer is not responsible for any inaccuracies, due to printing or transcription errors, contained in this manual.
Need help?
Do you have a question about the EFS54FC-DGW and is the answer not in the manual?
Questions and answers