Table of Contents
Advertisement
Quick Links
Advertisement
Table of Contents

Subscribe to Our Youtube Channel
Related Manuals for Quick TS1300


Summary of Contents for Quick TS1300
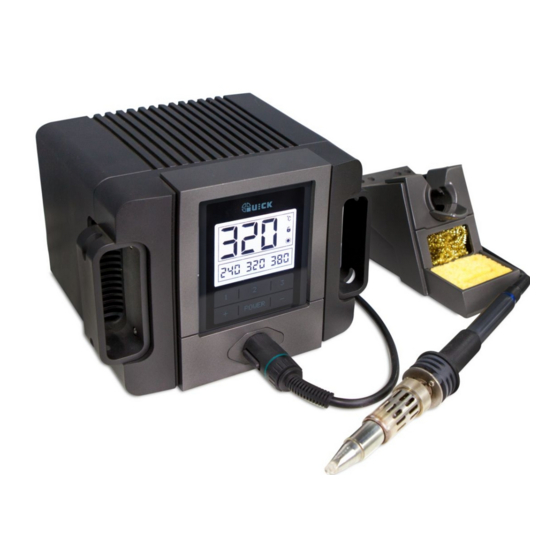
- Page 1 TS1300 Lead Free Soldering Station Instruction Manual Thank you for purchasing our Lead Free Soldering Station. It is designed for lead free soldering. Please read this manual before operating the unit. Store this manual in a safe, easily accessible place for future reference.
-
Page 2: Table Of Contents
Contents Ⅰ. Safety Instruction ..............................2 Ⅱ. Summary ................................4 Ⅲ. Feature ................................. 4 Ⅳ. Specifications ............................... 5 Ⅴ. Setting & Operating the Soldering Station ......................5 5.1 Iron Holder and Sponge ..........................6 5.2 Connection ..............................6 5.3Turn on/off ..............................7 5.4 Temperature Setting ............................. -
Page 3: Ⅰ. Safety Instruction
Ⅰ. Safety Instruction CAUTION When the power is on, the tip’s temperature is very high. The mishandling may lead to burns or fire, be sure to comply with the following precautions: Please avoid an abuse of the unit and use the appliance only as the described manner. - Page 4 Only use genuine replacement parts. Do not wet the unit. When your hands are wet, don’t use and disconnect the unit, or to pull the supply cord. The soldering process will produce smoke, so make sure the area is well ventilated.
-
Page 5: Ⅱ. Summary
Ⅱ. Summary The soldering station’s temperature adopts LCD double temperature display and digital calibration, shortcut and convenience. The temperature induction is very exact and sensitive, the speed of heating and recovery of temperature is very fast, and so it is the one of the most perfect tools for lead free soldering. 7 8 9 10 1. -
Page 6: Ⅳ. Specifications
Weight 2.7 Kg ★Ensure that your power supply data agrees with the information on the nameplate of the machine! Suggestion thermometer is QUICK 191/192. Ⅴ. Setting & Operating the Soldering Station CAUTION: The supply voltage is consistent with the unit! -
Page 7: Iron Holder And Sponge
5.1 Iron Holder and Sponge CAUTION: ●The sponge is compressed. It will swell when moistened with water. Before using the station, moisten the sponge with the water and squeeze it dry. Failure to do so may result in damage to the soldering tip. ●If the sponge becomes dry during working, add appropriate water. -
Page 8: Turn On/Off
4. Connect ESD socket (7). 5.3Turn on/off 1. Turn on the power switch (5). 2. Press and hold “POWER” button for 3s to enter main menu. Press POWER Item Figure Function ℃ Shows temperature unit (℃/℉) Shows ESD status (ON/OFF) Shows the unit status(Lock/Unlock) Display real time temperature Shows Heating element status (ON/OFF) -
Page 9: Temperature Setting
Shows cooling status Shows heating status Shows temperature ready 5.4 Temperature Setting CAUTION: Make sure the unit is logon (the default password is 000000) and the heater element is enabled, setting temperature method: Temperature setting: 1) Press the “+” button once to increase the value by one digit, press and hold it to continuously increase. -
Page 10: Temperature Setting
3. Press “ENTER” button to enter corresponding menu, see picture. Press “2” &“3” 6.2 Temperature setting 1. Press “ENTER” button to enter into temperature setting menu and blue data is shown. 2. Press “1” button to select temperature menu, see picture 1(selected Temp1). 3. -
Page 11: Alarm Temperature- Setting
Press ENTER Note: The alarm temperature + setting range is 2-99℃. 6.4 Alarm Temperature- Setting 1. Press “ENTER” button to enter into menu and blue data is shown. 2. Press “1” button to select mode (ON or OFF). 3. Press “+” and “-”button to adjust alarm temperature value (The alarm temperature- setting is effective in the “ON”... -
Page 12: Close Time Setting
picture. Press ENTER The soldering station enters into sleep state with a beep. After entering the sleep state, the figure “ ” will be displayed and the LCD display screen will dim. Note: The sleeping time range is 5s to 99 min, press any touch switch to activate station. -
Page 13: Temperature Unit Setting
6.7 Temperature unit setting 1. Press “ENTER” button to enter into menu. 2. Press “1” button to select temperature unit (℃or℉) . 3. Press “STORE” button to save the selection unit and press “BACK” to return unit menu, see picture. Press ENTER 6.8 Key Tone Setting... -
Page 14: Address Setting
3. Press “STORE” button to save it and press “BACK” to return ESD menu, see picture. Press ENTER 6.10 Address setting 1. Press “ENTER” button to enter Address menu and blue data is shown. 2. Press the + or - button to change the set value. 3. -
Page 15: Change Password
Press ENTER 6.12 Change password 1. Press “ENTER” to enter password menu and enter the default password 000000(Press “+” and “-”button to adjust password value and press “1” to move the cursor to the next digital). 2. Press “ENTER” button to confirm it. 3. -
Page 16: Ⅶ.calibrating The Temperature
Ⅶ.Calibrating the Temperature The soldering iron should be recalibrated after changing the iron. Tool: QUICK 191/192 thermometer Method: 1. Press and hold “1” and “3” buttons at the same time to enter into calibration menu. 2. The LCD display is flashing, press “+” and “-” button to enter value. - Page 17 3. Tip type Soldering tip maintenance 1) High temperature would affect/decrease the lifetime of soldering tip. Set the...
-
Page 18: Ⅸ.error Messages
temperature as per application but as low as possible. 2) The oxide and carbide produced by residual flux will damage the soldering tip, like soldering deviation and slow heat conduction etc. Clean the soldering tip regularly (every week for long time continuous using). 3) Under high temperature, the solder in tip will produce oxide, which will damage its heat conduction. - Page 19 “NO handle”: handle is not insert “Sensor shorten”: sensor short circuit “Heater broken”: heating element open (Tip low temperature alarm)
- Page 20 QUICK INTELLIGENT EQUIPMENT CO., LTD. ADD: NO.11, FengXiang Road, Wujin High-Tech Industrial Development Zone, Jiangsu, China TEL: 86-519-86225678 FAX: 86-519-86558599 POSTCODE: 213167 WEBSITE: www.quick-global.com...
Need help?
Do you have a question about the TS1300 and is the answer not in the manual?
Questions and answers