Advertisement
Available languages
Available languages
Quick Links
Advertisement

Related Manuals for Gastrodomus COOKMATIC


Summary of Contents for Gastrodomus COOKMATIC
-
Page 1: Rev
COOKMATIC... -
Page 2: Table Of Contents
Cookmatic 2013 con piastre_piegh cookmatic 23/06/14 11.39 Pagina 2 REV. 01 COOKMATIC ITALIANO ENGLISH FRANÇAIS DEUTSCH ESPAÑOL... -
Page 3: Cookmatic
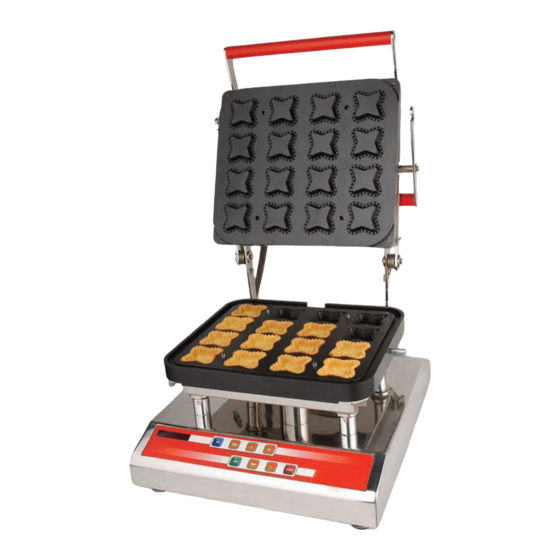
COOKMATIC Vi ringraziamo per la fiducia accordataci Cookmatic fa parte dell’ultima generazione di macchine per la produzione di basi per tartellette, è stata progettata e realizzata con modalità evolute per rendere il lavoro sempre più efficiente, sicuro ed altamente produttivo. - Page 4 COMPOSIZIONE DELLA MACCHINA MONTAGGIO PIASTRE - FIANCO MACCHINA La macchina si compone di: - una base (01) sulla quale è montata la tastiera di comando (02) e, sul retro, l’interruttore generale; - un piano (03) con montata la resistenza, fissato su 4 colonne della base macchina, sul quale viene montata la piastra (04) di cottura (inferiore femmina);...
- Page 5 ACCENSIONE DELLA MACCHINA Prima di procedere all’accensione della macchina accertarsi che la tensione di rete disponibile (volt) sia uguale al valore della tensione elettrica indicata sulla targa della macchina Inserire la spina del cavo elettrico, posto sul retro e solidale alla macchina, in una presa di alimentazione della tensione elettrica.
- Page 6 IMPOSTAZIONE DEL TEMPO DI COTTURA Durante la fase di riscaldamento delle piastre si può impostare il tempo di cottura, tempo che può essere programmato fino alla soglia dei 10 minuti circa. - Si preme il tasto “TIME” e sul display comparirà il valore del tempo precedentemente impostato, riferito alla ultima lavorazione effettuata dalla macchina, e tenuto in memoria.
- Page 7 Cookmatic 2013 con piastre_piegh cookmatic 23/06/14 11.39 Pagina 7 COOKMATIC SPEGNIMENTO DELLA MACCHINA Dopo aver premuto il tasto “OFF” (fine del lavoro) si può togliere la tensione alla macchina ruotando verso la posizione “O” la manopola dell’interruttore generale, posto sul retro; non essendoci più tensione il display si spegne.
-
Page 8: English
Two baking plates, an upper and lower one, are mounted onto the Cookmatic machine. These are then heated and by inserting small amounts of pastry (little balls) into the small moulds on the lower plate, tartlets are obtained that can be filled and decorated in the shape and design you wish, depending on the type of plate used. - Page 9 MACHINE COMPOSITION MOUNTING PLATES – MACHINE SIDE The machine is composed of: - a base (01) on which the control keyboard (02) is mounted and, at the back, the master switch; - a surface (03) on which the resistance is mounted, attached to the 4 columns on the machine base, onto which the lower female baking plate (04) is mounted;...
- Page 10 MACHINE POWER-UP Before you power up the machine, make sure that the available mains voltage is equal to the electric voltage value indicated on the machine plate. Plug the electric lead, built into the back of the machine, into a power socket. To power up, turn the master switch knob, on the back of the machine, to position “I”.
- Page 11 - Press the “TIME” key. The display will show the previously set time value, referring to the last baking process carried out by the machine and stored in memory. If the machine is new, the temperature value is the one relating to the final inspection test carried - the required baking time is set using the “+”...
- Page 12 Cookmatic 2013 con piastre_piegh cookmatic 23/06/14 11.39 Pagina 12 COOKMATIC To make it easier to memorise baking temperature and time and the type of plate, with reference to the type of product being baked, a table is supplied with the machine where the user can record comparison parameters.
-
Page 13: Français
évoluées afin de rendre le travail encore plus efficace, sûr et très productif. Cookmatic exploite la technologie électronique la plus avancée et est gérée par un logiciel, à l’interface conviviale, qui assure fiabilité et facilité d’utilisation. - Page 14 COMPOSANTS DE LA MACHINE MONTAGE DES PLAQUES – VUE LATÉRALE La machine est constituée de: - une base (01) qui comprend le clavier de commande (02) et, à l’arrière, l’interrupteur général; - un plateau (03) qui comprend une résistance, fixé sur 4 pieds de la base machine et sur lequel est montée la plaque (04) de cuisson (plaque inférieure femelle);...
- Page 15 MISE EN MARCHE DE LA MACHINE Avant de procéder à la mise en marche de la machine, s’assurer que la tension de réseau disponible (volt) correspond à la valeur de la tension électrique indiquée sur la plaque de la machine. Brancher la fiche du cordon d’alimentation, situé...
- Page 16 PROGRAMMATION DU TEMPS DE CUISSON Au cours de la phase de chauffage des plaques, il est possible de programmer le temps de cuisson; ce temps peut être programmé jusqu’à un seuil d’environ 10 minutes. - Appuyer sur la touche “TIME”; l’afficheur visualise alors la valeur du temps précédemment programmée, référée à...
- Page 17 Cookmatic 2013 con piastre_piegh cookmatic 23/06/14 11.39 Pagina 17 COOKMATIC ARRÊT DE LA MACHINE Après avoir appuyé sur la touche “OFF” (fin de la production), couper le courant à la machine en tournant sur la position “O” le bouton de l’interrupteur général, situé à l’arrière; une fois le courant coupé, l’afficheur s’éteint.
-
Page 18: Deutsch
Produktionskostenreduzierung. In der Tat ist man mit nur einem einzigen Bediener in der Lage mit der Cookmatic Maschine geformte und gebackene kleine Törtchenböden von einer Menge um die 700 Stück/h anzufertigen. Für besondere Anforderungen, indem die Backzeit reduziert wird, können bis zu 50%-70% vorgebackene Törtchenböden vorbereitet und... - Page 19 MASCHINENBESTANDTEILE MONTAGE DER BACKPLATTEN – SEITLICHE MASCHINENANSICHT Die Maschine besteht aus: - Die Maschine besteht aus: - Einem Maschinenkörper (01) worauf die Steuertastatur (02) und, auf der hinteren Seite. der Generalschalter montiert sind. - Einer Grundfläche (03), mit einem aufgebauten Widerstandselement, die auf 4 Säulen des Maschinenkörpers befestigt ist, worauf die untere Backplatte (04) (mit hohlen Formen) montiert wird.
- Page 20 - Die Hebel des Plattenverschlussgriffes (08) an den Abstandsstücken (10) einhaken und kontrollieren, dass die Selbstzentrierung erfolgt. - Mehrere Male den Deckel (mit der montierten oberen Platte) schließen und öffnen und überprüfen, dass diese Bewegung frei von jeglichen Hindernissen durchgeführt werden kann. - Die 4+4 Befestigungsschrauben der Backplatten festschrauben.
- Page 21 Nach Drücken der Taste “SET“ erscheint auf dem Display der in dem Moment aktuelle Temperaturwert, der sich während der Erhitzungsphase der Platten ändern wird, bis diese die gewünschte Temperatur erreicht haben. Nach Erreichung der Temperatur erlischt die LED. Zur Erreichung der Höchsttemperatur von 250°C werden ca. 30-35 Minuten gebraucht, für 180 °C dagegen ca.
- Page 22 Cookmatic 2013 con piastre_piegh cookmatic 23/06/14 11.39 Pagina 22 COOKMATIC ENDE DER PRODUKTION Ist die Produktion beendet muss die Taste “OFF” gedrückt werden, die Erhitzungsphase der Backplatten beendet und die Maschine wird für die Programmierung gesperrt. Auf dem Display erscheinen wieder die drei Linien, das bedeutet, dass die Maschine für eine neue Programmierung bereit ist.
-
Page 23: Español
En la máquina Cookmatic se montan dos placas de cocción, una superior y una inferior. Las placas se calientan y, por el simple procedimiento de colocar en cada molde de la placa inferior una pequeña cantidad o dosis de masa (una bolita), se obtienen tarteletas que se rellenarán y decorarán con la... - Page 24 COMPOSICIÓN DE LA MÁQUINA MONTAJE DE LAS PLACAS - LATERAL MÁQUINA La máquina se compone de: - una base (01) en la que va montado el teclado de mando (02) y, en su parte de atrás, el interruptor general; - una superficie (03) donde se monta la resistencia, fijada sobre 4 columnas de la base de la máquina;...
- Page 25 - atornillar a fondo (apretar) los 4+4 tornillos de fijación de las dos placas; - repetir, para mayor seguridad, la operación de apertura-cierre de la tapa. ENCENDIDO DE LA MÁQUINA Antes de encender la máquina, asegurarse de que la tensión de red disponible (volt) sea igual al valor de tensión eléctrica indicado en la placa de la máquina.
- Page 26 PROGRAMACIÓN DEL TIEMPO DE COCCIÓN Durante la fase de calentamiento de las placas se puede establecer el tiempo de cocción. Ese tiempo puede establecerse en torno a los 10 minutos. - Se pulsa la tecla “TIME” y en el display aparecerá el valor del tiempo antes establecido, referido a la última elaboración efectuada por la máquina y mantenida en memoria;...
- Page 27 Cookmatic 2013 con piastre_piegh cookmatic 23/06/14 11.39 Pagina 27 COOKMATIC APAGADO DE LA MÁQUINA Después de haber pulsado la tecla “OFF” (fin del trabajo) se puede cortar la tensión de la máquina llevando a la posición “O” el mando del interruptor general, situado en la trasera; al cortarse la tensión, el display se apaga.
- Page 28 TIPOLOGIA DELLE PIASTRE TYPES OF PLATES - TYPES DE PLAQUES - BACKPLATTENTYPOLOGIEN - TIPOS DE PLACAS PIASTRA/PLATE 1 22.5 IMPRONTE/INDENTS 30 PIASTRA/PLATE 2 Ø 40 Ø 25.7 IMPRONTE/INDENTS 30 PIASTRA/PLATE 3 34.7 IMPRONTE/INDENTS 30 PIASTRA/PLATE 4 33.5 31.2 69.5...
- Page 29 PIASTRA/PLATE 5 IMPRONTE/INDENTS 30 PIASTRA/PLATE 6 Ø 98 Ø 78 IMPRONTE/INDENTS 8 PIASTRA/PLATE 8 56.5 Ø 44 Ø 31.8 IMPRONTE/INDENTS 25 PIASTRA/PLATE 9 Ø 33 Ø 28 IMPRONTE/INDENTS 30...
- Page 30 PIASTRA/PLATE 10 28.2 IMPRONTE/INDENTS 30 PIASTRA/PLATE 11 Ø 100 Ø 98 IMPRONTE/INDENTS 8 PIASTRA/PLATE 12 Ø 52 Ø 36.9 IMPRONTE/INDENTS 25 PIASTRA/PLATE 13 Ø 68 Ø 61 IMPRONTE/INDENTS 16...
- Page 31 PIASTRA/PLATE 14 26.4 IMPRONTE/INDENTS 25 PIASTRA/PLATE 15 Ø 35 Ø 32.4 IMPRONTE/INDENTS 25 PIASTRA/PLATE 17 22.4 37.4 IMPRONTE/INDENTS 25 PIASTRA/PLATE 18 112.4 IMPRONTE/INDENTS 14...
- Page 32 PIASTRA/PLATE 19 67.4 IMPRONTE/INDENTS 28 PIASTRA/PLATE 20 Ø 35 Ø 27.4 IMPRONTE/INDENTS 25 PIASTRA/PLATE 21 Ø 60 Ø 56.5 IMPRONTE/INDENTS 20 PIASTRA/PLATE 22 51.35 IMPRONTE/INDENTS 30...
- Page 33 PIASTRA/PLATE A Ø 68 Ø 43.6 IMPRONTE/INDENTS 13 PIASTRA/PLATE B Ø 47 Ø 35.8 IMPRONTE/INDENTS 30 PIASTRA/PLATE C 31.9 60.4 IMPRONTE/INDENTS 15 PIASTRA/PLATE D Ø 41 Ø 23.6 IMPRONTE/INDENTS 30...
- Page 34 PIASTRA/PLATE E 17.4 51.9 IMPRONTE/INDENTS 30 PIASTRA/PLATE F Ø 90 Ø 62.6 IMPRONTE/INDENTS 8 PIASTRA/PLATE G 29.5 IMPRONTE/INDENTS 25 PIASTRA/PLATE H 34.5 IMPRONTE/INDENTS 16...
- Page 35 PIASTRA/PLATE I IMPRONTE/INDENTS 30 PIASTRA/PLATE J Ø 40 Ø 28 IMPRONTE/INDENTS 30 PIASTRA/PLATE K IMPRONTE/INDENTS 20 PIASTRA/PLATE L IMPRONTE/INDENTS 4...
- Page 36 PIASTRA/PLATE M 23.3 40.8 IMPRONTE/INDENTS 30 PIASTRA/PLATE N IMPRONTE/INDENTS 30 PIASTRA/PLATE O Ø 42 Ø 29.5 IMPRONTE/INDENTS 30 PIASTRA/PLATE P 25.81 IMPRONTE/INDENTS 30...
- Page 37 PIASTRA/PLATE Q 21.5 44.5 IMPRONTE/INDENTS 35 PIASTRA/PLATE R 20.3 IMPRONTE/INDENTS 30 PIASTRA/PLATE S Ø 129 Ø 115 IMPRONTE/INDENTS 4 PIASTRA/PLATE T Ø 109 Ø 95.1 IMPRONTE/INDENTS 6...
- Page 38 PIASTRA/PLATE U 61.8 IMPRONTE/INDENTS 12 PIASTRA/PLATE UM 60.43 IMPRONTE/INDENTS 12 PIASTRA/PLATE V Ø 230 Ø 216 IMPRONTE/INDENTS 1 PIASTRA/PLATE W Ø 80 Ø 76.5 IMPRONTE/INDENTS 9...
- Page 39 PIASTRA/PLATE X 27.5 117.5 IMPRONTE/INDENTS 14 PIASTRA/PLATE Y 17.5 35.00 IMPRONTE/INDENTS 30 PIASTRA/PLATE Z Ø 160 Ø 146 IMPRONTE/INDENTS 2...
Need help?
Do you have a question about the COOKMATIC and is the answer not in the manual?
Questions and answers