Table of Contents
Advertisement
Quick Links
FPZ-655
FEATURES
Reinforced universal
adapter plate for
a strong hold
8" of screen height
adjustability
11-1/2" of shelf height
adjustability
Tinted tempered glass shelf
360° of swivel
High-gloss black finish
Sorted-For-You
TM
with
security hardware for
screen attachment
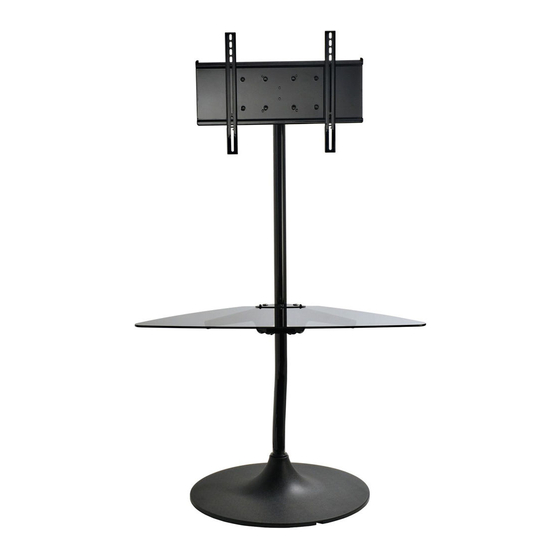
Flat Panel Stand
for 32" to 55" Flat Panel Screens
For a viewing experience that really stands out, Peerless' FPZ-655 Universal Flat Panel Stand for
32" – 55" flat panel TVs provides a brilliant combination of style and substance. With a modern
design, high gloss black finish and a smoked glass shelf, this stand looks great anywhere. With
360° of swivel and easy screen height adjustment, getting the perfect viewing angle is effortless.
The adjustable smoked glass shelf ensures easy centralization of components and accessories.
Complete with a universal adapter plate to fit virtually any screen, and cable management
system that keeps cables neatly organized. Plus, it holds up to 100lb. Style and substance in one
easy to assemble flat panel stand, only from Peerless.
VERTICAL
ADJUSTMENT
OPTIONS
Adjustable screen
positioning along the
height of the stand
Screen size: 32" - 55"
360° SCREEN
POSITIONING POSSIBILITIES
Set the perfect viewing angle
with 360° swivel
CLEAN AESTHETIC
Built-in cable management
provides a clean look in
any application
COMPONENT PLACEMENT
Tinted tempered glass shelf
with height adjustability
along the height of the stand
Cable
Height
management
adjustable shelf
Max load: 100lb (45kg)
Cosmetic covers
for a clean look
Advertisement
Table of Contents

Subscribe to Our Youtube Channel
Related Manuals for PEERLESS HAVE1 FPZ-655


Summary of Contents for PEERLESS HAVE1 FPZ-655
- Page 1 FPZ-655 for 32" to 55" Flat Panel Screens For a viewing experience that really stands out, Peerless’ FPZ-655 Universal Flat Panel Stand for 32" – 55" flat panel TVs provides a brilliant combination of style and substance. With a modern design, high gloss black finish and a smoked glass shelf, this stand looks great anywhere.
- Page 2 A R C H I T E C T S S P E C I F I C A T I O N S The Flat Panel Stand shall be Peerless model FPZ-655 shall be located where indicated on the plans. It shall be constructed of heavy gauge steel.
- Page 3 Installation and Assembly: 32" - 55" Flat Panel TV Stand Model: FPZ-655 Max Load Capacity: 100 lb (45 kg) screen 25 lb (11 kg) per shelf 1 of 33 ISSUED: 1-25-11 SHEET #: 125-9149-4 08-08-11...
-
Page 4: Tools Needed For Assembly
• Do not begin to install your Peerless product until you have read and understood the instructions and warnings contained in this Installation Sheet. If you have any questions regarding any of the instructions or warnings, for US customers please call Peerless customer care at 1-800-865-2112, for all international customers, please contact your local distributor. • This product should only be installed by someone of good mechanical aptitude, and fully understands these instructions. -
Page 5: Parts List
Parts List Description Qty. Part # adapter plate 201-P1110 vertival tube 104-P1075 shelf clamp bracket 201-P1159 shelf support bracket 104-P1072 adapter bracket 201-P1910 top cover 590-P1340 G bottom cover 590-P1341 H support base 590-1039 shelf support 104-P1073 button bumper 590-1209 K 1/4-20 x 20 mm decorative screw 520-2326 5/16-18 x 2" socket screw... - Page 6 Security Adapter Bracket Fasteners M4 x 12 mm (6) M6 x 12 mm (4) M5 x 12 mm (4) M8 x 15 mm (6) 510-1079 520-1050 520-1064 520-1068 M6 x 20 mm (4) M5 x 25 mm (4) 520-9554 520-1122 M8 x 25 mm (4) M4 x 25 mm (4) M6 x 25 mm (4) M6 x 30 mm (4) 520-1101 510-1082 520-1211 520-1067 multi-washer (6) 580-1036 M8 x 40 mm (4) 520-1152 I.D. .22" (5.6 mm) I.D. .34" (8.7 mm ) (4) (4) 540-1057 540-1059 4 of 33 ISSUED: 1-25-11 SHEET #: 125-9149-4 08-08-11...
- Page 7 Attach vertical tube (B) to support base (H) using one plastic bushing (AA), one M5 x 55 mm socket screw (R), and M5 nut (S) as shown in detail 1. Tighten M5 x 55 mm socket pin screw (R) using 4 mm allen wrench (X). DETAIL 1 Press three button bumpers (J) into shelf clamp bracket (C) as shown in figure 2.1 Press six button bumpers (J) into shelf support (I) as shown in figure 2.2. Loosely fasten two 1/4-20 x 20 mm decorative screws (K) as shown in figure 2.3. Figure 2.3 Figure 2.1 Figure 2.2 5 of 33 ISSUED: 1-25-11 SHEET #: 125-9149-4 08-08-11...
- Page 8 Attach shelf support (I) to vertical tube (B) with clamp bracket (D) using two 1/4-20 x 1.25" carriage bolts (T), and 1/4-20 nuts (U). Attach adapter support plate (Q) to adapter plate (A) with four M10 x 15 mm socket screws (N) using allen wrench (O) as shown in figure 4.1. Attach adapter support plate (Q) to vertical tube (B) using two 5/16-18 x 2" socket screws (L), and 5/16 nuts (M) as shown in detail 2. Figure 4.1 DETAIL 2 6 of 33...
- Page 9 Position glass shelf (W) on top of shelf support (I) and under shelf clamp bracket (C) as shown below. Secure glass shelf (W) in place by tightening two pre-installed 1/4-20 x 20 mm decorative screws (K) as shown in detail 3. DETAIL 3 Attach top cover (F) to adapter support plate (Q) with two M5 x 10 mm socket pin screws (V) as shown in figure 6.1. Attach bottom cover (G) to clamp bracket (D) with two M5 x 10 mm socket pin screws (V) as shown in figure 6.2. Tighten using 4 mm allen wrench (X).
-
Page 10: Installing Adapter Brackets
Installing Adapter Brackets WARNING • Tighten screws so adapter brackets are firmly attached. Do not tighten with excessive force. Overtightening can cause stress damage to screws, greatly reducing their holding power and possibly causing screw heads to become detached. Tighten to 40 in. • lb (4.5 N.M.) maximum torque. • If screws don't get three complete turns in the screen inserts or if screws bottom out and bracket is still not tightly secured, damage may occur to screen or product may fail. To prevent scratching the screen, set a cloth on a flat, level surface that will support the weight of the screen. Place screen face side down. If screen has knobs on the back, remove them to allow the adapter brackets to be attached. Place adapter brackets (E) on back of screen, align to holes, and center on back of screen as shown below. - Page 11 MULTI-WASHER SCREW ADAPTER BRACKET (E) If you have any questions, please call Peerless customer care at 1-800-865-2112. For Bump-out or Recessed Back Screen Begin with longer length screw, hand thread through multi-washer, adapter bracket and spacer in that order into screen as shown below. Screw must make at least three full turns into the mounting hole and fit snug into place.
-
Page 12: Mounting And Removing Flat Panel Screen
Mounting and Removing Flat Panel Screen WARNING • Always use an assistant or mechanical lifting equipment to safely lift and position the plasma television. Hook adapter brackets (E) onto adapter plate (A), then slowly swing screen in as shown. Turn screws clockwise at least six times to prevent screen from being removed as shown in detail 4. NOTE: Tighten using 4 mm allen wrench (P). Screen can be adjusted horizontally if desired. NOTE: It is important to lock screen down! To lock the screen down, tighten screws to adapter bracket as shown in detail 4. - Page 13 Run screen cables through two 18" mesh sleeves (Y) as shown below. Secure screen cables and two 18" mesh sleeves (Y) to vertical tube (B) with five cable ties (X) into slots on back of vertical tube (B). SCREEN SLOTS 11 of 33 ISSUED: 1-25-11 SHEET #: 125-9149-4 08-08-11...
Need help?
Do you have a question about the HAVE1 FPZ-655 and is the answer not in the manual?
Questions and answers