
Related Manuals for Science Image NDI HD mini


Summary of Contents for Science Image NDI HD mini
- Page 1 NDI® HD mini User Manual The world’s advanced NDI® converter with broadcast quality. ScienceImage ® www.science-image.com make a better world...
- Page 2 Reading before use If you find that some functions are unavailable in future use, you need to check the following to find out whether it is caused by improper operation or settings: 1. This product is an audio and video codec conversion device, which only supports streaming and pushing in the local area network, but not on the Internet;...
-
Page 3: Table Of Contents
Menu NDI® HD mini interface and indicator introduction ..........................4 3 power-on methods of NDI HD mini ..............................5 OLED screen display instructions ................................5 Login Web UI ......................................6 Method 2: Open the login page through NDI Studio Monitor ....................6 log in ...................................... -
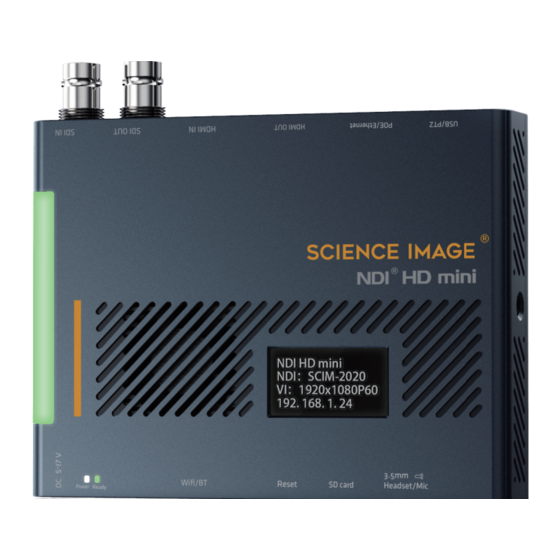
Page 4: Ndi® Hd Mini Interface And Indicator Introduction
NDI® HD mini interface and indicator introduction NDI® HD mini interface and indicator introduction SDI input------------------------one 3G-SDI input, only available in encoding state SDI output----------------------one 3G-SDI output, the picture is looped out in the encoding state, and the decoded output picture in the decoding state HDMI input---------------------one HDMI input, only available in encoding state HDMI output-------------------one HDMI output, loop out the picture in the encoding state, and decode the output picture in... -
Page 5: Power-On Methods Of Ndi Hd Mini
3 power-on methods of NDI HD mini ① Use the standard DC-12V power supply of the product to power on, and insert the network cable to connect to the LAN; ②Power on using USB, and insert the network cable to connect to the LAN;... -
Page 6: Login Web Ui
Login Web UI Open the web login page Method 1: Open the login page by entering the IP address of the device in the browser address bar Open the computer or mobile browser, enter the IP address displayed on the fourth line of the OLED screen of the device in the address bar, and press Enter to enter the login page, as shown below: Note: The PC or mobile phone must be in the same routing network as the NDI®... -
Page 7: Log In
Click the menu icon in the upper left corner or right-click anywhere, select "SCIENCEIMAGE"-click to find an item consistent with the NDI stream name of the device. As shown in the left picture above the fourth step: On the opened Studio Monitor page, click the gear icon in the lower right corner. As shown in the above right picture log in Enter the initial login information of the device: Username: admin... -
Page 8: Network Settings
Network settings Modify IP Click [Network] to enter the network setting page There are two modes for device IP address setting: DHCP and manual. DHCP mode Auto(DHCP) mode needs to be used in the link connecting the router. The router dynamically assigns an IP address to the device in real time. - Page 9 After filling in the IP address, click the [Apply] button below, and wait for 10 seconds to restart or power on the device to take effect. www.science-image.com make a better world...
-
Page 10: Modify The Ndi Stream Name In The Encoding State
Modify the NDI stream name in the encoding state If the device is used as an encoder, you need to modify the NDI stream name. The NDI stream name must be unique locally, otherwise software such as NDI Studio Monitor may not be recognized. After the modification, click the [Apply] button below to take effect in real time. -
Page 11: Video Settings
Video settings The video setting page can set the aspect ratio of the video source, frame rate, Tally light status, bit rate, NDI encoder volume, Logo background image push, and decoder volume. Encoder Mode web UI Decoder Mode web UI www.science-image.com make a better world... -
Page 12: Set Screen Aspect Ratio
Set screen aspect ratio Supports five screen aspect ratio settings: source aspect ratio, 4:3, 16:9, 16:10, square. Set frame rate Support 4 kinds of frame rate settings: source frame rate, 1/2 frame rate, 1/3 frame rate, 1/4 frame rate. Set up Tally lights Tally light can be turned on or off at any time (there are three display states: yellow/standby, green/pre-monitoring, red/program) Set bitrate (Bandwidth) -
Page 13: Set Ndi Encoder Volume
Set NDI encoder volume "Encoder volume" adjusts the volume of the video source encoded by the encoder, such as the volume of the picture in the NDI Studio Monitor. Logo background image upload streaming If it is in the encoding state, the user can choose to set the LOGO background picture as a picture stream according to actual needs (the picture needs to be in PNG format), click on the picture switch, [Save] and [Start Streaming]. -
Page 14: System Settings
System settings Reset login password Change the password. After the password is changed, you need to log out and log in again. Firmware upgrade The company’s official website will regularly release new upgrade firmware, and users can download the latest firmware to upgrade as needed. - Page 15 If the message "Good upgrade file, You can start upgrade now.", you can click the [Start Upgrade] button to upgrade. It will take about 2 minutes. When the progress bar reaches 10%, there will be a long pause. Don't be surprised, just wait patiently. www.science-image.com make a better world...
-
Page 16: Working Mode Switch
After the progress bar reaches 100%, click the pop-up [Finish] button and close the upgrade page to complete the upgrade operation. After confirming that the upgrade is successful, power on and restart the device. Note: Do not cut off the power during the upgrade process, otherwise the system files may be damaged and the system will not start normally. -
Page 17: How To Use Studio Monitor To View Ndi Video Stream
How to use Studio Monitor to view NDI video stream Open the Studio Monitor software, click in the upper left corner or right-click anywhere --->【SCIENCEIMAGE】---> click the name of the NDI stream you want to view ScienceImage Tech 2020.Aug www.science-image.com make a better world...
Need help?
Do you have a question about the NDI HD mini and is the answer not in the manual?
Questions and answers