Table of Contents
Advertisement
Quick Links
SH, VH & SE Series
Heat & Energy Recovery Ventilators
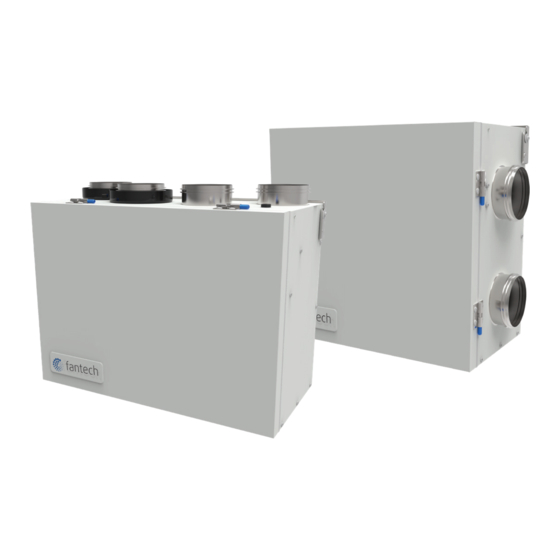
PARTS IN THE BOX
Heat Recovery Ventilator, 1 pc
Hanging Bracket, 1 pc
Drain Hose Kit, 1 pc
Operation and Installation Manual, 1 pc
Your ventilation system should be installed in conformance with the appropriate provincial requirements or, in the absence of
such requirements, with the current edition of the National Building Code, and / or ASHRAE's "Good Engineering Practices".
United States
10048 Industrial Blvd., Lenexa, KS, 66215
Tel.: 800.747.1762
Canada
50 Kanalflakt Way, Bouctouche, NB, E4S 3M5
Tel.: 800.565.3548
Fantech reserves the right to modify, at any time and without notice, any or all of its products' features, designs,
components and specifications to maintain their technological leadership position.
Please visit our website fantech.net for more detailed technical information.
Installation and Operation Manual
SH 704 • VH 704 • SE 704N
Item #: 444788
Rev Date: 2019-11-25
Advertisement
Table of Contents

Related Manuals for SystemAir Fantech SH Series


Summary of Contents for SystemAir Fantech SH Series
- Page 1 Item #: 444788 Rev Date: 2019-11-25 Installation and Operation Manual SH, VH & SE Series Heat & Energy Recovery Ventilators PARTS IN THE BOX Heat Recovery Ventilator, 1 pc Hanging Bracket, 1 pc Drain Hose Kit, 1 pc Operation and Installation Manual, 1 pc SH 704 •...
- Page 2 Note Warning/ Information Technical Practical tip Important information note For residential use only. PLEASE READ THIS MANUAL BEFORE INSTALLING UNIT Before installation careful consideration must be given to how this system will operate if connected to any other piece of mechanical equipment, i.e. a forced air furnace or air handler operating at a higher static pressure.
-
Page 3: Table Of Contents
Table of content DETERMINING YOUR AIRFLOW REQUIREMENT ........... . . 4 INSTALLATION EXAMPLES Fully dedicated system . -
Page 4: Determining Your Airflow Requirement
Determining your airflow requirement Room Count Method Room classification Number of rooms CFM (L/s) CFM Required Master bedroom x 10 L/s (20 CFM) if yes add 10 L/s (20 CFM) Basement yes or no if no = 0 Bedrooms x 5 L/s (10 CFM) Living room x 5 L/s (10 CFM) Others... -
Page 5: Installation Examples
Installation examples Suggested installation for: Example only – duct configuration may differ depending on the model. • Hydronic baseboard • Infloor heating FULLY DEDICATED SYSTEM • Electric baseboard BEST FOR NEW CONSTRUCTION • Mini split heat pump Benefits: Provides the best fresh air distribution in the Stale air is drawn from key areas of the home requiring local exhaust house;... -
Page 6: Partially Dedicated System
Installation examples (Cont'd) Suggested installation for: • Central furnace (air DIRECT CONNECTION of the FRESH air to living area to the RETURN PLENUM handling unit or central of the AIR HANDLER (Stale air drawn from key areas of home) air conditioners) •... -
Page 7: Simplified Installation - Option 1
Installation examples (Cont'd) Suggested installation for: DIRECT CONNECTION of both the HRV SUPPLY AIR STREAM and EXHAUST AIR STREAM • When bathroom and kitchen to the FURNACE COLD AIR RETURN already have local exhaust system SIMPLIFIED INSTALLATION (GOOD) • May be suitable for (RETURN/RETURN METHOD) - OPTION 1 retrofitting Benefits: Least expensive... -
Page 8: Simplified Installation - Option 2
Installation examples (Cont'd) Suggested installation for: DIRECT CONNECTION of the HRV SUPPLY AIR STREAM to the SUPPLY AIR SIDE on the • When bathroom and FURNACE & EXHAUST AIR STREAM to the FURNACE COLD AIR RETURN kitchen already have local exhaust system SIMPLIFIED INSTALLATION (GOOD) •... -
Page 9: Exterior Ducting Installation
Exterior ducting installation Weatherhood location OUTSIDE CORNER INSIDE CORNER • Decide where your intake and exhaust hoods will be located. 36" (1m) 36” (1m) min. min. Locating the Intake Weatherhood • Should be located upstream (if there are prevailing winds) from the 6' (2m) exhaust outlet. -
Page 10: Installing Ducts To / From Inside
Installing duct to/from inside To maximize airflow in the ductwork system, all ducts should be kept short and have as few bends or elbows as possible. Forty-five degree are preferred to 90º elbows. Use “Y” tees instead of 90º elbows whenever possible. All duct joints must be fastened with screws or duct sealant and wrapped with a quality tape to prevent leakage. -
Page 11: Hrv Installation
Installation Location The HRV/ERV must be located in a heated space where it will be possible to conveniently service the unit. Typically the HRV would be located in the mechanical room or an area close to the outside wall where the weatherhoods will be mounted. -
Page 12: Airflow Adjustment & Balancing
Installing drain line- (SH704 & VH704 ONLY) - Drainline not included in kit Through normal operation and during its defrost mode, the HRV may produce some condensation. This water should flow into a nearby drain, or be taken away by a condensate pump. The HRV and all condensate lines must be installed in a space where the temperature is maintained above the freezing point. -
Page 13: Maintenance
Electrical connections SH704 & VH704... - Page 14 Electrical connections (Cont'd) SE 704N...
-
Page 15: Troubleshooting
Troubleshooting Problem Causes Solutions Air is too dry Insufficient water vapour generated Install humidifier Air is too humid Sudden increase in humidity by cooking or bathing Ventilate at the source of the problem using a HRV or additional fan Sudden change in temperature Wait until outside temperature stabilizes (winter). -
Page 16: Maintenance Chart
Maintenance chart Limited Warranty • The heat recovery aluminum core has a limited lifetime warranty and the Maintenance Required Recommended Frequency Date Maintenance Performed enthalpy energy recovery core has a Check and Clean Filters Every 3 months or if 5 year limited warranty. dirty •... -
Page 17: Parts List
Parts list VH704 VH704 BOM # Description (463802) Motor, R2E 133-BH94-18 404378 Electrostatic Filters Kit 8” x 8.3” 405116 Heat Recovery Cell 8.5” x 8.5” x 8” 427560 Capacitors 2uF 412315 412072 Door Switch 410867 Kit Drain Plug 40315 Temperature Probe 40286 Door Assembly 428470... -
Page 18: Sh704
Parts list SH704 SH704 BOM # Description (463800) Motor, R2E 133-BH94-18 404378 Electrostatic Filters Kit 8” x 8.3” 405116 Heat Recovery Cell 9” x 9” x 8” 403120 Capacitors 2uF 412315 412072 Door Switch 410867 Kit Drain Plug 403157 Temperature Probe 40286 Kit, Chain 404261... -
Page 19: Se704N
Parts list SE704 SE704 BOM # Description (463801) Motor, R2E 133-BH94-18 404378 Electrostatic Filters Kit 8” x 8.3” 405116 Energy Recovery Cell 422731 Capacitors 2uF 412315 Door Switch 410867 Kit, Wall Bracket 444800 Kit, Chain 404261 Door Assembly 444801 Wiring Diagram 403136... - Page 20 Fantech reserves the right to make technical changes. For updated documentation please refer to www.fantech.net Fantech®...
Need help?
Do you have a question about the Fantech SH Series and is the answer not in the manual?
Questions and answers