Table of Contents
Advertisement
Quick Links
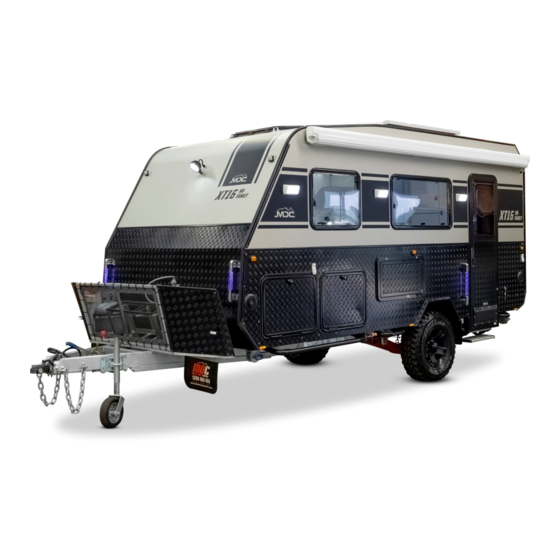
XT16-HR Family
User Manual and Guide
2019 Model Shown
©Copyright Market Direct Campers & Caravans 2018
Read owner's manual before using the equipment. Third party component manuals should be read in conjunction
with this manual. Maintenance guidelines must be met or exceeded, failing to meet these guidelines may result in
serious injury or death and property damage. Specifications may change without notice.
Advertisement
Table of Contents
Troubleshooting

Subscribe to Our Youtube Channel
Related Manuals for MDC XT16-HR Family


Summary of Contents for MDC XT16-HR Family
- Page 1 XT16-HR Family User Manual and Guide 2019 Model Shown ©Copyright Market Direct Campers & Caravans 2018 Read owner’s manual before using the equipment. Third party component manuals should be read in conjunction with this manual. Maintenance guidelines must be met or exceeded, failing to meet these guidelines may result in...
-
Page 2: Table Of Contents
1300 4X4 Shoes and Linings ..........20 Table of Contents Corrosion Prevention ..........20 INTRODUCTION ............2 Wheels and Tyres ............21 Store Locations ............3 Highway .............. 21 QUEENSLAND ............3 Off Road ............. 21 Contact Details............3 Jacking Your Caravan .......... 21 ABOUT YOUR HYBRID OFFROAD CARAVAN .. -
Page 3: Introduction
1300 4X4 INTRODUCTION WARNING– Before using this product you should read this manual and those manuals supplied by component manufacturers applicable to this product. This manual is supplied as a reference to required maintenance of the product. Failure to use and maintain the product in accordance with what is outlined in this manual may affect your warranty. -
Page 4: Store Locations
Adelaide 1246 South Rd Clovelly Park SA 5042 Contact Details NATIONAL TOLL FREE WARRANTY HOTLINE SPARE PARTS 1300 MDC CARE 1300 MDC PARTS 1300 4X4 4X4 1300 494 494 1300 632 2273 1300 632 72787 ABOUT YOUR HYBRID OFFROAD CARAVAN Specifications... -
Page 5: Bearings And Seals
1300 4X4 Style (Hard Floor, Soft Floor, Hybrid) Hybrid Width 2250mm Height (Roof Closed) 3100mm without air Length (Hitch to Tail lights) 6510mm Wheel Track 2250mm Distance Wheels to Front 4500mm Distance Wheels to Rear 2010mm Tare 2250kg 2800 Ball Weight 220kg Drawbar Construction Galvanised Inside &... -
Page 6: Fridge Fitting Chart
1300 4X4 Fridge Fitting Chart Dimensions: L: 840mm W: 530mm H: 480mm Engel Dometic Evakool Bushman Ironman MT35FP CFX-28 RF40 CFX-35 RF47 CFX-40 TMX35 CFX-50 Glacier 30 CF80ACVERB ED85 CF80ACDZVERB... -
Page 7: How To Hitch Your Coupling
1300 4X4 How to Hitch your coupling Here is a short guide on how to safely use your coupling to couple and uncouple the trailer from the towing vehicle. Make sure the handbrake is applied prior to coupling and uncoupling. - Page 8 1300 4X4 Make sure the dust cap is securely connected to the bump cover. This is done by locating the rear lip on the dust cap onto the groove of the bump cover and then pushing it in a downward motion until the dust cover is secure (there should be a slight click when it has been assembled correctly) Test if the dust cover is connected to the bump cover by applying a slight upward force to the dust cover, it shouldn’t separate.
-
Page 9: Coupling
1300 4X4 Coupling STEP 1 Push down the button (1) and push the locking mechanism back (2). When the locking mechanism (2) is all the way back, release the button (1) locking the plate in place STEP 2 Offer up the tow pin to the coupling making sure the tow pin cover is removed and there is no visible debris on it. - Page 10 1300 4X4 STEP 3 Make sure the tow pin is seated inside the universal and the tow pin top is sticking out of the locking mechanism (see below). Press the button (1) to release the locking mechanism there will be an audible locking noise at which point the mechanism will return to the initial position as shown in step 1.
-
Page 11: Uncoupling
1300 4X4 Uncoupling STEP 1 Push down the button 1 and push the locking mechanism back 2. When the locking mechanism is all the way back release the button while holding the mechanism to ensure it does not spring back to the locked position. STEP 2 Lift the coupling up off the tow pin. -
Page 12: Setting Up Your Caravan
1300 4X4 Setting up your Caravan Loading Your Caravan It is important to load your caravan correctly to distribute weight evenly and achieve a suitable ball weight load and prevent loading in a manner that can cause a caravan to sway and/or roll excessively left and right. The optimum ball weight on a caravan is between 9 and 11% of the total caravan weight. -
Page 13: Levelling Your Caravan
1300 4X4 Levelling Your Caravan The stabiliser legs on your caravan are not designed for supporting the full weight of the trailer, they are there to stabilise it once it is level. Using your stabilisers as a lifting mechanism will void your warranty as will extending them with a “rattle gun”... -
Page 14: Kitchen
1300 4X4 Kitchen To extend the kitchen from the caravan, press down the blue slide tab, raise the pad bolt and pull kitchen out. The kitchen will lock into place when extended. To put kitchen away, again press down the blue tabs and push back into place. Always install the support leg when the kitchen is extended per diagram 2 Diag: 2... -
Page 15: Preparing For Bad Weather
1300 4X4 Preparing for Bad Weather During inclement weather the following should be done: • Close all roof vents and hatches to prevent water entering. • Protect the awning from high winds by retracting or securing with guy ropes and pegs. •... -
Page 16: Exterior
1300 4X4 Exterior Ensure all seals on the caravan have proper compression at 30-50%, are free of dirt and have nothing protruding past the seals. UV light and the elements can over time cause seals and fittings to perish and become brittle. The use of a caravan cover will extend the life of components and keep your investment looking better for longer. -
Page 17: Trailing Arm Pivot Bolts
1300 4X4 Trailing Arm Pivot Bolts The pivot bolts are a high tensile steel. The service interval for these bolts is 5000km under normal use and 2500km for harsh off-road conditions. During travel they should be inspected daily to ensure they have not rotated or become damaged. -
Page 18: Breakaway Switch
1300 4X4 Breakaway Switch By law, all trailers with an ATM of 2000kg or greater must have a “Breakaway System” to halt the trailer in the event it becomes detached from the tow vehicle whilst traveling. Your caravan is fitted with this system with the switch mounted on the drawbar with a steel wire lanyard to connect to your tow vehicle. -
Page 19: Adjuster
1300 4X4 Adjuster To adjust the handbrake cable tension release locknuts A, B and C in the diagram Handbrake Adjuster 1 below. To tighten the handbrake cable, turn the adjuster wheel D in a clockwise direction. Once adjusted retighten lock nuts and test. -
Page 20: Correct Use Of Your Electric Brakes
1300 4X4 Correct Use of Your Electric Brakes Your trailer brakes are designed to work in synchronisation with your tow vehicle brakes. Never use your tow vehicle or trailer brakes alone to stop the combined load. Your trailer and tow vehicle will seldom have the correct amperage flow to the brake magnets to give you comfortable, safe braking unless you make proper brake system adjustments. -
Page 21: Magnets
It is important to replace both shoes on each brake and both brakes of the same axle. This is necessary to retain the “balance” of your brakes. Be sure to replace your shoes only with genuine MDC parts available from our outlets. -
Page 22: Wheels And Tyres
Failure to reinflate can cause severe handling problems resulting in injury or death. Jacking Your Caravan Your MDC caravan has factory jacking points behind the axles on each side of the caravan and also a bottle jack locating ring on each of the trailing arms on the suspension. -
Page 23: Electrical Systems
MDC accepts no liability for any personal injury, damages or loss as a result of unqualified or untrained persons repairing or altering the electrical systems on this product. If in doubt call your local MDC outlet or phone: 1300 831407 Battery Care Your camper is fitted with 100Ah AGM Batteries. -
Page 24: Control Panel
1300 4X4 Control Panel Control Panel 1. Toilet/Fridge Power 2. DC Outlets 3. Water Pump/Gage 4. Hot Water Heater 5. Internal Fridge 6. Voltmeter 7. Amp Meter 8. Water Tank Gauge 9. Charger Control Panel *Voltmeter will indicate battery voltage when idle or charge voltage when charging * Amp meter will show current being used not charge current... -
Page 25: Switch Panel Circuit Diagram
1300 4X4 Switch Panel Circuit Diagram... -
Page 26: Main Circuit Diagram
1300 4X4 Main Circuit Diagram... -
Page 27: Gas & Water Systems
1300 4X4 Gas & Water Systems Hot Water System WARNING: The flue outlet on your gas hot water system must be uncovered prior to use. Open the protective dust cabinet and remove the white cover before use. Do not operate whilst towing. Do not operate in enclosed spaces Your caravan is fitted with a Truma boiler hot water system. -
Page 28: Diesel Heater
1300 4X4 Fig: 6 Fig: 7 Your gas alarm is located beside the entry door below the bed. Fig: 8 All gas appliances and supply must be turned off at the isolation valve when towing. Always turn off your gas bottle before towing your caravan. -
Page 29: Product Information
1300 4X4 Important informa�on before opera�ng the diesel heater • The diesel heater is designed for use in an RV, caravan or camper. • The heater is designed to heat the main living area of your caravan or camper. Attempting to warm the additional annex area may be beyond the performance of the diesel heater unit. -
Page 30: Schematic
1300 4X4 Schematic... -
Page 31: Parts List
1300 4X4 Parts List Fig No. Part No. Description 161-10026 Combustion air inlet tube ø25mm 161-10027 Stainless steel exhaust tube ø25mm 520-00005 20-32mm stainless steel hose clamp 161-10030 Muffler 523-00003 Fastening clamp for Combustion air inlet tube R-type ø27mm 161-10021 Nylon oil hose ø4mm×1.25mm 161-10022... -
Page 32: Heater Control
1300 4X4 Heater Control The control switch panel is used to control the unit functions. 1. Ventilation mode indicator 2. Heating/Combustion mode indicator 3. Heating selector button 4. Stop button 5. Ventilation selector button 6. Temperature selector Important tips about operation: •... -
Page 33: Trouble Shooting And Fault Guide
1300 4X4 Temperature control • The control can be used to pre-set an interior temperature. According to the size of heating space and prevailing outdoor temperature, the heater’s temperature can be set within the range of +10 °C to +30 °C. Control in the heating mode •... - Page 34 1300 4X4 Code of Description of Malfunction reason Troubleshooting malfunction malfunction Over-voltage Check your power supply by multimeter. If below nominal Voltage is beyond or Under- voltage 25%, pls recharge or change battery. If above nominal voltage ±25% voltage nominal voltage 25%, please change your power supply. 1.
-
Page 35: Protecting From Mould
1300 4X4 2. Fuel pipe blocked or Check whether the pipe is blocked by impurity and each broken connection is intact. if so, please repair or replace it. 3. Fuel pipe blocked If there is fuel condensation, please use fuel which is by fuel condensation suitable for low temperature to replace previous fuel. -
Page 36: Pre-Trip Checklist
1300 4X4 When packing up dry, it is important to check under the mattress that there is no build-up of condensation overnight. Body heat on a mattress can create enough temperature difference with the exterior for moisture to form under it. If left unchecked this can cause mould when your caravan is stored. -
Page 37: Wheel Chocks
1300 4X4 Wheel Chocks Wheel chocks are an important safety device when leaving your trailer parked on even the slightest incline. On level ground it is recommended to chock both sides of the wheel. On a hill you should chock the wheels on the downhill side ensuring the chocks Covers Hard floor campers and caravans will benefit greatly from a storage cover. -
Page 38: Trouble Shooting
1300 4X4 Trouble Shooting Electrical... -
Page 39: Water
1300 4X4 Water Problem Possible Cause Remedy No power from control panel Check circuit breaker Flat Battery Charge battery Replace pump, Contact dealer for Pump not working (no noise) Faulty pressure switch replacement Check connections with multimeter Bad electrical connection or test light Turn on tap and hold finger over nozzle for 5 seconds and release. -
Page 40: Brakes
1300 4X4 Brakes Problem Possible Cause Remedy Open Circuits Find and correct Severe under adjustments Adjust brakes No Brakes Faulty controller Test and correct/replace Short circuits Find and correct Great or oil on linings or magnets Clean or replace Corroded connection Clean or replace connectors Worn lining or magnets Replace... -
Page 41: Handy Tips
1300 4X4 Handy Tips Driving Off Road Towing your caravan off road adds many dimensions to the driver’s responsibilities and factors to be considered. When travelling remote always carry enough spare parts and supplies to cater for a “worst case scenario.” Always perform preventative maintenance and daily checks. -
Page 42: Trip Planning
1300 4X4 Protecting the environment Remote areas and National Parks are sensitive areas and all precautions should be taken not to damage tracks, interfere with flora and fauna and not to contaminate the area. In sensitive areas it is advisable to use grey water tanks and contained toilets. -
Page 43: Warranty Statement
MDC. MDC shall not be liable, (in part or whole) for any warranties, either express or implied, made by agents or resellers on behalf of MDC without the knowledge or express written permission of MDC. Such unauthorised claims shall be the responsibility of the agent or reseller only. -
Page 44: Maintenance
Goods Bought At Auction From time to time, MDC, may, at its discretion, offer items for auction, either independently or via a third party. Whilst every effort will be made to provide all relevant information regarding the item on auction, as per Australian law, any and all goods bought at auction subsequently do not carry any statutory warranty. - Page 45 1300 4X4 MASTERCLASS Tutorials...
- Page 46 1300 4X4 Maintenance Schedule...
- Page 47 1300 4X4 500KM FIRST SERVICE CHECKED Hitch Check hitch bolts to 76Nm. Lubricate with high temp bearing grease Handbrake Inspect and adjust handbrake Brakes Inspect and adjust brakes Inspect condition and torque to 125Nm (12mm studs) Wheel nuts (140Nm 14mm studs alloy rims) (200Nm 14mm studs steel rims) Tyres Inspect for abnormal wear, damage and correct pressure General fixings...
- Page 48 1300 4X4 12 MONTHS / 10,000KM SERVICE CHECKED Hitch Inspect for damage and lubricate. Check bolt Torque to 76Nm Jockey Wheel Inspect for condition and operation Hand winch Check brake function and webbing Suspension Lubricate and check bushes for excess movement. Torque bolts to 190Nm Brakes Inspect and adjust.
- Page 49 1300 4X4 24 MONTHS / 20,000KM SERVICE CHECKED Hitch Inspect for damage and lubricate. Check bolt Torque to 76Nm Jockey Wheel Inspect for condition and operation Hand winch Check brake function and webbing Suspension Lubricate and check bushes for excess movement. Torque bolts to 190Nm Brakes Inspect and adjust.
- Page 50 1300 4X4 36 MONTHS / 30,000KM SERVICE CHECKED Hitch Inspect for damage and lubricate. Check bolt Torque to 76Nm Jockey Wheel Inspect for condition and operation Hand winch Check brake function and webbing Suspension Lubricate and check bushes for excess movement. Torque bolts to 190Nm Brakes Inspect and adjust.
- Page 51 1300 4X4 48 MONTHS / 40,000KM SERVICE CHECKED Hitch Inspect for damage and lubricate. Check bolt Torque to 76Nm Jockey Wheel Inspect for condition and operation Hand winch Check brake function and webbing Suspension Lubricate and check bushes for excess movement. Torque bolts to 190Nm Brakes Inspect and adjust.
- Page 52 1300 4X4 CHECKED 60 MONTHS / 50,000KM SERVICE Hitch Inspect for damage and lubricate. Check bolt Torque to 76Nm Jockey Wheel Inspect for condition and operation Hand winch Check brake function and webbing Suspension Lubricate and check bushes for excess movement. Torque bolts to 190Nm Brakes Inspect and adjust.
-
Page 53: Supplier Contact Details
1300 4X4 Supplier Contact Details Dometic Thetford Australia https://www.dometic.com/en-au/au/contact-us Address: 41 Lara Way, Campbellfield VIC 3061 Phone: (03) 9358 0700 Email: infoaus@thetford.com.au Cruisemaster Address: 352B Bilsen Road, Geebung QLD 4034 Phone: (07) 3624 3800 Email: sales@cruisemaster.com.au Statewide Bearings Coopers Plains Cairns Address: 902 Beaudesert Rd Coopers Plains QLD 4108 Unit3, 49 Cook St Cairns QLD 4870... - Page 54 1300 4X4 Collie Geraldton 96 Forrest Street, Collie WA 6225 Unit 1, 75 Flores Road, Geraldton WA 6530 Ph: (08) 9734 1624 Ph: (08) 9964 4655 Email: collie@statewidebearings.com.au Email: geraldton@statewidebearings.com.au Karratha Kalgoorlie 51 Orkney Road, Karratha WA 6714 5 Darcy Lane, Kalgoorlie WA 6430 Ph: (08) 9144 2333 Ph: (08) 9091 4111 Email: karratha@statewidebearings.com.au...
Need help?
Do you have a question about the XT16-HR Family and is the answer not in the manual?
Questions and answers