Table of Contents
Advertisement
Quick Links
Advertisement
Table of Contents

Related Manuals for Metal Defender MD-12


Summary of Contents for Metal Defender MD-12
- Page 1 User Manual...
-
Page 2: Table Of Contents
Index Precautions – pg. 1 Product Description – pg. 2 Interference – pg.3 Performance and Features – pg. 4 Parts – pg. 5 Installation – pg. 6 Installation – pg. 7 Panel Interface – pg. 7 Zone Description – pg. 8 Display Panel –... -
Page 3: Precautions
Please read the following carefully before operation: The following precautions are intended to tell you how to operate this product appropriately and safely. P lease read this part carefully and make sure that you understand completely before you read other parts of this manual. -
Page 4: Product Description
The user could also adjust the individual zones to exclude common metal objects carried on a day to day basis including: coins, keys, jewelry, belt buckles. The MD-12 is perfect for environments where theft protection is needed: industrial and mining enterprises, banks, e-recycling and... -
Page 5: Interference
Interference The interferences that can interfere with the operation of this detector are described as follows: Mechanical Interference Revolving Door: The distance between the revolving door and this detector should be 1000 mm. Make sure the door is opened outwards. For two doors, this detector should be installed on one of them, and we advise you to lock the other door. -
Page 6: Performance And Features
Performance and Features The metal detector can be operated through the operating panel. The unit can precisely display the detected metal hidden on the body and the alarm zone can be directly displayed through the LED zone indicators. An audible alarm will simultaneously go off. -
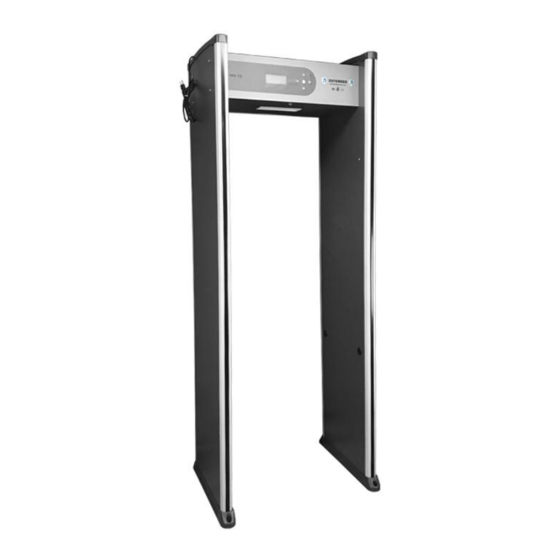
Page 7: Parts
Parts of the Detector 1. Base Unit 2. Alarm Indicator 3. Probe 4. Infra Sensor 5.Water-Proof Feet... -
Page 8: Installation
Installation Please read through the precautions prior to installation, so as to ensure a normal operation of the product and avoid external interference. 1). Unscrew the control panel case and open it. 2). As in figure 2-3, connect the control panel case to left door and right door at the location of the bolt hole openings, tighten the bolts with the provided nuts. -
Page 9: Installation
Panel Interface 1. LCD Display Interface: It displays each parameter during debugging; alarm records and the amount of the pass throughs 2. Up Key: Number adjustment (increase) 3. Down Key: Number adjustment (decrease) 4. Left Key: Menu upward key or cursor left key 5. -
Page 10: Zone Description
Zone Description Alarm Zone Indicator There are 12 groups of zones distributed in the left and right doors. When metal is detected, an LED will light up in the zone that the metal was detected in. Infrared Sensor The infrared sensor can prevent false alarms when no one is passing through. -
Page 11: Display Panel
LCD Display Panel 1. Function main menu: 6 sub menus. Sensitivity: There are 12 zones on the metal detector. The sensitivity for each zone may independently be adjusted in the range of 0-255 with larger numbers for higher sensitivity. The sensitivity for the 12 independent zones will be correspondingly changed while adjusting the integral sensitivity. -
Page 12: Operating Procedure
Operating Procedure 1. Press the ENT key to enter debugging interface, it will ask to enter the password, which is the factory password or the new password for previous operation. 2. Press the ENTER key again: if the password is correct, it will enter the main menu setting (A), otherwise, it will display (B) : 3. -
Page 13: Operating Procedure
6. Select “ALARM” with the “LEFT and RIGHT” keys in “F UNCTION”, and press the ENTER key to enter. Press the “Up and Down” keys to change the alarm time, and press the ENTER key after changing. 7. Select “OCCASION“ with the “LEFT and RIGHT” keys in “FUNCTION ”, and press the ENTER key to enter. -
Page 14: Adjustment Of Article Detection
10. Select “PASSWORD” with the “LEFT and RIGHT” keys in “FUNCTION”. Directly change the cursor position with the “LEFT and RIGHT” keys and enter the new password by adjusting the numeral with the “UP and DOWN” key, then press the ENTER key. -
Page 15: Technical Parameters
Technical Parameters Input Power: AC 220V/50HZ~60HZ Net Weight: 71kg Power: < 20W Working Environment: 0℃~45℃ Alarm: Visible and audible alarm Sensitivity Adjustment: 0~255 grades sensitivity adjustment Alleyway Size: 2000mm×700mm×605mm Overall Size: 2230mm×830mm×730 mm... -
Page 16: Factory Defaults
Factory Defaults Length of Alarm Time: 1 second Sensitivity of Zone 1~12: 230 Total Sensitivity Value: 230 Password: 000000 Package Contents Power cord 8 sets of screws Key for Head Unit Manual...
Need help?
Do you have a question about the MD-12 and is the answer not in the manual?
Questions and answers