
Related Manuals for Metal Defender MD-33


Summary of Contents for Metal Defender MD-33
- Page 1 MD-33 User Manual Contact 772 Twin Rail Drive Minooka, IL 60447 Phone: (815) 467-6464 Email: sales@metaldefender.com Website: www.metaldefender.com...
-
Page 2: Medical Safety
MEDICAL SAFETY Metal Defender makes every effort to ensure its products are safe for use. Extensive research by Metal Defender has produced no information which would indicate that its products have any adverse effects on medical implants, pregnancy, recording media or magnetic strips. - Page 3 Index Medical Safety – pg.2 General Description of MD-33 – pg.5 Installation Environment – pg.6 Functions and Features – pg.7 Parts of the Detector – pg.8 Assembly Instructions – pg.9 Installation Instructions – pg.10 Panel Interface – pg.11 Understanding the Zones – pg.12 Operating Instructions –...
- Page 4 1. Please assemble and deploy on a flat, vibration-free surface in order to avoid false alarms caused by shaking the security gate. 2. Wait 1 minute after you turn on the metal detector in order to get the best detection results.
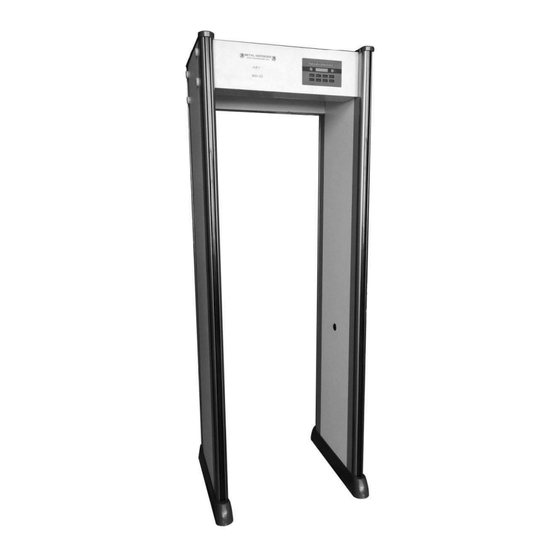
- Page 5 Controls/Displays The MD-33 utilizes backlit Liquid Crystal Displays (LCD’s) and LED bar Displays graphs for continuous on-line operating status and self-diagnostic reporting. All controls and settings are simplified with menu selections and touchpad controls.
-
Page 6: Installation Environment
Installation Environment 1. Large stationary metal items near the installation environment When installing the units, they should be positioned away from stationary or large fixed metal objects 4.5 feet or more; otherwise it will affect the sensitivity of the unit and may cause false alarms. -
Page 7: Functions And Features
8. Harmless: Harmless to heart pacemakers, pregnant women, magnetic floppy disk ect. 9. Weather resistant: Made of PVC composite material, IP55 rated. 10. Easy installation: The system is an integrated design which only takes 20 minutes to complete the installation or removal. 11. ADA compliant: The MD-33 meets ADA standards. - Page 8 Parts of the Detector 1. Main board 2. Panel 3. Built-in infrared sensor probe 4. Infrared sensor 5. Waterproof feet 6. Power socket...
- Page 9 Assembly Instructions...
-
Page 10: Installation Instructions
Installation Instructions 1. Open the packages of the main head unit and 2 panels. 2. Put the main head unit display panel facing down, and the left and right side of the door as the above picture. Connect the left / right door by bolts and nuts. -
Page 11: Panel Interface
Panel Interface 1. Pass number: Counts the number of people that pass through the unit 2. Alarm Times: Counts the number of times the unit detects metal 3. Standby indicator: the security door is in non-alarm-status indication (green). 4. Alarm Indicator: the security door is in alarm status indicator (red). 5. -
Page 12: Understanding The Zones
Understanding the Zones A - Alarm Zone Indicator On the panel door there are 3 vertical zone columns, each containing 11 zones, for a total of 33 zones. Whenever any metal is detected on a patron, the corresponding zone will light up and the audible alert will sound. - Page 13 Operating Instructions 1. The main interface is displayed after boot up: “Pas. 0000 Alm. 000”. 2. Press [PROGRAM] button on the main interface, Enter the password screen and press [∧] button to change number, press [∨] key to switch zones, press [ENTER] key to confirm code.
-
Page 14: Technical Specifications
Technical Specifications Power Supply: 110-240V/50~60HZ Power: <20W Net Weight: 147.7lb Operating environment: -20 ~45 Channel dimensions: 78in (height) × 27 9/16in (width) × 23 13/16in (depth) Dimensions: 88in (height) × 32in (width) × 28in (depth) Package dimensions (door): 90in (length) × 29in (width) × 10 1/4in (height) Package dimensions (main chassis): 30 3/4in (length) ×... - Page 15 What does the signal strength indicator mean? This is how the unit detects metal. This indicates the density and presence of metal. Sometimes if there are any overhead pipes, hvac vents, metal doors, metal cabinets or florescent light fixtures this may trigger this indicator to light up. Ideally you would want to keep 2-3 feet from these items and find a location where this indicator won’t light up continuously.
- Page 16 I set up my unit, but it will not sound when I walk through with metal? Always remember that the control panel with the buttons and LED should always be facing away from the people walking through. Continue with the flowchart and make sure that your alarm time length is not set at y-00.
- Page 17 SUGGESTED SINGLE LANE CONFIGURATION...
- Page 18 SUGGESTED MULTI-LANE CONFIGURATION...
- Page 19 2 YEAR WARRANTY INFORMATION Metal Defender warrants that each piece of security equipment manufactured by Metal Defender is protected by the following limited parts and labor warranty for a period of 24 (twenty-four) months (the “Warranty”). During this 24-month period Metal Defender will inspect and evaluate all equipment returned to its authorized repair station or factory to determine if the equipment meets Metal Defender’s performance specifications.
- Page 20 Replacement Parts Please Call Us Directly For Price: Replacement Legs (815-290-5354) (815-467-6464) Please Call Us Directly For Price: Replacement Head Unit (815-290-5354) (815-467-6464) Speaker $19.99 Zone Card $22.99 Fuse $15.99 Power Supply $34.99 Motherboard $79.99 Power Cords $21.99 Set of Nuts + Bolts $14.99 Battery Back Up $165.00...
Need help?
Do you have a question about the MD-33 and is the answer not in the manual?
Questions and answers