
Related Manuals for Metal Defender MD-6A


Summary of Contents for Metal Defender MD-6A
- Page 1 MD-6A User Manual Contact 772 Twin Rail Drive Minooka, IL 60447 Phone: (815) 467-6464 Email: support@metaldefender.com Website: www.metaldefender.com...
-
Page 2: Medical Safety
MEDICAL SAFETY Metal Defender makes every effort to ensure its products are safe for use. Extensive research by Metal Defender has produced no information which would indicate that its products have any adverse effects on medical implants, pregnancy, recording media or magnetic strips. -
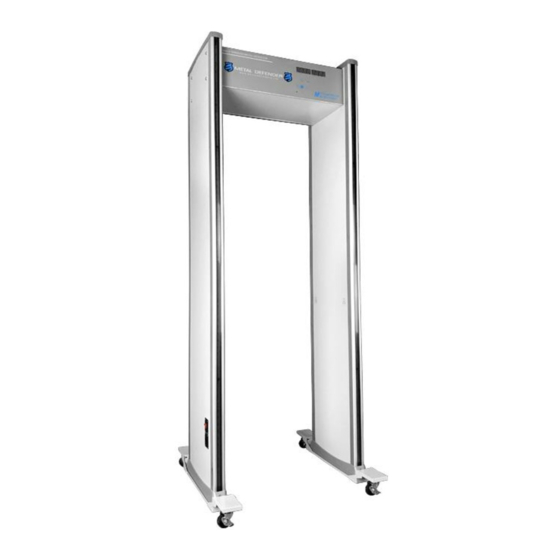
Page 3: Parts Of The Detector
Index Medical Safety – pg.2 Parts of the Detector – pg.3 Technical Specifications – pg.5 Product Description – pg.6 Common Troubleshooting Tips & Tricks – pg.6-7 Interference – pg.8 Install Instructions – pg.9-10 Product Guide – pg.11 Understanding the Zones – pg.12 FAQ –... - Page 4 PLEASE READ THE FOLLOWING INSTRUCTION CAREFULLY BEFORE OPERATON Please follow the corresponding instructions to operate the unit safely and accurately. 1. The unit can be used indoors and outdoors. If used outdoors a canopy must be provided to ensure the unit is kept safe from the elements. 2.
-
Page 5: Technical Specifications
Technical Specifications Metal Defender’s MD-6 Walk-through Metal Detector provides pinpoint accuracy and discrimination features. This detector is effective in all environments including but not limited to airports, government buildings, correctional facilities, and sports venues. While being cost effective it also provides the same security that professionals worldwide receive from other brands. -
Page 6: Product Description
The MD-6A by Metal Defender has 6 individual zones that can all be programmed based on the users desired settings. The sensitivity can be adjusted up or down;... - Page 7 - Make sure there are no heavy metal objects in the near vicinity that can cause interference. - If there are other metal detectors installed nearby ensure that they are on different operating frequencies. - Lastly make sure the unit is installed on a flat vibration free surface. 4.
- Page 8 Interference Frequency and Interference information Electronic Jamming The working frequency for the metal detector is between 4KHz-8KHz. The working frequency should exclude certain electronic objects around the unit such as other units, tv, and radios. Moving metal objects Interference The walk-through metal detector will receive interference based on heavy metal content in the environment.
-
Page 9: Installation Instructions
Installation Instructions 1. Two (2) people are required for the initial setup. 2. Carefully unpack your new walk thru metal detector. 3. On a Flat Clean surface, set the head module on the pad provided. The head unit should be face up with the LED screens facing the ceiling. - Page 10 5. Connect the commutation cables from each leg to the corresponding spot on the motherboard. Next connect the white led strip from each leg to the corresponding spot on the motherboard. Once both of the connectors are secured and fastened in place connect the master power plug to whichever leg you would prefer the power cord to be running from.
-
Page 11: Product Guide
Product Guide Operating the metal detector is extremely simple. A quick overlay of the changeable features are listed below. Password: By default to access the machine settings you will press the enter button and be shown a password entry screen. The password is 800 0000 as to make it easier to access for the customer. -
Page 12: Understanding The Zones
Understanding the Zones A: Alarm Zone Locations – There are 6 unique and precise zones that will monitor and attempt to detect for metal each time somebody walks through. Each zone can be individually programmed for a specific sensitivity. Each individual zone will light up when metal is detected and a beep will sound to alert security as to where the metal is located. - Page 13 What does the signal strength indicator mean? This is how the unit detects metal. This indicates the density and presence of metal. Sometimes if there are any overhead pipes, hvac vents, metal doors, metal cabinets or florescent light fixtures this may trigger this indicator to light up. Ideally you would want to keep 2-3 feet from these items and find a location where this indicator won’t light up continuously.
- Page 14 sure that the correct serial ports inside the head unit are securely fastened in the proper locations. There seems to be a lot of alarm detections occurring, more than we want or expected. Why is this? Before implementing a metal detector into your security, one must have a plan as to how the equipment is going to best work for them.
- Page 15 SUGGESTED SINGLE LANE CONFIGURATION...
- Page 16 SUGGESTED MULTI-LANE CONFIGURAT...
- Page 17 2 YEAR WARRANTY INFORMATION Metal Defender warrants that each piece of security equipment manufactured by Metal Defender is protected by the following limited parts and labor warranty for a period of 24 (twenty-four) months (the “Warranty”). During this 24-month period Metal Defender will inspect and evaluate all equipment returned to its authorized repair station or factory to determine if the equipment meets Metal Defender’s performance specifications.
-
Page 18: Power Supply
Replacement Parts Please Call Us Directly For Price: Replacement Legs (815-290-5354) (815-467-6464) Please Call Us Directly For Price: Replacement Head Unit (815-290-5354) (815-467-6464) Speaker $19.99 Zone Card $22.99 Fuse $15.99 Power Supply $34.99 Motherboard $79.99 Power Cords $21.99 Set of Nuts + Bolts $14.99 Battery Back Up $165.00...
Need help?
Do you have a question about the MD-6A and is the answer not in the manual?
Questions and answers