
Related Manuals for Ventus C6070A


Summary of Contents for Ventus C6070A
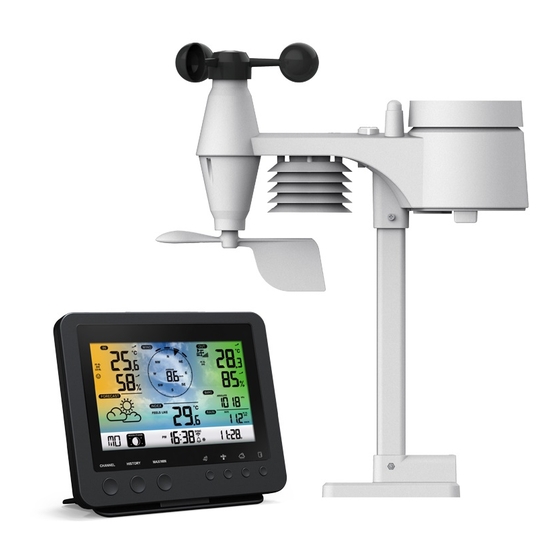
- Page 1 WI-FI color weather station with 5-In-1 professional sensor Model: C6070A User Manual CHANNEL HISTORY MAX/MIN...
-
Page 3: Table Of Contents
TABLE OF CONTENTS INTRODUCTION . . . . . . . . . . . . . . . . . . . . . . . . . . . . . . . . . . . . . . . . . . . . . . OVERVIEW . -
Page 4: Introduction
INTRODUCTION Thank you for selecting Wi-fi weather station with 5-in-1 professional sensor. This system gathers and automatically uploads accurate and detailed weather data to Weather Underground and Weathercloud website - the famous weather service which allows weather observers to upload their local weather data with automated personal weather stations (PWS) - at which you can access and upload your weather data freely. -
Page 5: Lcd Display
1 . Table stand 10 . LCD display 19 . [ °C / °F ] slide switch 2 . [ SNOOZE ] key 11 . [ CLOCK SET ] key 20 . [ BARO UNIT ] key 3 . [ CHANNEL ] key 12 . -
Page 6: Installation And Setup
RAIN GAUGE 1 . Rain collector 2 . Tipping bucket 3 . Rain sensor 4 . Drain holes TEMPERATURE AND HUMIDITY SENSOR 1 . Radiation shield Sensor casing 2 . Temperature and humidity sensor (inside the radiation shield) WIND SENSOR 1 . - Page 7 ASSEMBLY THE STAND AND POLE Step 1 Insert the top side of the pole to the square hole of the weather sensor. NOTE: Ensure the pole and sensor's indicator align. Step 2 Place the nut in the hexagon hole on the sensor, then insert the screw in other side and tighten it by the screw driver.
-
Page 8: Power Up Console
Install the wireless 5-IN-1 sensor in an Add rubber open location with no obstructions above pads before Point to and around the sensor for accurate mount on NORTH rain and wind measurement. Install the pole the sensor with the smaller end facing the North to properly orient the wind direction vane. -
Page 9: Pairing Wireless 5-In-1 Weather Sensor & Console
PAIRING WIRELESS 5-IN-1 WEATHER SENSOR & CONSOLE After insert of batteries, the console will automatically search and connect the wireless 5-IN-1 sensor (the sensor antenna icon blinking). Once the connection is successful, antenna icon and readings for outdoor temperature & humidity, wind speed, wind direction and rainfall will appear on the LCD. - Page 10 3 . Follow their instruction to enter your station information, in the Step 2, enter a name for your weather station, then choose “Other” in “Station Hardware” section. Once you have completed, click “Submit” to create your station ID and key. 4 .
-
Page 11: Create Weathercloud Account
CREATE WEATHERCLOUD ACCOUNT 1 . In https://weathercloud.net enter your information in "Join us today" section, then follow the instructions to create your account . NOTE: Use the valid email address to register your account. 2 . Sign in weathercloud and then you will go the "Devices" page, click "+ New" to create new device. -
Page 12: Setup Wi-Fi Connection
4 . Jot down your ID and key for the further setup step. SETUP WI-FI CONNECTION 1 . When you first power up the console, or press and hold the [ WI-FI / SENSOR ] key for 6 seconds in normal mode, the console LCD will show "AP" and " "... -
Page 13: Setup The Weather Server Connection
SETUP THE WEATHER SERVER CONNECTION Enter the following information into the below web interface "SETUP" page. If you choose not to use Wunderground.com or Weathercloud.net, leave the check boxes unchecked. Press “SETUP” icon Language: English to SETUP page SETUP ADVANCED WiFi Router setup Press to search router Select the Wi-fi router (SSID) you will connect to... -
Page 14: Advance Setting In Web Interface
The time will automatically synchronize Internet time server at 12:00AM and 12:00PM per day. Also you can press the [REFRESH ] key to get the internet time manually within 1 minute. ADVANCE SETTING IN WEB INTERFACE Press "ADVANCED" key at the top of web interface to enter the advance setting page, this page allow you to set and view the calibration data of the console, also you can update the firmware in here (Only available in PC platform). -
Page 15: View Your Weather Data In Weathercloud
You can also use the Apple ipad's "WunderStation" app to login your own weather station to view the live data. WunderStation VIEWING YOUR WEATHER DATA IN WEATHERCLOUD 1 . To view your weather station live data in a web browser (PC or mobile version), please visit https://weathercloud.net and sign in your own account. -
Page 16: Other Setting & Functions Of The Console
FIRMWARE UPDATE STEP 1 . Download the latest version firmware (function or WI-FI) to your PC. 2 . Set the Console into AP (access point) mode then connect the PC to the console (ref to "SETUP WI-FI CONNECTION" section in previous page). 3 . -
Page 17: Moon Phase
MOON PHASE The moon phase is determined by Northern Southern Moon Phase the time, date and time zone. The hemisphere hemisphere following table explains the moon New Moon phase icons of the Northern and Southern hemispheres. Please refer Waxing Crescent to ORIENTING THE 5-IN-1 SENSOR TOWARDS SOUTH section about how to setup for the Southern... -
Page 18: Activating Alarm And Temperature Pre-Alarm Function
ACTIVATING ALARM AND TEMPERATURE PRE-ALARM FUNCTION 1 . In normal mode, press [ ALARM ] key to show the alarm time for 5 seconds. 2 . When the alarm time displays, press [ ALARM ] key again to activate the alarm function. Or press [ ALARM ] key twice to activate the alarm with ice pre-alarm function. -
Page 19: Wireless Sensor Signal Receiving
WIRELESS SENSOR SIGNAL RECEIVING 1 . The console display signal strength for the wireless 5-IN-1 sensor, as per table below: No signal Weak signal Good signal 2 . If the signal has discontinued and does not recover within 15 minutes, the signal icon will disappear. -
Page 20: Weather Forecast
HEAT INDEX The heat index, which is determined by the wireless 5-IN-1 sensor's temperature & humidity data, when the temperature is between 27°C (80°F) and 50°C (120°F). Heat Index range Warning Explanation 27°C to 32°C (80°F to 90°F) Caution Possibility of heat exhaustion 33°C to 40°C (91°F to 105°F) Extreme Caution Possibility of heat dehydration... -
Page 21: Rainfall
TO VIEW THE ABSOLUTE / RELATIVE BAROMETRIC READING In normal mode, press and hold [ BARO ] key to switch between ABSOLUTE / RELATIVE barometric reading. RAINFALL The RAINFALL section shows the rainfall and rain rate information TO SET THE RAINFALL UNIT 1 . -
Page 22: Past 24 Hours History Data
PAST 24 HOURS HISTORY DATA The console automatically stores the weather data of the past 24 hours. 1 . Press [ HISTORY ] key to check the beginning of the current hour's weather data, e.g. the current time is 7:25 am, March 8, the display will show the data of 7:00am, March 8. 2 . -
Page 23: Maintenance
TO SILENCE THE ALERT ALARM Press [ SNOOZE ] key to silence the alert alarm or let the alarm automatically turn off after 2 minutes. NOTE: - Once the alert is triggered, the alarm will sound for 2 minutes and the related alert icon and readings will flash. -
Page 24: Specification
- Do not tamper with the unit’s internal components. This invalidates the warranty. - Placement of this product on certain types of wood may result in damage to its finishing for which manufacturer will not be responsible. Consult the furniture manufacturer’s care instructions for information. - Page 25 Time Related Function Specification Time display HH: MM Hour format 12hr AM / PM or 24 hr Date display DD / MM or MM / DD Time synchronize method Through Internet time server to synchronize the UTC Weekday languages EN / DE / FR / ES / IT / NL / RU Time Zone +13 ~ -12 hour ON / OFF...
-
Page 26: Wireless 5-In-1 Sensor
Display modes Current Memory modes Historical data of past 24 hours, Max / Min Alarm Hi / Lo Humidity Alert Wind Speed & Direction Display and Function Specification Note: The following detail are listed as they are displayed or operate on the console. Wind speed unit mph, m/s, km/h and knots Wind speed display range...
Need help?
Do you have a question about the C6070A and is the answer not in the manual?
Questions and answers
Finns manualen på väderstation C6070A på Svenska?