Advertisement
Quick Links
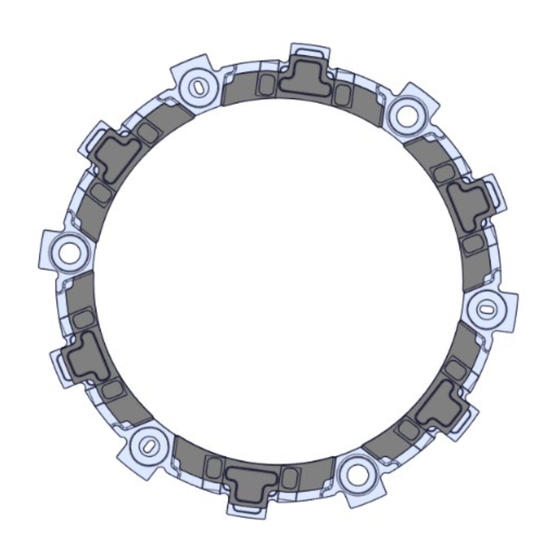
EXP ASSEMBLY INSPECTION
The Rekluse EXP assembly is built using high quality
materials, however, it does experience natural wear and tear
like any clutch component. The amount of wear is based on
the rider's use and type of terrain.
It is important to inspect the EXP assembly at regular
intervals for signs of wear, including the internal ramps and
wedges.
Symptoms of wear may include:
• The clutch either slips or stalls even with Free Play
Gain adjusted correctly
• The clutch excessively drags
• It is difficult to find the proper Free Play Gain
adjustment
INSPECTION SCHEDULE
The EXP assembly should be inspected using the following
schedule. The "Light" inspection range is based on an
average rider's moderate use.
The "Heavy" inspection range is based on riding in extreme
environments or riding conditions.
Bike Model
Dirt / Off-Road
Adventure / Dual
Sport
Street
Doc ID: 193-300A
Revision: 121718
Light
40-50 hours
8,000-15,000 miles
10,000-20,000 miles
1
Clutch Use
20-30 hours
3,000-5,000 miles
5,000-8,000 miles
©2018 Rekluse Motor Sports
Rekluse Motor Sports, Inc.
customerservice@rekluse.com
Heavy
Advertisement

Related Manuals for Rekluse EXP


Summary of Contents for Rekluse EXP
- Page 1 The amount of wear is based on the rider’s use and type of terrain. It is important to inspect the EXP assembly at regular intervals for signs of wear, including the internal ramps and wedges.
- Page 2 Remove the EXP assembly from the bike. Instructions for disassembling the clutch can be found in your installation manual. b. Clean off any debris or oil from the EXP bases with a clean towel. Step 2: Measure the EXP a.
- Page 3 • If all the wedges in the EXP assembly spring back, continue with the next step. • If one or more of the wedges stick, the EXP bases and Teflon pads may need to be replaced. Continue with the next step for further inspection.
- Page 4 A hammered tab is when one of the EXP base tabs has been compressed and is narrower than the other tab. If the EXP tab wear is more than .020” (.5 mm), the EXP assembly needs to be replaced.
- Page 5 If there are any signs of damage, replace the EXP bases. d. Check that all the friction pads on both sides of the EXP assembly are still bonded onto the bases. If any of them are missing, replace the EXP bases.
- Page 6 If the friction pads are glazed, replace the EXP bases. Glazed friction pad f. Inspect both sides of the EXP assembly for signs of discoloration. • Light staining may be caused by the oil and the EXP may still function properly. Light staining Doc ID: 193-300A Revision: 121718...
- Page 7 Step 5: Disassemble the EXP assembly a. Using a flat-blade screwdriver, push the ¼ turn pin in far enough to clear the opposite side of the EXP to unlock the pin. b. With the pin still pushed past the base, turn ¼ of a turn to remove the pin and spring.
- Page 8 Step 6: Inspect the ramps a. Inspect all the ramps that are located inside of both EXP bases. Replace the EXP bases and Teflon pads if there is any evidence of a raised outline on the ramp, or if the ramp has an indentation.
- Page 9 Raised mark (burr) Indentation NOTE: If you replace the EXP bases, it is HIGHLY RECOMMENDED that you replace the Teflon pads or wedges as well for best performance. Doc ID: 193-300A...
- Page 10 • If the Teflon pads are good, continue with the next step. • If the Teflon pads are worn or damaged, the Teflon pads need to be replaced. A kit is available through Rekluse. Doc ID: 193-300A Revision: 121718...
-
Page 11: Need Help
Step 8: Reassemble the EXP bases a. Place all of the wedges onto one of the EXP bases, then place the second base on top of the wedges. Make sure the wedges have all their Teflon pads in place. b. Reinstall 3 of the EXP springs, then reinstall the quarter turn pins.
Need help?
Do you have a question about the EXP and is the answer not in the manual?
Questions and answers