Table of Contents
Advertisement
Available languages
Available languages
Quick Links
Advertisement
Table of Contents

Related Manuals for universalblue UVT1313-21


Summary of Contents for universalblue UVT1313-21
-
Page 2: Table Of Contents
Ventilador de techo Ceiling fan ÍNDICE ESPAÑOL 1. INSTRUCCIONES DE SEGURIDAD ..........3 2. CARACTERÍSTICAS DEL PRODUCTO ..........7 3. MONTAJE E INSTALACIÓN ............8 4. FUNCIONAMIENTO ..............15 5. LIMPIEZA Y MANTENIMIENTO ........... 17 6. INFORMACION INHERENTE MEDIOAMBIENTE ......18 7. -
Page 3: Español
ESPAÑOL Felicidades por haber adquirido este producto. recomendamos dedique algún tiempo leer cuidadosamente este Manual de Instrucciones / Instalación con el fin de hacer un buen uso del mismo. Lea cuidadosamente todas las instrucciones de seguridad antes de utilizar el aparato y conserve este Manual de Instrucciones / Instalación para poder consultarlo en el futuro. - Page 4 • Utilice este ventilador sólo como se describe en este manual. Otro uso no recomendado puede causar fuego, descargas eléctricas o lesiones a las personas. De no ser así se anulará su garantía. • El ventilador debe ser instalado por un electricista o persona cualificada para ello.
- Page 5 insatisfactorio (zumbido del motor) y causar daños al motor. • Este aparato no está diseñado para ser utilizado por personas (incluidos niños) con capacidades físicas, sensoriales o mentales reducidas o con falta de conocimiento, a menos que estén recibiendo supervisión o instrucción relativa al uso del aparato por una persona responsable.
- Page 6 • Para protegerse contra las descargas eléctricas: no sumerja la unidad o el cable en agua ni rocie con líquidos. • Apague el ventilador cuando no se use y antes de desmontarlo limpiarlo. Ensamble completamente el ventilador antes de encenderlo de nuevo.
-
Page 7: Características Del Producto
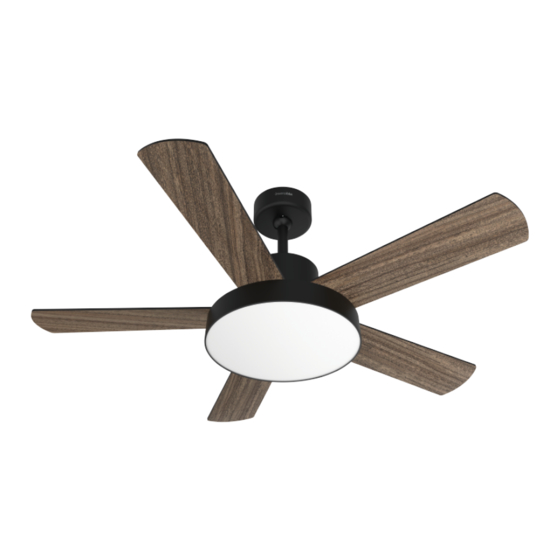
son factores necesarios en la instalación y el funcionamiento de este ventilador. 2. CARACTERÍSTICAS DEL PRODUCTO El contenido del paquete contendrá los siguientes elementos, además de este manual y la garantía del producto. - Page 8 CARACTERÍSTICAS UVT1314-21 Ventilador de techo 5 aspas Dimensión 48”/122cm Potencia máxima: 60 W 5 aspas Material aspas: MDF Con control remoto Con porta lámparas (luces LED de 24W) Con temporizador Con accesorios para facilitar el montaje Con función invierno incluida Color negro Motor DC 6 velocidades...
-
Page 9: Montaje E Instalación
3. MONTAJE E INSTALACIÓN Antes de instalar el aparato asegúrese que el aparato está desenchufado de la corriente eléctrica. Además, desconecte la corriente eléctrica de la instalación de su casa. DÓNDE INSTALAR • Asegúrese que el lugar en el que se vaya a instalar el ventilador sea bastante amplio, ya que esto permitirá... - Page 10 • Solo los ventiladores que llevan varilla de soporte o barra pueden ser instalados en techos inclinados en los que el ángulo de inclinación no supere los 25º. Se ha adquirido un modelo fijo no podrá ser instalado en techos inclinados. Desde el momento que se instale el producto, la alimentación •...
- Page 11 CONEXIÓN DEL MANDO A DISTANCIA L : AC IN 220-240V N : AC IN 220-240V : Amarillo/Verde PASO A PASO Nota: Las imágenes son orientativas y sólo deben ser utilizadas como apoyo a la instalación. 1. Abra la caja de cartón y saque el ventilador (fig. 1). 2.
- Page 12 rosca que había retirado anteriormente y apriete los tornillos del cuerpo del motor (fig. 3) 5. Deslice la cubierta inferior hasta el cuerpo del motor y fíjela con los tornillos. 6. Fije la varilla de soporte al motor utilizando el pasador y la tuerca del mismo.
- Page 14 KIT DE EQUILIBRIO DE ASPAS Junto con el producto adquirido encontrará un kit suministrado para evitar que las aspas se muevan desequilibradas. El ventilador puede tambalearse durante su funcionamiento debido a una irregularidad en las aspas o en el soporte de las mismas. Además, una instalación incorrecta o un ángulo torcido pueden causar algún problema adicional.
-
Page 15: Funcionamiento
Encienda de nuevo el ventilador y observe si la inclinación ha mejorado o empeorado. Apague el ventilador y cambie el clip a otra aspa y compruebe de nuevo. Repita este proceso con todas las aspas y anote con qué aspa la mejora es más notable. - Page 16 Botón : presione este botón • para encender la luz. Si desea cambiar de color de luz presione tantas veces como sea necesario para que se establezca el color deseado. Botón : presione el botón para • el ventilador funcione modo VERANO.
-
Page 17: Limpieza Y Mantenimiento
Nota: Cada control remoto va asociado al receptor incluido junto con el ventilador. Nota: Cuando apaga el ventilador con el mando a distancia se quedará guardada la última configuración de la luz establecida. Por ejemplo, si ha apagado el ventilador está la luz en posición “Cálida”, al encenderlo con el mando se establecerá... -
Page 18: Informacion Inherente Medioambiente
• No intente abrir la unidad sin un electricista autorizado. Instalación incorrecta la unidad puede ser peligrosa. • Limpie la unidad al menos una vez al año. • Si no va a utilizar el ventilador durante algún tiempo, se recomienda quitar las pilas al mando a distancia y guardarlo en un lugar limpio y seco. -
Page 19: Servicio Postventa
este producto, rogamos contacten el servicio local de eliminación de desechos o a la tienda donde compró el aparato. No tirar el embalaje del aparato a la basura sino seleccionar los diversos materiales como poliestireno, cartón, bolsas de plástico, etc. de acuerdo con las normas locales sobre la eliminación de basuras y las normas vigentes. - Page 20 • Para hacer uso de la garantía acuda al centro donde compró este producto o bien contacte con nosotros de cualquiera de las siguientes formas: o A través del email sat@universalblue.es, adjuntando la factura de compra e indicando sus datos de contacto y brevemente qué problema presenta su producto.
- Page 21 El motor de este producto tiene una garantía de 5 años. Puedes descargar este manual en nuestra página web: www.universalblue.es *Universal for Engineering Industries Spain, S.L. se reserva el derecho de hacer cualquier cambio en las especificaciones y características de los productos sin previo aviso, debido a la mejora continua de los productos.
-
Page 22: English
ENGLISH Congratulations on the purchase of your product. We recommend you to spend some time to read this Instruction Manual in order to fully understand how to use it correctly.. Read all the safety instructions carefully before use and keep this Instruction / Installation Manual for future reference. - Page 23 shock or injury to persons. This will also void your warranty. • The fan must be installed by an electrician or a qualified person. • The fan must be connected to a 220-240V power supply. • All electrical work must be carried out after disconnecting the electrical current by turning off the switch.
- Page 24 person. You should check that children do not use the fan as a toy. • The fan cannot be started in a room with a gas appliance running at the same time. • The fan must be turned off and stopped completely before reversing the direction of the fan.
-
Page 25: Product Features
• If the fan is not working properly, contact a qualified technician for examination and repair. Never attempt to dismantle the fan yourself. • To avoid personal injury or damage to the fan and other items, be cautious when working around or cleaning the fan. - Page 26 FEATURES UVT1314-21 5 blades ceiling fan Dimension 48"/122cm Maximum power: 60 W 5 blades Blades’ Material: MDF With remote control...
-
Page 27: Assembly And Installation
With lamp holder (LED light 24W) With timer With accessories for easy assembly With Winter function included Black colour DC motor 6 speeds 3 LED light colours Reversible blades: black and wood FEATURES UVT1315-21 5 blades ceiling fan Dimension 48"/122cm Maximum power: 60 W 5 blades Blades’... - Page 28 WHERE TO INSTALL • Make sure that the place where the fan is going to be installed is quite wide, as this will allow a better air flow and that the fan blades do not come into contact with any object, minimum space of 0.6m on each side.
- Page 29 Our fans are not designed to be installed in plasterboard or false ceiling, as these materials may not support 45kg. Note: Fastening screws (included) are designed for use with the fan and are fastened to wooden beams or concrete ceiling. If the installation is carried out on a different material, it is advisable to use the appropriate fixing screws for that material (these screws are not supplied with this equipment).
- Page 30 STEP BY STEP Note: The images are for guidance only and should be used to support the installation. 1. Open the box and remove the fan (fig. 1). 2. Mount the support plate on the ceiling with the appropriate screws. Make sure it is securely fastened. Caution: The screws supplied are for wooden beams and concrete ceilings.
- Page 31 7. Place the hemisphere of the support rod, tighten it with the screw and connect the electric cable coming from the roof to the screw terminal located at the top of the support rod, tighten the screws. 8. Then hang the fan to the ceiling and make the appropriate cable connections.
- Page 33 BLADE BALANCE KIT Included in the purchased product you will find a kit supplied to prevent the blades from moving unbalanced. The fan may wobble during functioning due to an irregularity in th eblades or blade support. Also, improper installation or an inlcined angle can cause additional problems.
-
Page 34: Using The Appliance
fan to find the position where the clip offers the better improvement. Next, remove the clip and place one of the balance weights on the point where the clip was placed. To do so separate the white sticker with your fingernails or, if necessary, carefully use a knife or scissors. - Page 35 button: Press this button to • set the WINTER mode function. button: Press this button to • turn the fan on and off. • 1 to 6 buttons: Press any of these buttons to set the fan speed, being 1 the lowest speed and 6 the highest.
-
Page 36: Cleaning And Maintenance
on the fan via the remote control the light will be in the same setting. If you turn on the fan via your room’s switch installation, the settings will not be saved and the light will be on the factory default color. -
Page 37: Environmental Information
• This electric product is in accordance with the relevant safety requirements. Repairs should only be carried out by licensed electricians using original spare parts, otherwise this may result in considerable danger to the user. • Please contact the store which you bought the product for after sale services if any. -
Page 38: After-Sales Service
For devices containing batteries or rechargeable batteries, these parts must be removed and disposed of in clearly marked recycling bins. Please go to the nearest recycling bin in your location or common store. Please comply with your legal obligations and contribute protecting our environment. - Page 39 • To make use of the guarantee go to the store where you purchased this product or contact us by: o By email, sat@universalblue.es. Please, attach the invoice, add your contact details and explain briefly what the issue is.
- Page 40 www.universalblue.es...
Need help?
Do you have a question about the UVT1313-21 and is the answer not in the manual?
Questions and answers