
Subscribe to Our Youtube Channel
Related Manuals for Oru Kayak INLET


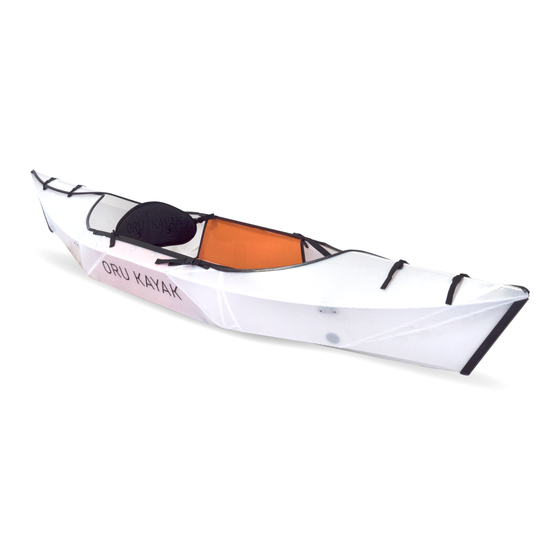
Summary of Contents for Oru Kayak INLET
- Page 1 SCAN AND WATCH ON YOUR PHONE Assembly Guide (Pages 1-10) Disassembly Guide (Pages 11-18) Read this entire Assembly Watch the instruction video: IMPORTANT Guide before assembling www.orukayak.com/inlet your Oru Kayak. INFO@ORUKAYAK.COM...
- Page 2 Attaches to the back half of the kayak. Provides structural rigidity. Seat pad: Tucks under the bungee in the floorboard. Spare parts kit: Extra hardware for repairs and upkeep. © 2020 ORU KAYAK, INC. ALL RIGHTS RESERVED 0116 ORU KAYAK | INLET KAYAK ASSEMBLY GUIDE...
- Page 3 Step 1: Open box The box contains all the components needed for assembly. Unclip the two buckles on the top of the box. WWW.ORUKAYAK.COM...
- Page 4 Loose components For help on this step, reference the assembly video at www.orukayak.com/assembly © 2020 ORU KAYAK, INC. ALL RIGHTS RESERVED 0116 ORU KAYAK | INLET KAYAK ASSEMBLY GUIDE...
- Page 5 Step 2 Step 3: Attach footrest/insert bulkheads Make sure the hull folds are STERN pushed out completely. (from V E L C p i t > step 2) C o c k Connect the footrest bungee to the orange para-cord at the bow of the kayak.
- Page 6 Connect the Velcro to the bulkhead. Wrap the front fairing over bow, and mate the two halves of the Velcro. CROSS-SECTION VIEW © 2020 ORU KAYAK, INC. ALL RIGHTS RESERVED 0116 ORU KAYAK | INLET KAYAK ASSEMBLY GUIDE...
- Page 7 Step 2 Step 4b: Close back deck Just like the front, place the flap with the curved edge over the flap with the straight edge, as shown. ( You may have to hold the bulkhead while starting the next Connect the cockpit side release step.) buckle.
- Page 8 Pull back the plate on the floorboard. Insert the backrest column. Release to Slide the seat pad under the bungee on lock column in place. the floorboard. © 2020 ORU KAYAK, INC. ALL RIGHTS RESERVED 0116 ORU KAYAK | INLET KAYAK ASSEMBLY GUIDE...
- Page 9 Step 6: Connect buckles and tension strap Connect the female footrest buckles to the closest male straps on the sides of the floorboard. Repeat for the seat straps, connecting the female buckles on the seat to the male buckles on the floorboard. Connect the tension strap together and tighten until the buckle reaches the stop in the strap.
- Page 10 Your Oru Inlet is ready for the from you, tighten or loosen adjustable water. straps. WARNING Do NOT attempt to carry the assembled kayak loaded with gear. Carry gear separately. © 2020 ORU KAYAK, INC. ALL RIGHTS RESERVED 0116 ORU KAYAK | INLET KAYAK ASSEMBLY GUIDE...
- Page 11 Some water may collect inside the plastic corrugated flutes. To let it drain, stand the assembled kayak vertically for about 10 minutes. Read this entire Disassembly INCORRECT DISASSEMBLY IMPORTANT Guide before disassembling CAN LEAD TO A DAMAGED your Oru Kayak. PRODUCT. INFO@ORUKAYAK.COM WWW.ORUKAYAK.COM...
- Page 12 © 2020 ORU KAYAK, INC. ALL RIGHTS RESERVED 0116 ORU KAYAK | INLET KAYAK ASSEMBLY GUIDE...
- Page 13 WWW.ORUKAYAK.COM Moving from bow to stern, unbuckle and loosen all side-release buckles and undo fairings. Unbuckle the seat and unhook the footrest, removing the seat back, seat pad, footrest, and bulkheads. IMPORTANT! REMOVE LOOSE PARTS AND SET ASIDE UNTIL STEP 4. Step 1: Unclip buckles/remove parts...
- Page 14 © 2020 ORU KAYAK, INC. ALL RIGHTS RESERVED 0116 ORU KAYAK | INLET KAYAK ASSEMBLY GUIDE Fold the back end of the kayak in towards Push the floorboard. (Note: front and back are indicated on the floorboard.) Holding the edge of the kayak with one hand, push down along the fold line printed on the kayak to pop in the fold.
- Page 15 WWW.ORUKAYAK.COM Fold the front end of the kayak in Hold towards the floorboard. Holding the edge of the kayak with one hand, push down along the fold line Push printed on the kayak to pop in the fold. Repeat along the other side, pushing on the printed fold line.
- Page 16 © 2020 ORU KAYAK, INC. ALL RIGHTS RESERVED 0116 ORU KAYAK | INLET KAYAK ASSEMBLY GUIDE DO NOT CLOSE THE BOX UNTIL STEP 5. Locate the icons on your floorboard. Step 4: Insert loose parts...
- Page 17 WWW.ORUKAYAK.COM Place each part in the corresponding Parts should not overlap when location, between the floorboard being put into the kayak. (orange) and the white skin. Repeat for all four parts. Step 4: Insert loose parts...
- Page 18 © 2020 ORU KAYAK, INC. ALL RIGHTS RESERVED 0116 ORU KAYAK | INLET KAYAK ASSEMBLY GUIDE Close the kayak and fully tighten the box closure straps. You may put the kayak on its side and use some body pressure to help you close the box.
- Page 19 WE ARE WWW.ORUKAYAK.COM HERE TO HELP For product or assembly questions contact us: info@orukayak.com (415) 630-3717...
Need help?
Do you have a question about the INLET and is the answer not in the manual?
Questions and answers