Oru Kayak COAST XT Assembly Manual
Hide thumbs
Also See for COAST XT:
- Assembly manual (16 pages) ,
- Owner's manual (16 pages) ,
- Assembly and disassembly manual (20 pages)
Advertisement
Quick Links
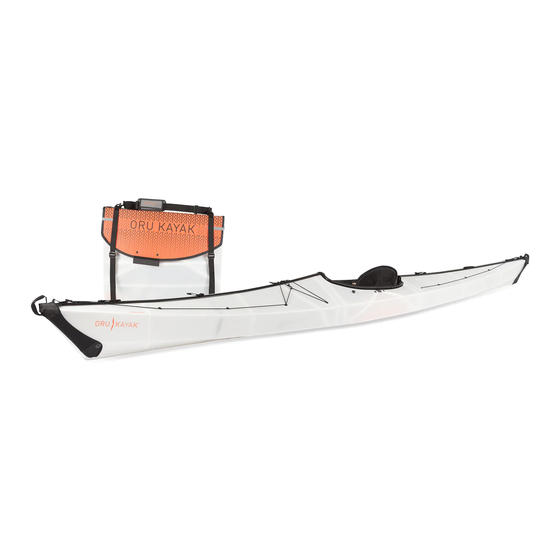
COAST
The
ASSEMBLY GUIDE
Deck
buckles
STERN
(back)
Handle
Stern
fairing
Bulkhead
US PATENT NO. 8,316,788
For your first assembly, avoid common mistakes by reading this Assembly Guide or watching
the assembly video at www.orukayak.com/assembly
XT
Seam
Backrest
Cockpit
channels
handles
Cockpit
Bulkhead
Seat
Coaming
Deck
Thigh
pad
(cockpit rim)
bungee
braces
PMS 1665
c=0
m=68
y=100
k=0
r=243
g=115
b=33
Handle
Bulkhead
fairing
BOW
(front)
Bow
Advertisement

Related Manuals for Oru Kayak COAST XT


Summary of Contents for Oru Kayak COAST XT
- Page 1 COAST ASSEMBLY GUIDE Deck Seam Backrest Cockpit Seat Coaming Deck PMS 1665 Thigh buckles channels handles (cockpit rim) bungee m=68 braces y=100 r=243 g=115 b=33 STERN (back) (front) Handle Handle Cockpit Stern fairing Bulkhead Bulkhead Bulkhead fairing US PATENT NO. 8,316,788 For your first assembly, avoid common mistakes by reading this Assembly Guide or watching the assembly video at www.orukayak.com/assembly...
-
Page 2: How To Get Started
Oru Coast XT is designed to be simple and intuitive to assemble. With a bit of practice, the Coast XT can be put together in ten minutes PLEASE NOTE but the first time will take longer, as you learn the process and the Your first time assembling may take folds break in. - Page 3 Step 1: Open the Oru Kayak box The box contains all the components needed for assembly. Loosen and slide the shoulder strap off the sides of the box. You won’t use it while kayaking, but you will need it when you fold the Oru Kayak back into box form.
- Page 4 Loose seam channels (4): Stern bulkhead (small): shock cord in the floorboard. Help seal the deck seam. Provides structural rigidity in the kayak’s stern (back). BACKREST SEAT PAD SEAM COCKPIT STERN MAINTENANCE SHOULDER CHANNELS BULKHEAD BULKHEAD STRAP ORU KAYAK | ASSEMBLY GUIDE...
- Page 5 Step 2: Unfold the box NOTE: Removable orange stickers will Hold the two folds at the help guide you through orange stickers. Pull as your first assembly. indicated in the illustration (at left) to open. Push the ends apart to extend the box into a long sheet.
- Page 6 The box becomes the hull and deck of the kayak. Several key parts are permanently Parts: hull/deck attached to the hull/deck. The bow (front) and stern (back) of the Oru Kayak are different, so pay attention to orientation throughout the assembly process.
- Page 7 The box lid becomes the floorboard. The floorboard is a crucial part of Parts: floorboard the Oru Kayak assembly: it locks into the cockpit at the coaming, adding structure, and holds the seat pad and backrest. Handles: Lock into coaming and provide support when entering or exiting the kayak.
- Page 8 NOTE way during the next steps The buckles with the orange stiching are used for the seat NOT the footrest. CLOSE UP Connect the buckles on both sides of the cockpit. (front) ORU KAYAK | ASSEMBLY GUIDE...
- Page 9 You will use these in Step 10. NOTE The end strap will tighten over the strap NEED HELP WITH THIS STEP? openings on the GO TO ORUKAYAK.COM/BLOGS/TIPSANDTRICKS bow and stern. WWW.ORUKAYAK.COM ORU KAYAK | ASSEMBLY GUIDE...
- Page 10 Repeat with second seam channel channel. Repeat at the stern of the kayak with third and loose fourth seam channels. seam channel space permanently seam attached seam channel channel CLOSE UP The seam channels attach end-to-end as shown. ORU KAYAK | ASSEMBLY GUIDE...
- Page 11 Step 6: Close the cockpit STERN This step puts the kayak into its basic shape. CLOSE UP Slide the keyhole over farthest shiny screw. Rotate the front cockpit rib front to slide the keyhole over cockpit the farthest shiny screw. (Close Don’t worry about the other screws yet.
- Page 12 NOTE See close up. Handle goes into groove on the coaming. Rotate the cockpit handle to lock into the coaming, as NEED HELP WITH THIS STEP? shown. GO TO WWW.ORUKAYAK.COM/TIPS-AND-TRICKS ORU KAYAK | ASSEMBLY GUIDE...
- Page 13 Step 8: Close the front of the kayak Line up the shiny screws with the slots in the front STERN cockpit rib. Tighten the first deck strap, sliding the shiny screws all the way into the slots in the front front cockpit rib.
- Page 14 Clip and tighten the rear deck buckles, as in Step 8, starting at the stern. Clip the buckle on each side of the backrest into the straps on the coaming. NEED HELP WITH THIS STEP? GO TO WWW.ORUKAYAK.COM/TIPS-AND-TRICKS ORU KAYAK | ASSEMBLY GUIDE...
- Page 15 Step 10: Add the finishing touches STERN Using the foam block attached to the end straps, plug the bow and stern of the kayak. Stretch the neoprene fairings over the Stretch the bungee across bow and stern and clip the buckles the deck in front of the to the first deck buckles at each end.
-
Page 16: Assembly Checklist
Congratulations! The coaming fits a Your Oru Kayak is standard spray skirt (size: medium) if desired. ready for the water. ORU KAYAK | ASSEMBLY GUIDE... - Page 17 Back on land: Folding your Oru Kayak into its box Disassembling the Oru Kayak is basically a simple reversal of the assembly. However, there are a few tricks. Follow these directions to learn how to pack your Oru Kayak back into its box quickly and easily.
- Page 18 Once you’ve removed all the detachable parts, note that there are two asymmetrical diagonal creases in the unfolded Oru Kayak hull (see dotted lines, at right). Note the black and orange arrows and targets on the hull. You’ll use these to guide the next step, in which you will fold the bow and Remove the floorboard by lifting up in stern of the Oru Kayak inward—like an accordion.
- Page 19 With all loose components removed, fold Fold second fold inward, compressing the Tip: The deck line one end inward as shown. Push down to folds like an accordion. invert that section into a V. will NOT be tensioned when these folds are done correctly.
- Page 20 • In case of serious damage or punctures, email us at Place and tighten the shoulder strap loops All packed up and ready to go! service@orukayak.com. over the box as shown. 1015 © 2015 ORU KAYAK, INC. ALL RIGHTS RESERVED...
Need help?
Do you have a question about the COAST XT and is the answer not in the manual?
Questions and answers