Advertisement
Quick Links
BAY+
The
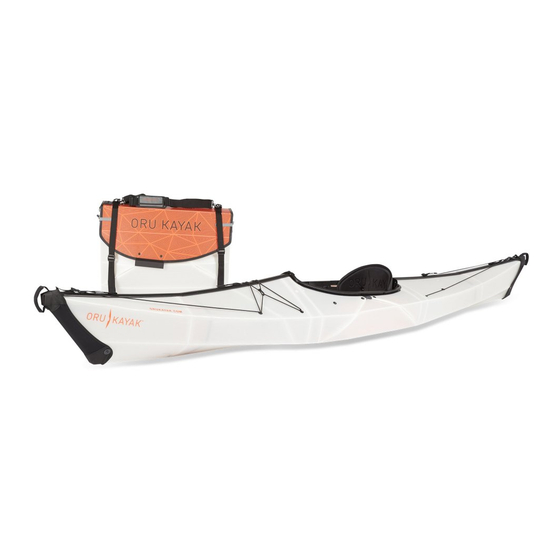
ASSEMBLY GUIDE
Ratchet
buckles
STERN
(back)
Handle
Stern
fairing
Bulkhead
US PATENT NO. 8,316,788
For your first assembly, avoid common mistakes by reading this Assembly Guide or
watching the assembly video at www.orukayak.com/assembly
Seam
Deck
Adjustable
channels
hatch
ergonomic
backrest
Cockpit
Seat
Coaming
handles
pad
(cockpit rim)
Cockpit
Deck
PMS 1665
c=0
m=68
straps
y=100
k=0
r=243
g=115
b=33
Bulkhead
BOW
(front)
Handle
Bow
fairing
Advertisement

Related Manuals for Oru Kayak BAY+


Summary of Contents for Oru Kayak BAY+
- Page 1 BAY+ ASSEMBLY GUIDE Ratchet Seam Deck Adjustable Cockpit Seat Coaming Deck PMS 1665 m=68 buckles channels hatch ergonomic handles (cockpit rim) straps y=100 backrest r=243 g=115 b=33 STERN (back) (front) Handle Handle Cockpit Stern fairing Bulkhead Bulkhead fairing US PATENT NO. 8,316,788 For your first assembly, avoid common mistakes by reading this Assembly Guide or watching the assembly video at www.orukayak.com/assembly...
-
Page 2: How To Get Started
Oru Kayak is designed to www.orukayak.com/tips-and-tricks be simple and intuitive to assemble. With a bit of practice, your Oru Kayak can be put together in five PLEASE NOTE minutes—but the first time will take longer, as you learn the pro- Your first time assembling may cess and the folds break in. - Page 3 Step 1: Open the Oru Kayak box The box contains all the components needed for assembly, and includes space to store gear—such as a personal flotation device (PFD) and a 4-piece paddle. Loosen and slide the shoulder strap off the sides of the box.
- Page 4 Seam channels (2): Help backrest: Combines extra gear on the seal the deck seam. adjustable back support kayak deck. and structural rigidity. SEAT PAD 2 SEAM STERN BACKREST 2 DECK SPARE SHOULDER CHANNELS BULKHEAD STRAPS PARTS STRAP ORU KAYAK | ASSEMBLY GUIDE...
- Page 5 Step 2: Open and unfold the box The buckles that close the side of the kayak box become the deck buckles closest to the cockpit on the kayak. They rotate into two different positions, and have two different straps. In this step you will open the buckles and release the short strap, then open the box. Open ratchet buckles on either side of box, by short strap...
- Page 6 The box becomes the hull and deck of the kayak. Several key parts are permanently Parts: hull/deck attached to the hull/deck. The bow (front) and stern (back) of the Oru Kayak are different, so pay attention to orientation throughout the assembly process.
- Page 7 The box lid becomes the floorboard. The floorboard is a crucial part Parts: floorboard of the Oru Kayak assembly: it locks into the cockpit at the coaming, adding structure, and holds the seat pad and backrest. Handles: Lock into coaming and provide support when entering or exiting the kayak.
- Page 8 There should be no gap between the two seam channels. (See close up.) Repeat at the stern. space seam channel loose seam channel permanently attached seam channel ORU KAYAK | ASSEMBLY GUIDE...
- Page 9 Step 4: Insert bulkheads Bow and stern bulkheads provide the Oru Kayak with structural rigidity. They do STERN not provide flotation. For extra buoyancy, place Oru Float Bags (not included, but available from Oru Kayak) between the bulkheads and the bow and stern.
- Page 10 Don’t worry about the other screws yet. front cockpit CLOSE UP Slide the NEED HELP WITH THIS STEP? keyhole over GO TO WWW.ORUKAYAK.COM/TIPS-AND-TRICKS farthest shiny screw. ORU KAYAK | ASSEMBLY GUIDE...
- Page 11 Step 6: Insert the floorboard The floorboard adds structure to the cockpit area. The handles rotate and clip onto the coaming (cockpit rim) to hold the floorboard in place. Fold the floorboard into a U-shape, and insert it into the cockpit. Now rotate the handles Fold the floorboard Flex the middle of the...
- Page 12 3). See close up. Push downward on the Close front coaming latch. seam channel while long strap tightening each strap to with finger make it easier. loop front coaming latch front cockpit ORU KAYAK | ASSEMBLY GUIDE...
- Page 13 Step 8: Close the back of the kayak Closing the back of the kayak is similar to closing the front (steps 7-8). You’ll install the backrest column STERN which supports the rear cockpit area. Slide the backrest column CLOSE UP How to lock the back- into the slotted backrest rest column into the...
- Page 14 Step 9: Add the finishing touches STERN Just a few more things to get your Oru Kayak ready for the water! Tighten straps at bow and stern, sealing ends with the foam blocks. Stretch the neoprene fairings over the bow and...
- Page 15 Storing items in your kayak Now that your kayak is built, you have two ways to store items you want to bring with you while paddling. UNDER THE RUBBER DECK STRAPS: STERN Stash water bottles, spare CLOSE UP paddles, and other larger Using the gear under the rubber deck hatch.
-
Page 16: Final Adjustments
Deck hatch is tight. below the kayak deck, in front of the cockpit han- Congratulations! Your dles. The footrest should keep your legs comfort- Bay+ is ready for the ably bent, with your knees water. splayed outward. ORU KAYAK | ASSEMBLY GUIDE... - Page 17 Back on land: Folding your Oru Kayak into its box Disassembling the Oru Kayak is basically a simple reversal of the assembly. However, there are a few tricks. Follow these directions to learn how to pack your Oru Kayak back into its box quickly and easily.
- Page 18 You’ll use these to guide the next step, in which you will fold the bow BLACK and stern of the Oru Kayak inward—like an TARGET ORANGE accordion. ARROW...
- Page 19 Hook the bulkhead keeper to the Fold one end inward as shown, Unlatch the front and back of the cockpit, D-ring, as it was when you received compressing it like an accordion and remove the floorboard. You’ve now your kayak. (you can start with the bow or stern).
- Page 20 Place and tighten the shoulder strap All packed up and ready to go! • In case of serious damage or loops over the box as shown . punctures, email us at service@orukayak.com. 0815 © 2015 ORU KAYAK, INC. ALL RIGHTS RESERVED...
Need help?
Do you have a question about the BAY+ and is the answer not in the manual?
Questions and answers