Oru Kayak BAY ST Assembly Manual
Hide thumbs
Also See for BAY ST:
- Assembly manual (21 pages) ,
- Owner's manual (16 pages) ,
- Assembly and disassembly manual (20 pages)
Advertisement
Quick Links
THE BAY ST
Assembly Guide
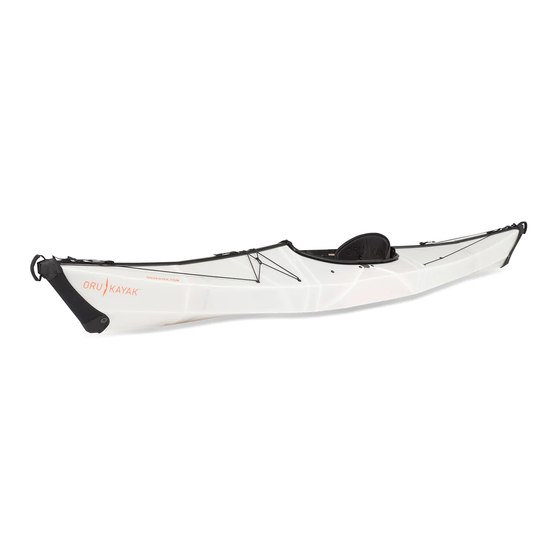
BOW
(front)
Handle
Bow
fairing
US PATENT NO. 8,316,788
HOW TO GET
Read this entire Assembly Guide
STARTED
before assembling your Oru Kayak.
Coaming
(cockpit rim)
Deck
line
Deck
web
Bow bulkhead
Watch the instruction video:
www.orukayak.com/pages/assembly
Seat
pad
Seat
back
Cockpit
Cockpit
handles
WE'RE HERE TO HELP!
If you have questions, email us at service@orukayak.com
Be patient! With practice your
assembly time will get to 10 minutes.
Handle
Zipper
channel
STERN
Stern
fairing
Stern bulkhead
(back)
Advertisement

Related Manuals for Oru Kayak BAY ST


Summary of Contents for Oru Kayak BAY ST
- Page 1 If you have questions, email us at service@orukayak.com US PATENT NO. 8,316,788 HOW TO GET Read this entire Assembly Guide Watch the instruction video: Be patient! With practice your STARTED before assembling your Oru Kayak. www.orukayak.com/pages/assembly assembly time will get to 10 minutes.
- Page 2 Step 1: Open the Oru Kayak box The box contains all the components needed for assembly and includes space to store gear—such as float bags and our 4-piece paddle. Loosen and slide the shoulder strap off the sides of the box.
- Page 3 Parts: Loose components Shoulder strap: Used to carry Stern (back) bulkhead: Seat pad: Tucks under the the kayak when in box form. Stow Provides structural rigidity. bungee in the floorboard. behind the backrest while kayaking. Zipper channels: These seal Backrest: Combines back Spare parts kit: Extra the deck seam.
- Page 4 Pop the hull flat with your hands as you extend it, pushing down the inverted folds, creating a bowl shape. PROFILE VIEW PUSH DOWN SIDES POP UP TO CREATE BOWL SHAPE ORU KAYAK | ASSEMBLY GUIDE...
- Page 5 The box becomes the hull and deck of the kayak. Several key parts are permanently Parts: Hull/deck attached to the hull/deck. The bow (front) and stern (back) of the Oru Kayak are different, so pay attention to orientation throughout the assembly process.
- Page 6 The box lid becomes the floorboard. The floorboard is a crucial part of Parts: Floorboard the Oru Kayak assembly; it locks into the cockpit at the coaming, adding structure, and holds the seat pad and backrest. Cockpit handles: Lock into coaming and provide support when entering or exiting the kayak.
- Page 7 Step 3: Insert the floorboard The floorboard adds structure to the cockpit area. The floorboard handles lock into the coaming SEE THIS IN MOTION IN THE ASSEMBLY VIDEO: (this is around the rim of the cockpit) to hold the floorboard in place. www.orukayak.com/pages/assembly Ensure that the floorboard backrest plate is Prop the kayak on its side, and...
- Page 8 (see close up). CLOSEUP Connect the buckles on both sides of the cockpit. NOTE The back buckles are used for the backrest NOT the footrest. (front) ORU KAYAK | ASSEMBLY GUIDE...
- Page 9 Step 5: Tighten end straps/insert bulkheads The end straps help seal the bow and stern while the bulkheads provide rigidity to the hull. STERN (back) foam plug strap Make sure the ends of the bow and stern are inverted. Tighten the bow and stern using the end straps (see note).
- Page 10 Apply downward pressure and push forward with your Finish closing the front hands while sliding coaming latch as shown in the zippers. after the upper close-up D . zipper (front) ORU KAYAK | ASSEMBLY GUIDE...
- Page 11 Step 7: Attach rear seat column Closing the back of the kayak is STERN similar to closing the front (step 5). (back) CLOSEUP You’ll install the backrest column, which How the backrest supports the rear cockpit area. DO NOT CLOSE column will look once LATCH YET this step is complete.
- Page 12 CLOSEUP Close the rear latch Close the rear coaming latch behind the seat behind the seat column. column. Make sure BOTH screws are (front) still inside the slots. ORU KAYAK | ASSEMBLY GUIDE...
- Page 13 Step 9: Tighten the tension strap Tightening the tension strap provides additional rigidity to the hull of the kayak. The tension strap is located inside the hull underneath the bow coaming latch. UNDER DECK Fasten the hook onto the strap loop. Make sure the strap is incorrect tight (see diagrams).
- Page 14 Step 10: Add the finishing touches STERN Just a few more things to get your Oru Kayak ready for the water! (back) Stretch the bungee across the deck in front of the Using the foam block attached to the cockpit (standard positions end straps, plug the bow and stern of shown.
-
Page 15: Final Adjustments
Stash water bottles, spare paddles, and other accessories under the bungee deck web. Congratulations! (front) Your Oru Kayak is The coaming fits the Oru ready for the water. Kayak spray skirt and all standard spray skirts (size medium), if desired. - Page 16 Disassembling the Oru Kayak is basically a reversal of the assembly; however there are a few tricks. Follow these directions to learn how to pack your Oru Kayak back into its box quickly and easily. Unclip the fairings and FULLY loosen Open the coaming latch.
Need help?
Do you have a question about the BAY ST and is the answer not in the manual?
Questions and answers