Table of Contents
Advertisement
Quick Links
Advertisement
Table of Contents

Subscribe to Our Youtube Channel
Related Manuals for JUNO JH070A2


Summary of Contents for JUNO JH070A2
- Page 1 User Manual Oven JH070A2...
-
Page 2: Table Of Contents
Subject to change without notice. VISIT OUR WEBSITE TO: Get usage advice, brochures, trouble shooter, service and repair information: www.juno.de/support SAFETY INFORMATION Before the installation and use of the appliance, carefully read the supplied instructions. The manufacturer is not responsible for any injuries or damage that are the result of incorrect installation or usage. - Page 3 WARNING: Keep children and pets away from the • appliance when it operates or when it cools down. Accessible parts become hot during use. If the appliance has a child safety device, it should be • activated. Children shall not carry out cleaning and user maintenance •...
-
Page 4: Safety Instructions
Do not use harsh abrasive cleaners or sharp metal • scrapers to clean the glass door since they can scratch the surface, which may result in shattering of the glass. SAFETY INSTRUCTIONS Installation Width of the front of 594 mm WARNING! Only a qualified the appliance person must install this... - Page 5 • Make sure not to cause damage to the mains plug and to the mains cable. Connecting to terminal board Should the mains cable need to be The appliance has a six-pole terminal replaced, this must be carried out by board.
- Page 6 – do not put aluminium foil directly on the bottom of cavity of the Total power (W) Section of the ca‐ appliance. ble (mm²) – do not put water directly into the hot 3 phases: 5 x 2.5 appliance. – do not keep moist dishes and food maximum 10380 2 phases: 4 x 4.0 in the appliance after you finish the...
-
Page 7: Installation
• Concerning the lamp(s) inside this • Use original spare parts only. product and spare part lamps sold Disposal separately: These lamps are intended to withstand extreme physical WARNING! Risk of injury or conditions in household appliances, suffocation. such as temperature, vibration, humidity, or are intended to signal •... -
Page 8: Product Description
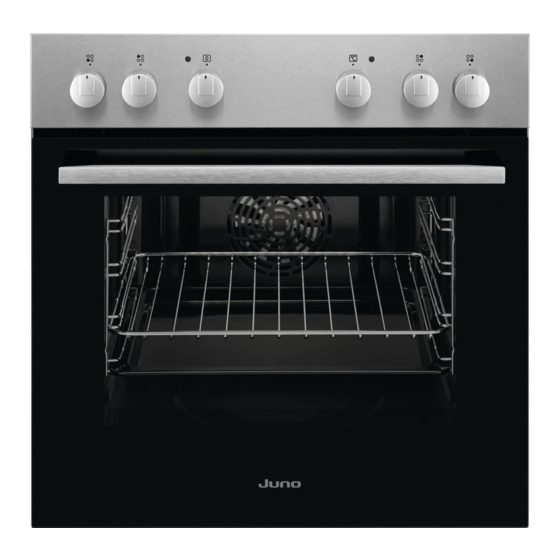
PRODUCT DESCRIPTION General overview Control panel Knobs for the hob Power lamp / symbol Knob for the heating functions Control knob (for the temperature) Temperature indicator / symbol Air vents for the cooling fan Heating element Lamp Cavity embossment - Aqua cleaning container Shelf support, removable Shelf positions... -
Page 9: Before First Use
BEFORE FIRST USE WARNING! Refer to Safety chapters. Before first use The oven can emit an odour and smoke during preheating. Make sure that the room is ventilated. Step 1 Step 2 Clean the oven Preheat the empty oven 1. Remove all accessories and removable 1. -
Page 10: Using The Accessories
Heating Application Heating Application function function To bake cakes with crispy This function is designed to bottom and to preserve food. save energy during cooking. When you use this function, Bottom Moist Fan the temperature in the cavity Heat Baking may differ from the set tem‐... -
Page 11: Additional Functions
Wire shelf: Push the shelf between the guide bars of the shelf support and make sure that the feet point down. Baking tray: Push the tray between the guide bars of the shelf support. Wire shelf, Baking tray: Push the tray between the guide bars of the shelf support and the wire shelf on the guide bars above. -
Page 12: Hints And Tips
HINTS AND TIPS If you use two baking trays at the same Refer to Safety chapters. time, keep one empty level between them. Cooking meat and fish Leave the meat for approximately 15 Cooking recommendations minutes before carving so that the juice The oven has four shelf positions. - Page 13 (°C) (min) Sweet rolls, 12 baking tray or dripping 35 - 40 pieces Rolls, 9 pieces baking tray or dripping 35 - 40 Pizza, frozen, wire shelf 35 - 40 0.35 kg Swiss roll baking tray or dripping 30 - 40 Brownie baking tray or dripping 30 - 40...
- Page 14 (°C) (min) Tartlets, 8 pieces baking tray or dripping 20 - 30 Vegetables, baking tray or dripping 35 - 40 poached, 0.4 kg Vegetarian ome‐ pizza pan on wire shelf 30 - 45 lette Mediterranean baking tray or dripping 35 - 40 vegetables, 0.7 Information for test institutes Tests according to IEC 60350-1.
-
Page 15: Care And Cleaning
(°C) (min) Beef Grill Wire max. 20 - 30 Put the wire burger, shelf shelf on the third level and the pieces, dripping dripping pan on 0.6 kg the second level of the oven. Turn the food halfway through the cooking time. - Page 16 How to remove: Shelf supports Remove the shelf supports to clean the oven. Step 1 Turn off the oven and wait un‐ til it is cold. Step 2 Pull the front of the shelf sup‐ port away from the side wall. Step 3 Pull the rear end of the shelf support away from the side...
- Page 17 Step 3 Close the oven door halfway Step 4 Put the door on a soft cloth on to the first opening position. a stable surface and release Then lift and pull forward and the locking system to remove remove the door from its seat. the internal glass panel.
-
Page 18: Troubleshooting
How to replace: Lamp WARNING! Risk of electric shock. The lamp can be hot. Before you replace the lamp: Step 1 Step 2 Step 3 Turn off the oven. Wait until Disconnect the oven from Put a cloth on the bottom of the oven is cold. -
Page 19: Energy Efficiency
Serial number (S.N.) ......... ENERGY EFFICIENCY Product Information and Product Information Sheet* Supplier's name Juno Model identification JH070A2 944068073 Energy Efficiency Index 95.1 Energy efficiency class Energy consumption with a standard load, conventional 0.89 kWh/cycle mode Energy consumption with a standard load, fan-forced 0.78 kWh/cycle... -
Page 20: Environmental Concerns
Residual heat Keep food warm When the cooking duration is longer than Choose the lowest possible temperature 30 min, reduce the oven temperature to setting to use residual heat and keep a minimum 3 - 10 min before the end of meal warm. - Page 24 867360957-A-282021...
Need help?
Do you have a question about the JH070A2 and is the answer not in the manual?
Questions and answers