Advertisement
Quick Links
112
C I S T E R N S
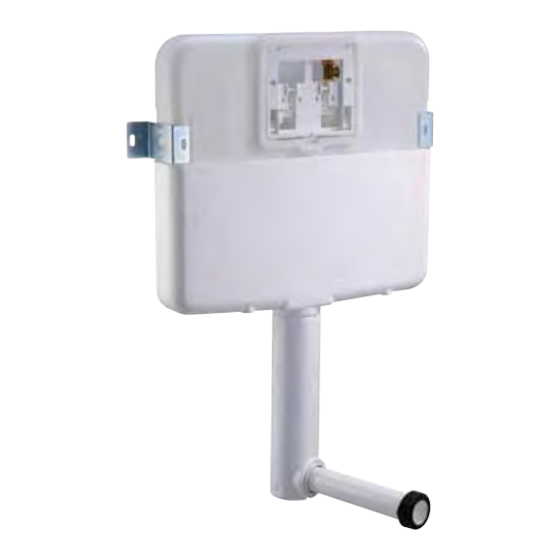
S C C 8 0
DE SC R IP TI O n
◗ For ground or suspended pans
◗ Masonry recessed inside wall
◗ Masonry mesh
◗ Low level installation
◗ Back or front wall fixing
◗ Mechanical double or simple flush front commands,
see choice page XX
◗ Cistern made from PEHD
◗ Cistern maximum water volume 7,2l
◗ Outer PSE insulation
◗ Adjustable double flush flush valve, 3l./6l. factory preset.
◗ Adjustable noiseless float valve
, 6l. factory preset
◗ Stop cock
◗ Inner or outer water connexion
◗ 3/8th" M or 1/2" M water connexion
◗ Height adjustable insulated supply bent
◗ Supply sleeve with pan seal
back fixing
Front fixing
I
II
I
II
III
I = 100 mm min.
I = 50 mm min.
II = 15
45 mm min.
II = 100 mm min.
III = 10
40 mm min.
Packing
Palette
Packing
Quantity
Nb
M
kg
3
SCC 80
Carton
1
-
SU PP LE m E n T S :
Command
(See page 54)
Download products information from www.siamp.com
Advertisement

Subscribe to Our Youtube Channel
Related Manuals for Siamp SCC 80


Summary of Contents for Siamp SCC 80
- Page 1 45 mm min. II = 100 mm min. III = 10 40 mm min. Packing Palette Packing Quantity SCC 80 Carton SU PP LE m E n T S : Command (See page 54) Download products information from www.siamp.com...
- Page 2 CONCEALED CISTERN INTEGRA ASSEMBLY AND MAINTENANCE MANUAL...
- Page 3 DESCRIPTION...
-
Page 4: Tools Required
2 / The internal stop valve should be regularly turned off and on to ensure that it remains serviceable. Siamp shall not be responsible or liable for improper installation of the product or of any cistern fitting damage caused by the use of cleaners containing chlorine... - Page 5 CISTERN DImENSIONS...
- Page 6 wALL CONFIguRATIONS FRONT FIXATION BACK FIXATION...
- Page 7 wALL CONFIguRATIONS FRONT FIXATION BACK FIXATION...
- Page 8 I - CISTERN ASSEmBLINg ➊ From 0 to 100 mm ➊ If needed, adjust supply bend and supply bend lining to desired height. If cut, supply bend must deburred. ➋ Assemble anti-condensation lining onto supply bend. ➌ Mount supply bend onto cistern. ➍...
-
Page 9: Wall Fixing
II - wALL POSITIONINg ➊ FRONT FIXATION BACK FIXATION Place assembled cistern onto wall. Check horizontal and vertical levels alignments. Mark the 2 drilling points. ➊ Drill wall at the marks using a Ø8 bit. Maximum drilling depth: 45 mm. III - wALL FIXINg ➊... -
Page 10: Water Supply Connection
IV - wATER SuPPLy CONNECTION Frame ➊ Remove the frame by lifting the two locks ➊ ➋ Connect stop cock (e) to float valve placing fibre seal in between Insert foam obturator on water supply pipe ➌ ➍ Connect water supply pipe to ½’’ stop cock end (ensure tightness using a fibre seal, not supplied) ➎... - Page 11 V - wATER SuPPLy CONNECTION TEST ➊ Insert the supply sleeve (c) and the drain sleeve on the toilet bowl ➋ Connect the toilet bowl to the cistern and to building drain system ➊ Turn on the water using stop cock (e), ➌...
- Page 12 VI - CLADDINg PREPARATION VII - CLADDINg ➊ Frame Cladding thickness: - Front fixation: from 15 to 45 mm - Back fixation: from 10 to 40 mm Once the covering is finished, take off the PSE template (k), keep the screws for fixing on the control plate, take off the cap (l).
- Page 13 VIII - TOILET BOwL CONNECTION Read the instructions for the bowl and seat cover before starting. ➊ ➊ Using a rule, draw a mark on supply sleeve (c) as shown on drawing. Remove supply sleeve (c) from toilet bowl and ➋...
- Page 14 VIII - TOILET BOwL CONNECTION (continued) ➌ ➍ ➎ ➏ Measure the dimension (L) in ➌ between the two marks. ➍ Transfer L dimension increasing it by 3 mm at the end of the supply sleeve (wall side, e.g. L = 50 mm, shorten supply sleeve by 53 mm.), measure it and make a mark ➎...
-
Page 15: Maintenance Operations
mAINTENANCE OPERATIONS During the use of your 80 flushing cistern, you may be required to maintain the INTEGRA equipment. I - MAINTENANCE OF THE VALVE (filter cleaning, replacement of membrane) Chassis ➊ ➍ ➌ ➋ Bolt ➊ Remove the control plat by lifting it slightly and tilting it forward ➋... - Page 16 mAINTENANCE OPERATIONS (cont’d) II - MECHANISM MAINTENANCE (cleaning or replacement of the seal) Proceed in the same way as for the maintenance of the float valve up to point then: ➏ ➊ ➊ Take off the brace ➋ 90° Grasp the mechanism by the tube and lift it vertically, make it turn 90° and then take it out. Plughole remains into ➋...
- Page 17 Unclip the washer, take out the seal and change it, then re-assemble the whole set. To position the mechanism properly the plughole and the mechanism are provided with a polariser. You have just installed a “Concealed cistern” toilet from SIAMP’s 80 range and we would like to thank you for putting your INTEGRA trust in us.
Need help?
Do you have a question about the SCC 80 and is the answer not in the manual?
Questions and answers