Table of Contents
Advertisement
Quick Links
Vitra S20 Troubleshooting
Sticking or not flushing
Passing water
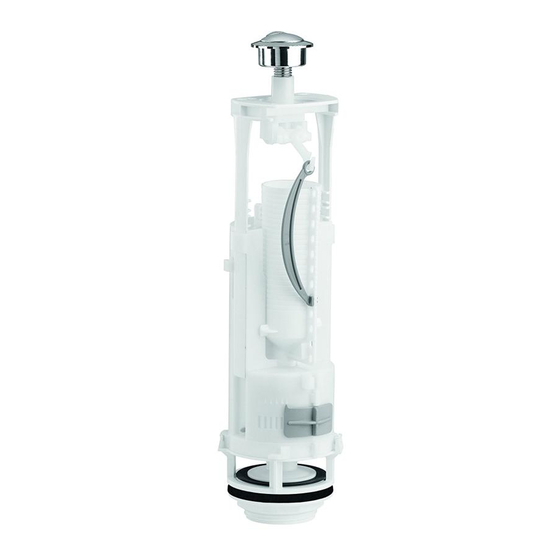
First check that the valve position is as shown above,
the valve should be clear of the cistern wall, if not
remove the valve and re-position.
If the valve position is correct, check the valve settings
are still in the factory set positions detailed in the table
(right).
If the problem persists please contact Siamp Aftersales
on 0161 681 2120 or aftersales@siamp.co.uk
✔
✘
No
Description
1
Stirrup
2
Lift Rod
3
Overflow
4
Residual Water
5
Short flush cursor
✘
Setting
Position 7 (number 6 will be visible)
Position 5 (4 holes above will be visible)
Factory set. D will be visible
0
10
✘
Figure
A
B
B
C
D
Advertisement
Table of Contents

Related Manuals for Siamp Optima 49


Summary of Contents for Siamp Optima 49
- Page 1 If the valve position is correct, check the valve settings are still in the factory set positions detailed in the table Residual Water (right). Short flush cursor If the problem persists please contact Siamp Aftersales on 0161 681 2120 or aftersales@siamp.co.uk...
- Page 2 Vitra S20 Troubleshooting Sticking or not flushing Passing water Fig A. Fig B. Fig C. Fig D. Stirrup in position 7. Lift Rod in position 5 Residual Water set at 0 Short flush cursor set at 10 (number 6 will be visible) (4 holes visible above) Overflow tube pre-cut at D...
- Page 3 Button Short flush Long flush N 50 Optional escutcheon (not always supplied) Stirrup Overflow Lift rod Stirrup catch clip Short flush cursor Residual sliding valve Valve gasket Strainer Strainer gasket Strainer nut Pan gasket OPTIMA ASSEMBLY INSTRUCTIONS Ref.: 50 5498 01...
- Page 4 I - PREPARING THE MECHANISM Measure the cistern -H (from the top of the lid to the inside base of the cistern) -D (diameter of the hole in the lid) ➊ ➋ ➋ Check the position of the stirrup If the stirrup (m) is correctly positioned on the basis of the below table, proceed ➊...
- Page 5 III - ASSEMBLING BOWL AND CISTERN IV - SETTING WATER LEVEL After having connected your ballcock to the water supply, open the tap and set the level of the long flush using the ballcock (see overleaf). Note: The max. water level should be 20 mm lower than the overflow tube (l).
- Page 6 - BP 219 - MC 98007 MONACO Cedex Tél. 00 377 93 15 53 75 - Fax : 00 377 92 05 71 04 - E-mail: contact@siamp.com Siamp UK Ltd - Unit C2 - Meadowbank Business Park - Tweedale Way Hollinwood - Oldham - Greater Manchester - OL9 8EH Telephone : 0161 681 2120 - Fax : 0161 681 2130 - aftersales@siamp.co.uk...
Need help?
Do you have a question about the Optima 49 and is the answer not in the manual?
Questions and answers
Small continuous run of water