Siamp OPTIMA 50 Manual
- Assembly instructions (4 pages) ,
- Instructions (4 pages) ,
- Assembly instructions (4 pages)
Advertisement
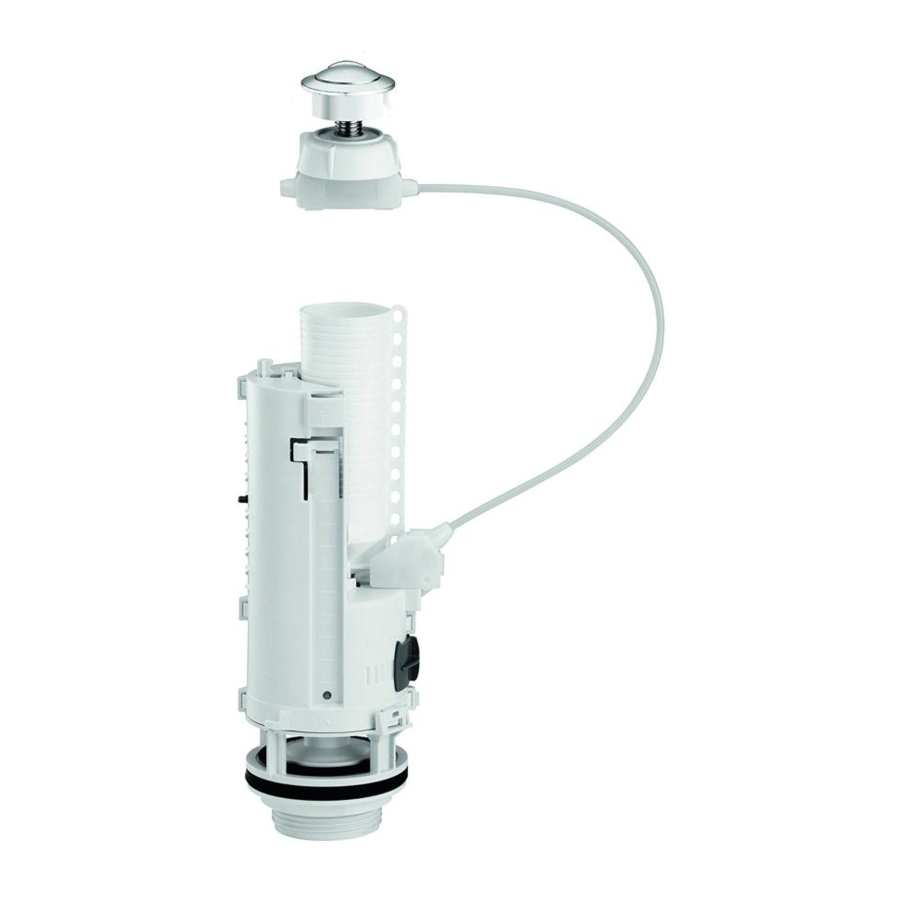
OVERVIEW

PREPARING THE MECHANISM
Measure the cistern

- H (from the top of the lid to the inside base of the cistern)
- D (diameter of the hole in the lid)

- In the table below, choose the right level for the overflow shortening
- Unscrew the strainer nut (g)
| Height H of cistern | Overflow tube shortening | |
| Diameter D of hole in lid 18 to 38 mm and 45 to 50 mm | Diameter D of hole in lid 38 to 44 mm | Cut between |
| > 332 mm | > 350 mm | No cut |
| 327 to 332 | 345 to 350 | A and B |
| 322 to 326 | 340 to 344 | B and C |
| 317 to 321 | 335 to 339 | C and D |
| 312 to 316 | 330 to 334 | D and E |
| 307 to 311 | 325 to 329 | E and F |
| 302 to 306 | 320 to 324 | F and G |
| 297 to 301 | 315 to 319 | G and H |
| 292 to 296 | 310 to 314 | H and I |
| 287 to 291 | 305 to 309 | I and J |
| 282 to 286 | 300 to 304 | J and K |
| 277 to 281 | 295 to 299 | K and L |
| 272 to 276 | 290 to 294 | L and M |
INSTALLATION

Position the mechanism in the cistern and secure it in place with the nut (g)
Manually screw the flush valve nut (f) until it is in contact with the ceramic. If necessary give an extra quarter turn (maximum) with the appropriate spanner.
NB: Excessive tightening can damage the mechanism and would not be covered by the guarantee.

 Do not use any sealing paste

ASSEMBLING BOWL AND CISTERN
- ΠFix screws - not included - at the bottom of the cistern (see order of parts below)

- Position the latex foam gasket - not included - on the nut (g)
- Ž Position the cistern on the bowl and secure it with wing nuts
![]()


SETTING WATER LEVEL
After having connected your ballcock to the water supply, open the tap and set the level of the long flush using the ballcock (see overleaf).
Note: The max. water level should be 20 mm lower than the overflow tube (l).

To adjust the water level of the short flush, slide the cursor along (k). Immerse the cursor of 40 mm.
Note : The closer the cursor is to 18, the more water will be flushed.

In some (rare) cases, the dead water level (amount of water remaining after the long flush) must be increased to ensure more efficient cleaning. To do this, move the sliding valve (e) to the left (the more it is open, the more the residual water increases).
Note: Increasing the dead water reduces the volume of water flushed. If necessary, readjust the max. water level using the ballcock.
INSTALLATION OF BUTTON

- Once the set-up has been completed, place button (a) on lid and screw button nut (c)
- Clip cable case
- Place lid back on top of cistern
MAINTENANCE
Changing the valve gasket

- After having opened the cistern, turn the mechanism 90° to separate it from its strainer
- Change the valve gasket
- Reposition the mechanism, locking it into the strainer
- Close the cistern again.
Fax: 00 377 92 05 71 04
E-mail: contact@siamp.com
Web: www.siamp.com
Documents / Resources
References
Download manual
Here you can download full pdf version of manual, it may contain additional safety instructions, warranty information, FCC rules, etc.
Advertisement


Need help?
Do you have a question about the OPTIMA 50 and is the answer not in the manual?
Questions and answers