Table of Contents
Advertisement
Quick Links
Advertisement
Table of Contents

Related Manuals for Lithium Grim Have Mercy


Summary of Contents for Lithium Grim Have Mercy
- Page 1 Have Mercy Building instructions v1.2...
-
Page 2: Table Of Contents
Have Mercy v1.2 Table of contents PCB layout ............................... 3 Components ............................4 Power section ............................5 Build sequence ............................5 Calibration ............................... 6 Off board wiring ............................6 Potentiometers............................ 6 Switches ............................... 8 Modifications ............................9 Transistors ............................9 Op amp and charge pump ........................ -
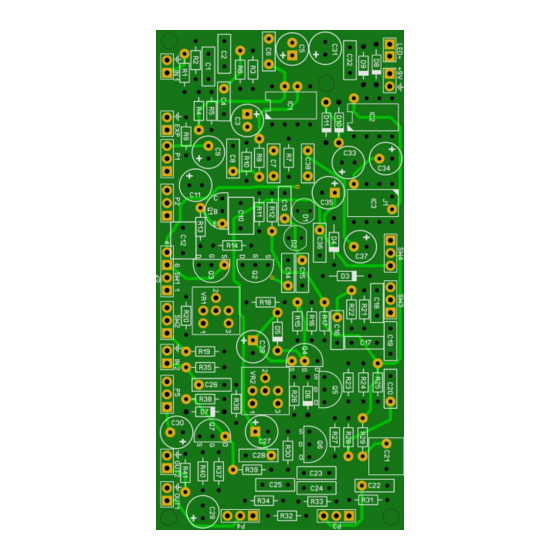
Page 3: Pcb Layout
Have Mercy v1.2 PCB layout Dimensions: 50 mm x 100 mm 1.97 inch x 3.94 inch Manufacturers and product names are mentioned solely for circuit identification, and where applicable their trademarks are the property of their respective owners who are in no way associated or affiliated with the author. No cooperation or endorsement... -
Page 4: Components
Have Mercy v1.2 Components Name Value Comment Name Value Comment Name Value 100n LED Red 100p MLCC LED Red Electrolytic 1N270 Germanium 100n 1N270 Germanium 100u Electrolytic Zener 10V 100n Zener 10V MLCC Zener 10V 100n 1N5817 Electrolytic Zener 12V... -
Page 5: Power Section
Have Mercy v1.2 Power section IC3 can be either a LT1054 or a (cheaper) ICL7660S. If you want to use the 7660S then you’ll need to connect both pads of J1 I do not advise to use a battery in this build as the charge pumps will do strange things when the battery is depleting. -
Page 6: Calibration
Have Mercy v1.2 Besides the components mentioned in the components table, you will need: • 3 mono input jacks. 2 x 3PDT footswitch (9 pins) • 2,1mm DC jack (isolated). • 22 gage stranded hook-up wire. • 2 x LED holders. This enables you to mount the LEDs in the enclosure. - Page 7 Have Mercy v1.2 Note that R led1 and R led2 are 4k7 resistors. You can change these values depending on the type of LED you use but 4k7 is safe enough for almost all LEDs @9V. Manufacturers and product names are mentioned solely for circuit identification, and where applicable their trademarks are the property of their respective owners who are in no way associated or affiliated with the author.
-
Page 8: Switches
Have Mercy v1.2 Switches Manufacturers and product names are mentioned solely for circuit identification, and where applicable their trademarks are the property of their respective owners who are in no way associated or affiliated with the author. No cooperation or endorsement... -
Page 9: Modifications
Have Mercy v1.2 Modifications Transistors Q4 to Q7 are based on the BS170P as used in a lot of Zvex pedals. You can of course use the regular BS170 instead of BS170P but note that the pinout is different! Soundwise they are exactly the same. -
Page 10: Extra Noise And Pop Protection In Boost Section
Have Mercy v1.2 Extra noise and pop protection in boost section The effect originally does not have R36. It was added to prevent popping and hissing when turning down/off the volume on your guitar. You could leave it out and solder a simple jumper instead. -
Page 11: Troubleshooting
Have Mercy v1.2 Troubleshooting All PCB’s have been 100% factory e-tested and out of every batch I receive I build an effect to double check, so there should not be a connection problem on the PCB itself. The board is not working (at all), what now? •... -
Page 12: Schematic
Have Mercy v1.2 Schematic Manufacturers and product names are mentioned solely for circuit identification, and where applicable their trademarks are the property of their respective owners who are in no way associated or affiliated with the author. No cooperation or endorsement...
Need help?
Do you have a question about the Have Mercy and is the answer not in the manual?
Questions and answers