Advertisement
Quick Links
Advertisement

Related Manuals for WOPET Chimp 7L


Summary of Contents for WOPET Chimp 7L
- Page 1 INSTRUCTIONS WOpet Chimp 7L Automatic Pet Feeder...
-
Page 2: Table Of Contents
【CONTENTS】 Feeder appearance …………………………………………………………1 Feeder assembling …………………………………………………………4 Function setting ………………………………………………………………6 Feeder cleaning ……………………………………………………………11 ………………………………………………………………12 Important notes ………………………………………………………………13 FCC warnings... - Page 3 Please read these instructions carefully before use Thank you for choosing this WOpet intelligent product. In order to guarantee your personal and material safety, please read these instructions carefully before using our product. Under no circumstances shall WOPET be liable to pay compensation or...
-
Page 4: Feeder Appearance
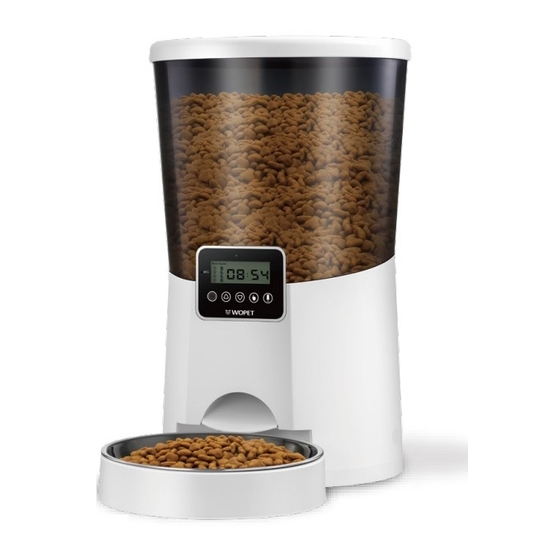
Feeder appearance Feeder specification Desiccant Compartment (Detachable & Desiccant Not Included) 2.75inch 14.8inch 3.5inch 13.8inch 8.8inch... - Page 5 Product name: WOpet Chimp 7L Automatic Pet Feeder Product size: 14.8 X 13.8 X 8.8inch Net weight: 2.9 KG Barn reserves: 7L Product materials: ABS Adapter parameters: Input: 110-220V, 50/60HZ, 0.6A Output: 5.0V, 2000mA...
- Page 6 Schematic diagram of the key panel Microphone SET key REC key Up key Down key Feeding key...
-
Page 7: Feeder Assembling
Feeder assembling Connect the adapter As shown in the picture, place the power cord into the bottom slot to prevent the feeder from losing power during movement. Set the bottom power switch to "I". You can also use batteries to ensure that the feeder can work normally when there’s power outage. - Page 8 Assemble the feeding tray Put the feeder upside down, and align the two clasps on the feeding tray with the slot on the base, and gently push it down until it is firmly clamped in place. (Slide it upward to remove the tray) Place the feeder upright, and put the stainless steel bowl in the tray.
-
Page 9: Function Setting
Function setting Power on Plug-in the feeder, and check the bottom power switch is on. When the power is on, the green light flashes, which indicates that the power is normal. (You can also use batteries in case of power outage) Set the current time Press the "set"... - Page 10 The setting of the minutes is the same as setting the hours. Note: The machine uses a 24-hour clock system.
- Page 11 Set feeding schedule The feeding setting includes the feeding amount and the feeding time. Press the "set" key to enter the feeding setting of the first meal. At this time, the meal number labeled as the first meal "①" tarts to flash.
- Page 12 After finishing setting the first meal, press the "set" key to move the cursor to enter the settings of the second meal "②". Follow the same steps as setting the first meal. Repeat to set feeding schedules for the other meals. Note: The set value will be saved after the LCD backlight goes off, and the device will enter the lock screen state.
- Page 13 Cancel feeding schedule In the setting state, when there is no operation for more than 8 seconds, the LCD backlight will turn off and exit the setting. Or long-press the "set" key and exit the setting after the LCD backlight goes out. Note: If you want to cancel the feeding of a meal, you just need to set the “Copies”...
-
Page 14: Feeder Cleaning
Manual feeding In the un-setting state (LCD backlight is off), press and hold the "feeding" key for 3 seconds to feed. It will dispense one serving each time. Restore factory settings In the setting state (LCD backlight is on), press and hold the "REC"... -
Page 15: Important Notes
Important notes Low power reminder: The red alarm light will flash when the battery power is low. Please replace the battery in time for normal use. Only for indoor use. It is best to keep the feeder against a wall to prevent the pet from knocking it down. -
Page 16: Fcc Warnings
FCC warnings WARNING: Changes or modifications to this unit not expressly approved. Non-compliance could void the user's authority to operate the equipment. NOTE: This equipment has been tested and found to comply with the limits for a Class B digital device, pursuant to Part 15 of the FCC Rules. - Page 17 This equipment generates, uses and can radiate radio frequency energy and, if not installed and used in accordance with the instructions, may cause harmful interference to radio communications. However, there is no guarantee that interference will not occur in a particular installation. If this equipment does cause harmful interference to radio or television reception, which can be determined by turning the equipment off and on, the user is encouraged to try to correct the interference by one or...
- Page 18 https://www.facebook.com/wopetworld...
Need help?
Do you have a question about the Chimp 7L and is the answer not in the manual?
Questions and answers