Table of Contents
Advertisement
Advertisement
Table of Contents

Related Manuals for WOPET FT80D


Summary of Contents for WOPET FT80D
- Page 1 Even Automatic Feeder Model: FT80D USER MANUAL...
-
Page 3: Table Of Contents
[CONTENTS] Product Specifications Feeder Assembly Install the food tank Install the bowls Load in desiccant Install the lid Plug in the power Feeder panel introduction Buttons Overview Setting Guideline Set the current time Set feeding meals Cancel feeding schedule Recording Manual feeding Reset to Factory Default Feeder cleaning... -
Page 4: Product Specifications
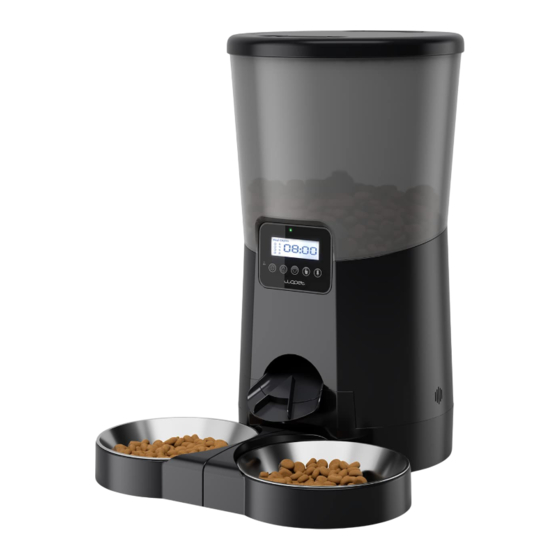
Product Specification Model FT80D Capacity Meals 4 meals per day Screen LCD screen One portion 12grams(8 portions max per meal) Food size 2- 12mm(dry food only) Battery-powered supply 3× alkaline D batteries (not included) DC-powered supply 5V/1A Operating temperature -10℃- 55℃/14°F-131°F Dementions 23.5*23.5*33.5cm/9.3×9.3×13.2 inches... - Page 5 desiccant Food tank Turnplate Control panel Feeder base Meal Splitter Base Food bowls...
-
Page 6: Feeder Assembly
Feeder Assembly Install the food tank Align the feeder base with the tank and install the feeder as indicated by the arrow shown. -
Page 7: Install The Bowls
Install the bowls 2.1 Single food bowl Insert (1) one bowl into the main base, as hown in (2) and (3). - Page 8 2.2 Dual food bowls Step 1: Install the bowls Put the two food bowls together in the direction of the arrow shown in figure (4), and then insert the food bowl into the main base as shown in (5) and (6).
-
Page 9: Load In Desiccant
Step 2: Insert the meal splitter Install the meal splitter as indicated by the arrow as shown in (7), from top to bottom in place as shown in (8). Load in desiccant Open the desiccant cap, put in the desiccant, and then close the desiccant cap. -
Page 10: Install The Lid
Install the lid First, align the lid to the tank and install from top to bottom, as shown in (9). Next, fit into place, then rotate the lid clockwise as shown in (10). (10) -
Page 11: Plug In The Power
Plug in the power Step 1: Open the batteries cover, as shown in (11). Insert the power cable oriented, put the cable into the slot. (11) Step 2: Install 3 new D cell, alkaline batteries.(NOT Included) Note: Push the button switch to “I”. When the power is on, the green light lights up, which indicates that the power is normal. -
Page 12: Feeder Panel Introduction
Feeder panel introduction Work Abnormal Status Indicator Indicator Microphone Hole Recording Manual feeding Number Increase/Decrease... -
Page 13: Buttons Overview
Buttons Overview Note: The screen will lock automatically after 2 minutes of non-use. Hold for 3s to unlock. Button Description Operable Mode Function Press to save and move to the Set /Save next step Unlock button Press and hold for 3s to lock/ unlock other buttons and screen Press to increase the value Number... -
Page 14: Setting Guideline
Setting Guideline Step 1 — Set the Current Time 1.1-Hour setting (MUST BE UNLOCKED) Press and hold the button for 3s until the LCD display lights up and enter the hour setting mode. The two hour digits will start to flash, press to set the "hour". - Page 15 1.2-Minute Setting After setting the hour, press the button to save and enter the minute setting. Press to set the "minute". Press the button to save.
-
Page 16: Set Feeding Meals
Step 2 — Set feeding meals 2.1-Set the copy of the first meal (MUST BE UNLOCKED) 1. Press the button to enter the copies setting of the first meal. At this time, the meal number labeled as the first meal "①" will lights up. - Page 17 Note: The maximum number of copies is 8. 2.2-Set the time of the first meal After setting the copies, press the button to save. The feeder then enters the time setting mode. The setting method is the same method as setting the current time.
- Page 18 2.3-Set the 2-4 meals After finishing setting the first meal, press the button to save and the feeder then enters the setting mode of the second meal"②". Follow the same steps as setting the first meal. Repeat to set feeding schedules for the other meals. The maximum meal is 4.
-
Page 19: Cancel Feeding Schedule
STEP 3— Cancel feeding schedule Step 3.1 If you want to cancel the feeding of a meal, you just need to set the "copies" number to 0. STEP 4— Recording When not in the setting state( LCD lights off) Press and hold the button, it will make one "beep"... -
Page 20: Manual Feeding
STEP 5— Manual feeding When not in the setting state (LCD light is off), press the button to dispense 1 portion. STEP 6— Reset to Factory Default When not in the setting state (LCD light is off) Press and hold at the same time for 3s, all settings will be cleared, and the feeder will be restored to factory settings and restart automatically. -
Page 21: Feeder Cleaning
Feeder cleaning Turn off the feeder, unplug the power adapter, and take out the batteries before cleaning. The lid ,feeder tank, and turnplate can be disassembled to clean. Lift the material cylinder up, and then remove it to clean. Please use clean water or a soft detergent to clean. -
Page 22: Important Notes
Important notes Low power reminder: The red alarm light will flash when the battery power is low. Please replace the battery regularly for normal use. Only for indoor use.It is best to keep the feeder against a wall to prevent the pet from knocking it down. Please check whether there is enough food in the feeder and add more when required. -
Page 23: Faqs
FAQs Q1: How many meals can be set per day? A: 4 meals per day at most with 8 portions per meal. One copy is about 12 grams. Q2: Why is the feeder is not dispensing food smoothly? A: Check if there is food residual accumulation of food in the outlet. Please clean the feeder regularly to prevent food blockages. -
Page 24: Fcc Warningsfcc
FCC WarningsFCC Changes or modifications to this unit not expressly approved. Non-compliance could void the user's authority to operate the equipment. Notes: This equipment has been tested and found to comply with the limits for a Class B digital device, pursuant to Part 15 of the FCC Rules. - Page 25 This equipment generates, uses and can radiate radio frequency energy and, if not installed and used in accordance with the instructions, may cause harmful interference to radio communi- cations. However, there is no guarantee that interference will not occur in a particular installation. If this equipment causes harmful interference to radio or television reception, which can be determined by turning the equipment off and on, the user is encouraged to try to correct the interference by one or more of...
-
Page 26: Warranty Information
④ The warranty is not transferable. We only provide warranty services to buyers who purchased from our Amazon store and WOpet official website store and possess proof of purchase - not to any other purchaser or subsequent owner. - Page 27 Receiving defective or used (proof needed) products; Receiving with missing parts; Item is defective under proper use. WHAT IS NOT COVERED Purchase from non-amazon channels /non-WOpet official website store/other physical stores; Gift without proof of purchase; Tampering/abnormal use/accidental damage; Replacements and parts;...
- Page 28 MAKING A CLAIM If you have any problems when using our products, please send an email to the mailbox: support@wopet.com 30 days free Return & Replacement Standard Warranty: 1-Year product Warranty 2-Year Warranty Application: Please scan the QR code below to finish the registration form on our official website to get 2-Year in total warranty.
-
Page 29: Have A Question For The Seller
Have a Question For the Seller 1.Find your order 2.Click “View order details” Your Orders Home Your Order Product link Buy Again Buy it again Your Wish List Write a product review Your Account View order details Shop by Department 3.Click the Seller name 4.Click “Ask a question”... - Page 30 Gifted parts, replacements, consumable products are not covered by the 2-year warranty. Manufactures’ warranties may not apply in all cases, depending on factors such as use of the product, where the product was purchased, or who you purchase the product from.
Need help?
Do you have a question about the FT80D and is the answer not in the manual?
Questions and answers