Chapters
Table of Contents

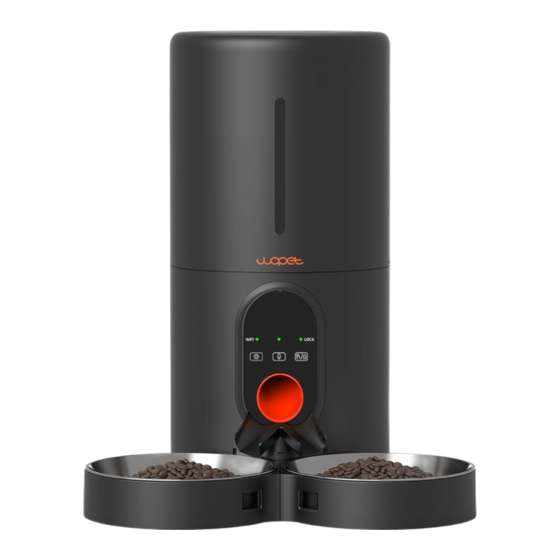
Related Manuals for WOPET Heritage View 10


Summary of Contents for WOPET Heritage View 10
- Page 1 Heritage View 10 Model: HV10 / HV10DP USER MANUAL * Figures and illustrations in this User Manual are provided for reference only and may differ from actual product appearance.
- Page 3 Scan code to learn how to set up your feeder. Scan code to get the “WOpet Life” App.
-
Page 4: Table Of Contents
Install food bowls Insert the TF (MicroSD) card Insert batteries and power cable Control Panel Buttons and Indicating Lights App Instructions Download the “WOpet Life” APP Register account Add feeder device Cleaning and Maintenance Cleaning the stainless steel bowls Clean the hopper Clean the turnplate... -
Page 5: Product Specifications
PRODUCT SPECIFICATIONS Model HV10 / HV10DP Capacity Meals 1-6 meals per day Camera Type 1080P full HD & 160° wide angle IR Night Vision 4 pieces Camera Vertical angle 105° Rotation Angle Memory Cards Included 4GB TF card (Micro SD) 10 grams / 0.35 oz (20 portions One Portion at most per meal) -
Page 6: Feeder Assembly
FEEDER ASSEMBLY Open the top cover Knob Put in desiccant Desiccant... -
Page 7: Install Food Bowls
Install food bowls Assemble the two food bowls in the direction of the arrow in the figure, as shown in Figure (a), and then insert ① into the food bowl. ① Install food bowls and stainless steel bowls. ② ③... -
Page 8: Insert The Tf (Microsd) Card
Insert the TF (Micro SD) card (Included with 4 TF card) To enable the video recording function, insert a TF card first. Open the battery compartment, the TF card slot is in the battery cover open position. Insert the TF card in the direction shown. Slide it in untilit clicks into place. -
Page 9: Insert Batteries And Power Cable
Insert batteries and power cable Open the battery cover upward according to the indicated position, put in 3 D-type batteries, and close the battery cover after insertion. Insert the TYPE-C power cord in the direction as shown in the figure. Battery cover Type-C Power Cord... -
Page 10: Control Panel
CONTROL PANEL Infrared Night Vision LED Camera Microphone Recorder Lock Indicator/ Wi-Fi Status Indicator Indicator Unlock/ Settings Manual Feed Record... -
Page 11: Buttons And Indicating Lights
BUTTONS AND INDICATING LIGHTS Button Description Function Instructions Hold for 2 seconds to lock/unlock. Indicating light turns off in unlocked state. In unlocked state, press to release Unlock/ one portion. Manual Feed Status indicator: Green light: The feeding process is functioning correctly. Red light: Motor stuck or other failure. -
Page 12: App Instructions
APP INSTRUCTIONS Download the “WOpet Life” app To download the “WOpet Life” app, scan the QR code or search “WOpet Life” in the Apple App Store® for iOS or Google Play Store for Android. Note: The mobile APP UI will be upgraded from time to timeplease refer to the actual interface for specific details. - Page 13 If not found, manually select from the device list - Add Device Manually. Added devices appear on the homepage list. Heritage View 10...
- Page 14 Note: The app supports both 2.4GHz & 5GHz Wi-Fi connections. To ensure normal WiFi Heritage View 10 connection and signal stability, please keep the device within 19.7ft / 6m of the router, without walls or other objects obstructing it. Network pairing works only in power supply mode, not in battery mode.
-
Page 15: Cleaning And Maintenance
CLEANING AND MAINTENANCE Cleaning the stainless steel bowls Remove the stainless steel bowls and rinse them with water or place in the dishwasher for cleaning. Clean the hopper Open the top cover and remove the desiccant. Knob Desiccant... -
Page 16: Clean The Turnplate
Rotate the hopper counterclockwise, then lift up and take it out. Clean the turnplate Turn counterclockwise to remove the turnplate. Turnplate After cleaning is completed, reinstall the turnplate and turn it clockwise to tighten. Turnplate Feeder base... -
Page 17: Faqs
3. Check if the account and password are correct. 4. Check if the feeder is powered by batteries. APP operation is not supported when powered by batteries. 5. Reset the feeder. 6. Email our customer service at support@wopet.com for further assistance. Q: The feeder shows offline. A: 1. Keep the feeder within close range to the router (within 6m/19.7ft), without walls or other objects causing ... - Page 18 3. Check if the hopper is empty. 4. Check if the rotor is jammed. If the indicator light is constantly red, remove and clean the rotor to solve the jam. 5. Check if the food size is too large which causes a blockage. The feeder allows dry food with a diameter of 2-12mm (0.08-0.47inch). Q: The amount of food dispensed is not the same. When first add food to the machine, the initial serving might be smaller.
- Page 19 5. Lastly, ensuring your device is properly connected to the network can also help us hear each other better. Any more questions, please email our support team: support@wopet.com Scan the QR code to set up the feeder...
-
Page 20: Fcc Warnings
FCC WARNINGS Changes or modifications to this unit not expressly approved Non-compliance could void the user's authority to operate the equipment. Notes: This equipment has been tested and found to comply with the limits for a Class B digital device, pursuant to Part 15 of the FCC Rules. -
Page 21: Ask Us A Question
Ask Us a Question 1.Find your order 2.Click “View order details” Your Orders Home Your Order Product link Buy Again Buy it again Your Wish List Write a product review Your Account View order details Shop by Department 3.Click the Seller name 4.Click “Ask a question”... -
Page 22: Warranty Information
Warranty Information If you have any problems when using our products, please send us an email at: support@wopet.com 30 days free Return & Replacement Standard Warranty: 1-Year product Warranty 2-Year Warranty Application: Please scan the QR code to finish the registration form on our... - Page 25 Heritage View 10 Modello: HV10 / HV10DP MANUALE DELL'UTENTE *Le figure e le illustrazioni in questo Manuale dell'utente sono fornite solo a titolo di riferimento e possono differire dall'aspetto effettivo del prodotto.
- Page 27 Scansiona il codice QR per configurare il distributore. Scansiona il codice per ottenere l'app “WOpet Life”.
- Page 28 Inserisci la scheda TF (MicroSD) Inserisci le batterie e il cavo di alimentazione Pannello di controllo Pulsanti e spie di indicazione Istruzioni per l'app Scarica l'app WOpet Life Registrati Aggiungi dispositivo di alimentazione Pulizia e manutenzione Pulizia delle ciotole in acciaio inossidabile Pulisci l’imbuto...
-
Page 29: Specifiche Del Prodotto
SPECIFICHE DEL PRODOTTO Modello HV10 / HV10DP Capacità Pasti 10 pasti al giorno Tipo di fotocamera 1080 Full HD & angolo ampio di 160° Visione notturna IR 4 pezzi Angolo di rotazione Angolo verticale di 105° della fotocamera Schede di memoria Scheda TF da 4GB inclusa (Micro SD) 10 grammi / 0,35 once Una Porzione... -
Page 30: Linee Guida Per Il Montaggio
LINEE GUIDA PER IL MONTAGGIO Apri il coperchio superiore Pomeli Inserisci il disidratante Disidratante... -
Page 31: Installa Le Ciotole Per Il Cibo
Installa le ciotole per il cibo Assembla le due ciotole del cibo nella direzione della freccia nella figura (a), come mostrato in figura (a), e poi inserisci 1 nella ciotola del cibo. ① installare ciotole del cibo e ciotole in acciaio inossidabile. ②... -
Page 32: Inserisci La Scheda Tf (Microsd)
Inserisci la scheda TF (MicroSD) (inclusa con scheda TF da 4GB) Per abilitare la funzione di registrazione video, inserisci prima una scheda TF. Aprire il coperchio delle batterie verso l'alto secondo la posizione indicata, inserire 3 batterie di tipo D e chiudere il coperchio delle batterie dopo l'inserimento. -
Page 33: Inserisci Le Batterie E Il Cavo Di Alimentazione
Inserire le batterie e il cavo di alimentazione Apri il coperchio delle batterie verso l'alto secondo la posizione indicata, inserisci 3 batterie di tipo D e chiudi il coperchio delle batterie dopo l'inserimento. Inserisci il cavo di alimentazione TYPE-C nella direzione mostrata nella figura. -
Page 34: Pannello Di Controllo
PANNELLO DI CONTROLLO LED per Visione Notturna Infrarossa Fotocamera Registratore Microfono Indicatore Indicatore di Blocco Wi-Fi / Indicatore di Stato Sblocca / Impostazioni Alimentazione Registra Manuale... - Page 35 PULSANTI E LUCI INDICATRICI Pulsante Descrizione Istruzioni per la funzione Tenere premuto per sbloccare/ bloccare per 2 secondi; la luce indicatrice si spegne di conseguenza. In stato sbloccato, premere per Sblocca / rilasciare una porzione. Alimentazione Indicatore di stato: manuale Luce verde: Il processo di alimen- tazione funziona correttamente.
-
Page 36: Scarica L'app Wopet Life
CONFIGURAZIONE APP WOPET Scarica l'APP "WOpet Life" Per scaricare l'app "WOpet Life", scansiona il codice QR o cerca "WOpet Life" sull'App Store® per iOS o su Google Play Store per Android. Nota: l'interfaccia utente dell'app mobile verrà aggiornata di tanto in tanto, si prega di fare riferimento all'interfaccia effettiva per i dettagli specifici. - Page 37 Se non trovato, seleziona manualmente dall'elenco dei dispositivi. I dispositivi aggiunti appaiono nell'elenco della homepage. Heritage View 10...
- Page 38 Nota: Questo prodotto è compatibile solo con WiFi 2.4GHz e non supporta WiFi 5GHz. Per una connessione WiFi Heritage View 10 stabile, tenere il dispositivo entro 6m dal router, senza ostruzioni da pareti o oggetti. L'accoppiamento di rete funziona solo in modalità di alimentazione, non in modalità...
-
Page 39: Pulizia E Manutenzione
PULIZIA E MANUTENZIONE Pulizia delle ciotole in acciaio inossidabile Rimuovi le ciotole in acciaio inossidabile e sciacquale con acqua o mettile in lavastoviglie per la pulizia. Pulisci l’imbuto Apri il coperchio superiore e rimuovi il disidratante. Disidratante Manopola... -
Page 40: Pulisci Il Piatto Girevole
Ruota l’imbuto in senso antiorario, poi sollevalo e toglilo. Pulisci il piatto girevole Ruotare in senso antiorario per rimuovere il piatto girevole. Piattino girevole Dopo aver completato la pulizia, reinstallare il piatto girevole e girarlo in senso orario per stringerlo. Piattino girevole Base dell'alimentatore... - Page 41 4. Contatta il nostro servizio clienti per assistenza. 5. Reimposta il distributore. 6. Invia un'email al nostro servizio clienti all'indirizzo support@wopet.com per ulteriori assistenza. D: Il distributore viene visualizzato offline. R: 1. Mantieni il distributore entro breve distanza dal router (entro 6 m), senza pareti o altri oggetti che causano un segnale debole.
- Page 42 3. Verifica se il contenitore del cibo è vuoto. Se il LED di indicazione lampeggia rapidamente in rosso, è necessario ricaricarlo. 4. Verifica se il rotore è bloccato. Se la luce indicatrice di lavoro è costantemente rossa, rimuovi e pulisci il rotore per risolvere il blocco.
- Page 43 5. Infine, assicurarti che il tuo dispositivo sia correttamente connesso alla rete può anche aiutarci a sentirci meglio. Per ulteriori domande, invia un'email al nostro team di supporto support@wopet.com Scansiona il codice QR per configurare il distributore...
-
Page 44: Avvertenze Fcc
AVVERTENZE FCC Le modifiche o le alterazioni a questa unità non sono espres- samente approvate. La non conformità potrebbe annullare l'autorizzazione dell'utente a utilizzare l'attrezzatura. Note: Questo apparecchio è stato testato e risulta conforme ai limiti per un dispositivo digitale di Classe B, ai sensi della Parte 15 delle Regole FCC.Questi limiti sono progettati per fornire una protezione ragionevole contro interferenze dannose in un'in- stallazione residenziale. -
Page 45: Hai Una Domanda Per Il Venditore
Fai una domanda 1. Trova il tuo ordine 2. Clicca "Visualizza i dettagli dell'ordine" I tuoi ordini Home Il tuo ordine Link al prodotto Compralo di nuovo Compra di nuovo Scrivi una recensione La tua lista dei desideri del prodotto Il tuo account Visualizza i dettagli dell'ordine... -
Page 46: Informazioni Sulla Garanzia
Informazioni sulla Garanzia Se hai problemi nell'uso dei nostri prodotti, inviaci un'email a support@wopet.com 30 giorni di reso e sostituzione gratuiti Garanzia Standard: garanzia di 1 anno sul prodottoApplicazione di Garanzia di 2 anni:... - Page 49 Heritage View 10 Modell: HV10 / HV10DP BENUTZERHANDBUCH *Die in diesem Benutzerhandbuch enthaltenen Abbildungen und Illustrationen dienen nur zur Referenz und können vom tatsächlichen Produkt abweichen.
- Page 51 Scannen Sie den QR-Code, um den Futterspender einzurichten. Scannen Sie den Code, um die "WOpet Life"-App zu erhalten.
- Page 52 Befestigen Sie die Futterschalen Setzen Sie die TF (MicroSD)-Karte ein Setzen Sie die Batterien und verbinden Sie das Stromkabel Kontrollzentrum Tasten und Anzeigelampen App-Anweisungen WOpet Life-App herunterladen Konto registrieren Futtergerät hinzufügen Reinigung und Wartung Reinigung der Edelstahlschüsseln Den Trichter reinigen Die Drehscheibe reinigen...
-
Page 53: Produktspezifikation
PRODUKTSPEZIFIKATION Modell HV10 / HV10DP Kapazität Mahlzeiten 10 Mahlzeiten pro Tag Kameratyp 1080 Full HD & 160° Weitwinkel IR-Nachtsicht 4 Stück Kameradrehwinkel Vertikaler Winkel 105° Speicherkarten Inklusive 4GB TF-Karte (Micro SD) 10 gramm / 0,35 oz (maximal 20 Eine Portion Portionen pro Mahlzeit) Futtermenge 2-12 mm (nur Trockenfutter) -
Page 54: Montageanleitung
MONTAGEANLEITUNG Öffnen Sie die obere Abdeckung Der knopf Geben Sie das Trockenmittel ein Trockenmittel... -
Page 55: Befestigen Sie Die Futterschalen
Befestigen Sie die Futterschalen Setzen Sie die beiden Futterschalen gemäß der Pfeilrichtung auf dem Bild (a) zusammen und stecken Sie dann 1 in die Futterschale. ① Futterschalen und Edelstahlschüsseln installieren. ② ③... -
Page 56: Setzen Sie Die Tf (Microsd)-Karte Ein
Setzen Sie die TF (MicroSD)-Karte ein (mitgelieferte 4GB TF-Karte) Um die Videoaufnahmefunktion zu aktivieren, setzen Sie zuerst eine TF-Karte ein. Öffnen Sie die Batterieabdeckung gemäß der angegebenen Position nach oben, legen Sie 3 D-Batterien ein und schließen Sie die Batterieabdeckung nach dem Einlegen. Setzen Sie die TF-Karte in der angezeigten Richtung ein. -
Page 57: Setzen Sie Die Batterien Und
Setzen Sie die Batterien und das Stromkabel ein Öffnen Sie die Batterieabdeckung nach oben gemäß der angegebenen Position, legen Sie 3 D-Batterien ein und schließen Sie die Batterieabdeckung nach dem Einlegen. Stecken Sie das TYP-C Stromkabel in die in der Abbildung gezeigten Richtung ein. -
Page 58: Kontrollzentrum
KONTROLLZENTRUM Infrarot- Nachtsicht-LED Kamera Mikrofonrekorder Sperranzeige / WLAN- Statusanzeige Indikator Entsperren / Einstellungen Manuelle Fütterung Aufnahme... - Page 59 KNÖPFE UND ANZEIGELICHTER Taste Beschreibung Funktionsanweisungen Halten Sie 2 Sekunden lang gedrückt, um zu entsperren/sperren; die Anzeigeleuchte erlischt entsprechend. Im entriegelten Zustand drücken, um Entsperren/ einen Teil freizugeben. Manuelle Statusanzeige: Zufuhr Grünes Licht: Der Fütterungsproz- ess funktioniert einwandfrei Rotes Licht: Kein Futter oder eine andere Fehlfunktion Halten Sie die Taste 5 Sekunden Spracha-...
-
Page 60: Konto Registrieren
Zeit aktualisiert, bitte beziehen Sie sich auf die tatsächliche Schnittstelle für spezifische Details. Ein Konto registrieren Öffnen Sie die "WOpet Life"-App. Wenn Sie bereits ein Konto haben, tippen Sie auf "Anmelden". Um ein neues Konto zu erstellen, tippen Sie auf "Registrieren". - Page 61 Wenn nicht gefunden, wählen Sie manuell aus der Geräteliste. Hinzugefügte Geräte erscheinen auf der Startseitenliste. Heritage View 10...
- Page 62 Hinweis: Dieses Produkt ist nur mit 2,4GHz WLAN kompatibel und unterstützt kein 5GHz WLAN. Für eine stabile Heritage View 10 WLAN-Verbindung halten Sie das Gerät innerhalb von 6 Metern vom Router entfernt, ohne Blockierung durch Wände oder Objekte. Die Netzwerkverbindung...
-
Page 63: Reinigung Und Wartung
REINIGUNG UND WARTUNG Reinigung der Edelstahlschüsseln Entfernen Sie die Edelstahlschüsseln und spülen Sie sie mit Wasser ab oder legen Sie sie zur Reinigung in die Spülmaschine. Reinigen des Trichters Öffnen Sie die obere Abdeckung und entfernen Sie das Trockenmittel. Trockenmittel Knopf... - Page 64 Drehen Sie den Trichter gegen den Uhrzeigersinn, heben Sie ihn dann an und nehmen Sie ihn heraus. Reinigen des Drehtellers Drehen Sie gegen den Uhrzeigersinn, um den Drehteller zu entfernen. Drehteller Nach Abschluss der Reinigung den Drehteller wieder einset- zen und im Uhrzeigersinn drehen, um ihn festzuziehen. Drehteller Futterspenderbasis...
-
Page 65: Faqs
4. Kontaktieren Sie unseren Kundenservice für Unterstützung. 5. Setzen Sie den Futterautomaten zurück. 6. Kontaktieren Sie unseren Kundenservice unter support@wopet.com für weitere Unterstützung per E-Mail. F: Der Futterautomat wird offline angezeigt. A: 1. Halten Sie den Futterautomaten in unmittelbarer Nähe zum Router (innerhalb von 6 m), ohne Wände oder andere Objekte,... - Page 66 4. Überprüfen Sie, ob der Rotor blockiert ist. Wenn die A rbeitsanzeige konstant rot leuchtet, entfernen und reinigen Sie den Rotor, um das Blockieren zu lösen. 5. Überprüfen Sie, ob die Futtermenge zu groß ist und eine Blockierung verursacht. Der Futterspender unterstützt Trockenfutter mit einem Durchmesser von 2-12mm/ 0,08-0,47 Zoll.
- Page 67 5. Zu guter Letzt kann auch das Sicherstellen einer korrekten Netzwerkverbindung Ihres Geräts dabei helfen, dass wir uns besser hören können. Wenn Sie weitere Fragen haben, senden Sie bitte eine E-Mail an unser Support-Team: support@wopet.com Scannen Sie den QR-Code, um den Futterspender einzurichten...
-
Page 68: Fcc-Warnungen
FCC-Warnungen Änderungen oder Modifikationen an dieser Einheit sind nicht ausdrücklich genehmigt. Nichtbeachtung könnte die Berechtigung des Benutzers zum Betrieb der Ausrüstung aufheben. Anmerkungen: Dieses Gerät wurde getestet und entspricht den Grenzwerten für ein digitales Gerät der Klasse B gemäß Teil 15 der FCC-Vorschriften.Diese Grenzwerte sollen einen angemess- enen Schutz gegen schädliche Störungen bei der Installation in Wohngebieten bieten. -
Page 69: Stellen Sie Uns Eine Frage
Stellen Sie uns eine Frage 1. Finden Sie Ihre Bestellung 2. Klicken Sie auf "Bestelldetails anzeigen" Startseite Ihre Bestellungen Ihre Bestellung Produktlink Erneut kaufen Wieder kaufen Produktbewertung Ihre Wunschliste schreiben Ihr Konto Bestelldetails Einkaufen nach anzeigen Abteilung 3. Klicken Sie auf den Namen 4. -
Page 70: Garantieinformation
Sie den Hersteller, wenn Sie Fragen haben. Garantieinformationen Wenn Sie Probleme bei der Verwendung unserer Produkte haben, senden Sie uns bitte eine E-Mail an support@wopet.com 30 Tage kostenlose Rückgabe & Ersatz Standardgarantie: 1-Jahr Produktgarantie Antrag auf 2-Jahres-Garantie: Bitte scannen Sie den QR-Code, um das Registrierungsformular auf unserer offiziellen Webseite innerhalb von 30 Tagen... - Page 73 Heritage View 10 Modelo: HV10 / HV10DP MANUAL DEL USUARIO *Las figuras e ilustraciones en este Manual del usuario se proporcionan solo como referencia y pueden diferir del aspecto real del producto.
- Page 75 Escanee el código QR para configurar el alimentador. Escanee el código para obtener la aplicación “WOpet Life”.
- Page 76 Inserte la tarjeta TF (MicroSD) Inserte las baterías y el cable de alimentación Panel de control Botones y luces indicadoras Instrucciones de la app Descarga la aplicación WOpet Life Registrar cuenta Añada dispositivo alimentador Limpieza y mantenimiento Limpieza de los cuencos de acero inoxidable...
-
Page 77: Especificaciones Del Producto
ESPECIFICACIONES DEL PRODUCTO Modelo HV10 / HV10DP Capacidad Comidas 10 comidas al día Tipo de cámara 1080 Full HD & ángulo amplio de 160° Visión nocturna IR 4 piezas Ángulo de rotación Ángulo vertical de 105° de la cámara Tarjetas de Tarjeta TF de 4GB incluida (Micro SD) memoria 10 gramos / 0,35 oz... -
Page 78: Instrucciones De Montaje
INSTRUCCIONES DE MONTAJE 1. Abra la tapa superior Perilla 2. Ponga el desecante Desecante... -
Page 79: Instale Los Cuencos De Comida
Instale los cuencos de comida Ensamble los dos cuencos de comida en la dirección de la flecha en la figura, como se muestra en la Figura (a), y luego inserte 1 en el cuenco de comida. ① instalar tazones de comida y tazones de acero inoxidable. ②... -
Page 80: Inserte La Tarjeta Tf (Microsd)
Inserte la tarjeta TF (MicroSD) (incluida con tarjeta TF de 4GB) Para habilitar la función de grabación de vídeo, inserte primero una tarjeta TF. Abra la tapa de las pilas hacia arriba según la posición indicada, coloque 3 pilas de tipo D y cierre la tapa de las pilas después de la inserción. -
Page 81: Inserte Las Baterías Y El Cable De Alimentación
Insertar las baterías y el cable de alimentación Abra la tapa de las baterías hacia arriba según la posición indicada, coloque 3 baterías tipo D y cierre la tapa de las baterías después de la introducción. Inserte el cable de alimentación TYPE-C en la dirección mostrada en la figura. -
Page 82: Panel De Control
PANEL DE CONTROL LED de Visión Nocturna Infrarroja Cámara Grabadora de Micrófono Indicador de Indicador Bloqueo / I Wi-Fi ndicador de Estado Desbloquear / Ajustes Alimentación Grabar Manual... - Page 83 BOTONES Y LUZ INDICADORA Botón Descripción Instrucciones de función Mantenga presionado durante 2 segundos para desbloquear/bloquear, la luz indicadora se apaga según corresponda. Desbloquear/ En estado desbloqueado, presione Alimentación para liberar una porción. Manual Indicador de estado: Luz verde: El proceso de alimentación funciona correctamente Luz roja: Sin comida u otro mal funcionamiento...
-
Page 84: Registrar Cuenta
Nota: La UI de la app se actualiza periódicamente; consulte la interfaz actual para detalles. Registrar una cuenta Abre "WOpet Life". Pulsa "Iniciar sesión" para entrar o "Registrarse" para crear cuenta. Agregar un dispositivo Nota: Aktivieren Sie Bluetooth und Ortungsdienste, um Geräte zu steuern. - Page 85 Si no se encuentra, seleccione manualmente de la lista de dispositivos. Los dispositivos agregados aparecen en la lista de la página de inicio. Heritage View 10...
- Page 86 Nota: Este producto es compatible solo con WiFi de 2.4GHz y no admite WiFi de 5GHz. Heritage View 10 Para una conexión WiFi estable, mantenga el dispositivo a una distancia de 19.7 pies (6m) del enrutador, sin obstrucciones por paredes u objetos.
-
Page 87: Limpieza Y Mantenimiento
LIMPIEZA Y MANTENIMIENTO Limpieza de los cuencos de acero inoxidable Retire los cuencos de acero inoxidable y enjuáguelos con agua o colóquelos en el lavavajillas para limpiarlos. Limpie la tolva Abra la tapa superior y retire el desecante. Pomo Desecante... -
Page 88: Limpie El Plato Giratorio
Gire la tolva en sentido contra reloj, luego levántela y sáquela. Limpiar el plato giratorio Girar en sentido contrario a las agujas del reloj para quitar el plato giratorio. Plato giratorio Después de completar la limpieza, vuelva a instalar el plato giratorio y gírelo en sentido horario para apretarlo. - Page 89 5. Restablecer el dispensador. 6. Envíe un correo electrónico a nuestro servicio de atención al cliente a support@wopet.com para obtener ayuda adicional. P: Der Futterautomat wird offline angezeigt. R: 1. Halten Sie den Futterautomaten in unmittelbarer Nähe zum Router (innerhalb von 6 m), ohne Wände oder andere...
- Page 90 3. Verifique si el contenedor de alimento está vacío. Si la luz indicadora de funcionamiento parpadea rápidamente en rojo, es necesario rellenarlo. 4.Si la luz indicadora de funcionamiento está constantemente roja, retire y limpie el rotor para solucionar el atasco. 5.
- Page 91 5. Por último, asegurarse de que su dispositivo esté correctamente conectado a la red también puede ayudar a escuchar mejor. Si tiene algún problema al usar nuestros productos, envíe un correo electrónico a la dirección de correo electrónico: support@wopet.com Escanee el código QR para configurar el alimentador...
-
Page 92: Advertencias De La Fcc
ADVERTENCIAS DE LA FCC Los cambios o modificaciones a esta unidad no están expresa- mente aprobados. El incumplimiento podría anular la autoridad del usuario para operar el equipo. Notas: Este equipo ha sido probado y se ha encontrado que cumple con los límites para un dispositivo digital Clase B, de acuerdo con la Parte 15 de las Reglas de la FCC.Estos límites están diseñados para proporcio- nar una protección razonable contra interferencias perjudiciales en una... -
Page 93: Tienes Una Pregunta Para El Vendedor
Pregúntenos 1.Encuentra tu pedido 2. Haz clic en “Ver detalles del pedido” Inicio Tus pedidos Tu pedido Enlace del producto Comprar de nuevo Cómpralo de nuevo Tu lista de deseos Escribe una reseña del producto Tu cuenta Ver detalles del pedido Compra por departamento 3. -
Page 94: Información De Garantía
Información de la garantía Si tiene problemas al usar nuestros productos, envíenos un correo electrónico a support@wopet.com Devolución y reemplazo gratuitos durante 30 días Garantía estándar: Garantía del producto de 1 año Solicitud de garantía de 2 años: Escanee el código QR para completar el... - Page 97 Heritage View 10 Modèle: HV10 / HV10DP MANUEL DE L'UTILISATEUR *Les chiffres et illustrations dans ce manuel de l'utilisateur sont fournis à titre de référence seulement et peuvent différer de l'apparence réelle du produit.
- Page 99 Scannez le code QR pour configurer le distributeur. Scannez le code pour obtenir l'application “WOpet Life”.
- Page 100 Insérez la carte TF (MicroSD) Insérer les piles et le câble d'alimentation Panneau de contrôle Boutons et voyants indicateurs Instructions de l'application Téléchargez l'application Wopet Life Créez un compte Ajouter un dispositif d'alimentation Nettoyage et entretien Nettoyage des bols en acier inoxydable Nettoyer la trémie...
-
Page 101: Spécifications Du Produit
SPÉCIFICATIONS DU PRODUIT Modèle HV10 / HV10DP Capacité Repas 10 repas par jour Type de caméra Full HD 1080 & angle large de 160° Vision nocturne IR 4 pièces Angle de rotation Angle vertical à 105° de la caméra Cartes mémoire Carte TF de 4GB incluse (Micro SD) 10 grammes / 0,35 oz (20 portions au Une Portion... -
Page 102: Instructions D'assemblage
INSTRUCTIONS D'ASSEMBLAGE Ouvrir le couvercle supérieur Bouton Insérer le déshydratant Déshydratant... -
Page 103: Installer Les Bols Alimentaires
Installer les bols alimentaires Assemblez les deux bols à nourriture dans le sens de la flèche dans la figure, comme indiqué dans la Figure (a), puis insérez 1 dans le bol à nourriture. ① installer les bols à nourriture et les bols en acier inoxydable. ②... -
Page 104: Insérez La Carte Tf (Microsd)
Insérez la carte TF (MicroSD) (fournie avec une carte TF de 4GB) Pour activer la fonction d'enregistrement vidéo, insérez d'abord une carte TF. Open the battery cover upward according to the indicated position, put in 3 D-type batteries, and close the battery cover after insertion. -
Page 105: Insérer Les Piles Et Le Câble D'alimentation
Insérez les piles et le câble d'alimentation Ouvrez le couvercle des piles vers le haut selon la position indiquée, insérez 3 piles de type D et refermez le couvercle des piles après insertion. Insérez le câble d'alimentation TYPE-C dans la direction indiquée sur la figure. -
Page 106: Panneau De Contrôle
PANNEAU DE CONTRÔLE LED de Vision Nocturne Infrarouge Caméra Enregistreur Vocal Indicateur de Indicateur Verrouillage / Wi-Fi Indicateur de Statut Déverrouiller / Réglages Alimentation Enregistrer Manuelle... - Page 107 BOUTONS ET LUMIÈRES DE SIGNALISATION Bouton Description Instructions de fonctionnement Maintenir enfoncé pendant 2 secondes pour déverrouiller/ verrouiller, le voyant s'éteint en conséquence. En état déverrouillé, appuyez pour Déverrouiller/ libérer une portion. Alimentation Indicateur d'état : Manuelle Lumière verte : Le processus d'alimentation fonctionne correcte- ment Lumière rouge : Plus de nourriture...
- Page 108 CONFIGURATION DE L'APP WOPET Téléchargez l'APP "WOpet Life" Téléchargez "WOpet Life" en scannant le QR ou en la cherchant sur l'App Store® pour iOS ou Google Play Store pour Android. Note: Mise à jour périodique de l'UI de l'app; référez-vous à...
- Page 109 Si l'appareil n'est pas trouvé, sélectionnez-le manuellement dans la liste des appareils. Les appareils ajoutés apparaissent dans la liste de la page d'accueil. Heritage View 10...
- Page 110 Remarque : Ce produit est compatible uniquement avec le WiFi 2.4GHz et ne prend pas en charge le WiFi 5GHz. Heritage View 10 Pour une connexion WiFi stable, gardez l'appareil à moins de 6 mètres du routeur, sans obstacle par des murs ou des objets.
-
Page 111: Nettoyage Et Entretien
NETTOYAGE ET ENTRETIEN Nettoyage des bols en acier inoxydable Retirez les bols en acier inoxydable et rincez-les à l'eau ou placez-les dans le lave-vaisselle pour le nettoyage. Nettoyez la trémie Ouvrez le couvercle supérieur et retirez le déshydratant. Déshydratant Bouton... - Page 112 Tournez la trémie dans le sens antihoraire, puis soulevez-la et retirez-la. Nettoyage du plateau tournant Tournez dans le sens contraire des aiguilles d'une montre pour retirer le plateau tournant. Plateau tournant Après le nettoyage, réinstallez le plateau tournant et tournez dans le sens horaire pour serrer.
- Page 113 5. Réinitialisez le distributeur. 6. Envoyez un e-mail à notre service client à l'adresse support@wopet.com pour obtenir une assistance supplémentaire. Q : Le distributeur est indiqué hors ligne. R : 1. Gardez le distributeur à proximité du routeur (dans un rayon de 6m/19,7ft), sans murs ni autres objets qui pourraient affaiblir le signal.
- Page 114 3. Vérifiez si le réservoir d'alimentation est vide. Si le voyant de fonctionnement clignote rapidement en rouge, vous devez le remplir. 4. Vérifiez si le rotor est bloqué. Si le voyant de fonctionnement est constamment rouge, retirez et nettoyez le rotor pour résoudre le blocage.
- Page 115 5. Enfin, s'assurer que votre appareil est correctement connecté au réseau peut également nous aider à mieux nous entendre. Pour toute autre question, veuillez envoyer un e-mail à notre équipe d'assistance à l'adresse support@wopet.com Scannez le code QR pour configurer le distributeur...
- Page 116 Avertissements de la FCC Les modifications ou changements apportés à cet appareil ne sont pas expressément approuvés. Le non-respect de ces règles pourrait annuler l'autorité de l'utilisateur à utiliser l'équipement. Remarques : Cet équipement a été testé et jugé conforme aux limites pour un appareil numérique de Classe B, conformément à...
-
Page 117: Avez-Vous Une Question Pour Le Vendeur
Posez-nous une question 1. Trouvez votre commande 2. Cliquez sur “Voir les détails de la commande” Vos commandes Accueil Votre commande Lien du produit Achetez à nouveau Achetez à nouveau Votre liste de souhaits Écrire un avis sur le produit Votre compte Voir les détails Magasinez par... -
Page 118: Informations Sur La Garantie
Informations sur la garantie Si vous avez des problèmes lors de l'utilisation de nos produits, veuillez nous envoyer un email à l'adresse support@wopet.com Retour et remplacement gratuits sous 30 jours Garantie standard : Garantie produit de 1 an Application de garantie de 2 ans : Veuillez scanner le code QR pour terminer le formulaire d'inscription sur notre site officiel...
Need help?
Do you have a question about the Heritage View 10 and is the answer not in the manual?
Questions and answers
I have the dual feeder for two cats. When you are setting up the meal schedule .. when it says breakfast and I put 2 portions.. does that mean each cat will get 2 portions? Or does it mean they will split 2 portions, meaning they each get 1 portion?