
Subscribe to Our Youtube Channel
Related Manuals for Quasar Science R2


Summary of Contents for Quasar Science R2
- Page 1 QUASAR SCIENCE LED Linear Light Quick Start Guide Download Full Manual at QUASARSCIENCE.COM/R2...
-
Page 2: What's In The Box
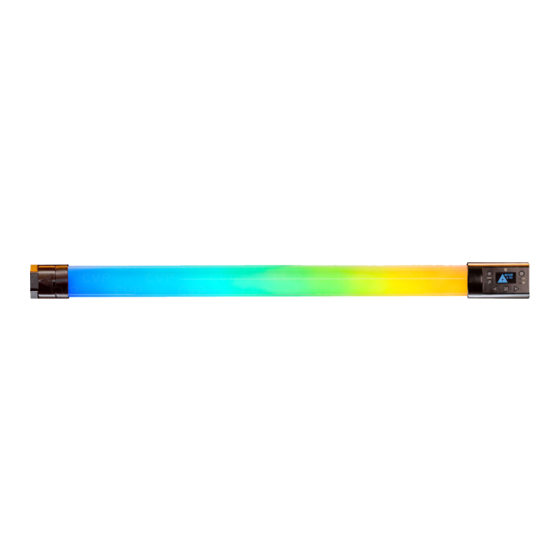
What’s in the Box 1 - R2 LED Linear Light 2 - Q-Boot Silicon Bumpers with Ossium Rail (Q25R2 shown) 1 - 8ft AC Power Cable 1 - 8ft DC Power Cable: P-TAP to 2.1mm Barrel 1 - Quick Start Guide... - Page 3 R2 Overview Lens Hatch Ossium Mounting 1/4-20 Threaded Control Side Ossium Rail Slim Diffuser Heat Sink Points Power Side End Cap Mounting Holes (White Hexagons) End Cap *Q25R2 shown as reference...
- Page 4 R2 Interface Layout Power Side Control Side Power On / Off “Data” Status Light “Output” Button LED Screen “Link” Button “Wireless” Status Light “Left / -” Button “Right / +” Button AC IN Port “Enter / Set” Button USB-C Update Port...
- Page 5 Mounting R2 Mount Dual Screw Baby Pin Mount Dual Screw Baby Pin Mount Rotator* using Mount Rotator* using 5/32 hex directly to the light using 3/16 to Ossium Rail Slider using 5/32 hex wrench wrench to Ossium Rail Slider Hex wrench.
-
Page 6: Getting Started
> Intensity < > < •To link an RR or R2 light to a CRMX /Wireless DMX transmitter: . Go to Wireless Mode->Wireless DMX. 1. Double tap 2. If the “Wireless” Status Light is flashing, press and hold to unpair. - Page 7 Key Interface “Output” Button Toggle Sign Number of Pixels Configured Profile and Number of Channels Control Status Output Mode Control Mode (DMX, Art-Net, sACN, Control Address CRMX, Bluetooth, WiFi) Power Button: Light On: Press and hold for 1 second. Light Off: Press and hold for 2 seconds. Double Tap: Go to Status Screen. Output Button: Toggle the button to enable/disable light output for manual mode operation.
-
Page 8: Status Lights
Status Lights The Data and Wireless Status Lights can be various colors based on the connection type and status. Check that the light is in the correct wired and wireless modes and that Status lights are enabled in the config. See Page 8 for color combinations. Data LED Wireless LED Data... - Page 9 Status Lights Local Wired Wireless Manual Mode DMX Mode / Data Received Wireless DMX Data Data Data Data: Red / Wireless: Off Data:Red / Wireless: Green (Or Universe Color) Data: Off / Wireless: Off Ethernet Mode / Data Received WiFi Mode (Art-Net over WiFi) Data Data Lead/Follow - Wired...
-
Page 10: Button Shortcuts
Button Shortcuts Min / Max Value Jump: On parameter menus such as Intensity, Color Temperature, Saturation, Hue, and Effects Parameters, While pressing and holding to increase the value, tapping will jump to the next value or max value. While pressing and holding to decrease the value, tapping will jump to the next value or minimum value. - Page 11 Main Menu - Manual Mode 0 to 100% by 1% > Intensity 1,750K to 10,000K by 1 Just Notable Difference > Color Temp -G 100 to G 0 to +100 G -- Ex. +G 25 = 1/4 +Green, -G 50 = 1/2 -Green (Magenta), >...
-
Page 12: Config Menu
Config Menu Set the DMX Channel. > DMX Channel Set the number of pixel groups in the light to control in groups. (See Page 12) > Number of Pixels Set the DMX profile for the light. (See Page 18-23) > Profile Select the Wired data options to control the light. - Page 13 Pixel Selection & Layout 1, 2, 5,10 - Available grouping options for the Q25R2’s 10 individually controllable pixels. > Number of Pixels 1, 2, 3, 4, 6, 8, 12, 24 - Available grouping options for the Q50R2’s 24 individually controllable pixels. 1, 2, 3, 4, 6, 8, 12, 16, 24, 48 - Available grouping options for the Q100R2’s 48 individually controllable pixels.
- Page 14 Wired Control Menu Choose DMX512 or Ethernet Mode to Wire Control the light. > Wired Mode Control the light with DMX512. > DMX Control the light with sACN or Art-Net. > Ethernet > DMX Settings Set the DMX Channel 001 to 512. >...
- Page 15 Wireless Control Menu > Wireless Mode Lumen Radio CRMX wireless DMX. Press and hold to Clear. Tap transmitter to pair. > Wireless DMX Enable the light to connect over Bluetooth. > Bluetooth Enable the light to connect to a wireless network to receive Art-Net over WiFi. >...
- Page 16 Lead/Follow Mode •Lead/Follow mode allows one light to control many lights at once. The Lead transmits color and intensity data, wired or wirelessly, to the Follows. When the Lead changes levels, the Follows will change as well. This applies to on board FX as well. •To use Lead/Follow mode, go to Config ->...
-
Page 17: Output Mode
Output Mode •There are 3 different Output Modes, which are used to increase the light output or the resolution in different areas of the dimming range. Normal Output: Normal operating temperature, standard light output. > Output Mode High Output: High operating temperature, maximum light output. Low Output: Gives maximum resolution in the low dimming section of Output Mode the light. - Page 18 Effects (Manual) Main Menu Effects Parameters Effect Result Item Result Rainbow Scroll through the hue from 0° at full saturation Effect Choose effect Short Circuit Light is on with random bursts of turning off Intensity Set Intensity of effect Paparazzi Light is off with random flashes of turning on Color Set base color temp...
- Page 19 Effect Controls (Manual) Fire Emergency Light Submenu Weight Result Item Result Rate 0-200% for the speed of the effect Pattern Single, Double, Triple, Quad 100% is normal speed Color Presets R&B, B&B, R&32, R&56, B&32, B&56 Maximum Highest intensity level of effect R&B&32, R&B&56 Minimum Lowest intensity level of effect...
- Page 20 DMX Profiles & Pixel Patching DMX Profiles for the lights come in 2 types. Basic DMX Profiles that include HSIC, RGB, CCT modes and FX Profiles that have additional channels to trigger the built in FX. Different DMX channel arrangements to control the Parameters for your light. DMX Profiles (Basic) P1-8 Direct control of the 5 available colors channels;...
- Page 21 DMX Pixel Patching Examples If the Number of Pixels = 1, the entire fixture functions as 1 group controlled by the currently set DMX Profile. F or DMX Profile = “1: HSIC Mode – 8 Bit – 5 Channels”, that group has 5 DMX control channels: 1.
- Page 22 DMX Profiles (Basic) # of Channels Name Bit Depth Channel Description Per Pixel HSIC 8 Bit 1: Intensity 2: Color Temp 3: +/- Green Control 4: Hue 5: Saturation HSIC-16 16 Bit 1+2: Intensity 3: Color Temp 4: +/- Green Control 5+6: Hue 7+8: Saturation 8 Bit 1: Intensity 2: Hue 3: Saturation XFade with +/-G...
- Page 23 DMX Profiles (Basic) Parameters Available Parameters based on Profile +/- Green Control DMX Values Parameter DMX Value Value DMX Value Effect Intensity 0-255 0 - 100% 0-10 No Effect Color Temp 0-255 1,750K-10,000K 11-20 Full Minus Green +/- Green See Chart at right 21-119 8-46 -99% to -1%...
- Page 24 DMX Profiles (FX) # of Ch # of FX Parameter Channel Group FX Channel Group Name Bit Depth Per Pixel (Repeated per Pixel) (One Group per Light) 8 Bit 1: Intensity 2: Color Temp 3: +/- Green HSIC-FX 4: Hue 5: Saturation x+1: FX x+2: FX Rate x+3: FX Size 16 Bit...
- Page 25 DMX Profiles (FX) Parameters FX Selection Effects Parameters Effect DMX Value Item Result 0-26 0-10 Effect Choose effect Rainbow 27-38 11-15 Intensity Set intensity of effect Short Circuit 39-51 16-20 Color Temp Set base color temp Paparazzi 52-64 21-25 +/- Green Set +/- green of the color temp Strobe 65-77...
-
Page 26: Basic Specifications
Basic Specifications Q25R2 Q50R2 Q100R2 Model Max 25 watts Max 50 watts Max 100 watts Wattage 1.76 lbs (0.8 kg) 3.3 lbs (1.5 kg) 5.84 lbs (2.64 kg) Weight 23 x 1.75 in 46.9 x 1.75 in 90.86 x 1.75 in Dimensions (584.2 x 44.5 mm) (1161.7 x 44.5 mm) -
Page 27: Warranty
If this product fails to work as warranted, customer's sole and exclusive remedy shall be repair or replacement according to the terms of this limited warranty. Quasar Science, LLC does not assume any responsibility for incidental or consequential damages. This warranty gives you specific legal rights and you may... - Page 28 R2 LED Linear Light Quick Start Guide Please do not return your light to your retailer. Contact Quasar Science with any questions, issues or concerns. 687 S. Anderson St. Los Angeles, CA 90023 support@quasarscience.com (800) 876-0665 Q UASAR SCIENCE QUASAR SCIENCE V1.5...
Need help?
Do you have a question about the R2 and is the answer not in the manual?
Questions and answers