
Subscribe to Our Youtube Channel
Related Manuals for PIONEER DJ VM-50


Summary of Contents for PIONEER DJ VM-50
- Page 1 Instruction manual VM - 50 / VM - 50 - W / VM - 70 / VM - 80 Active Monitor Speaker pioneerdj.com/support/ For FAQs and other support information for this product, visit the above site.
-
Page 2: Main Features
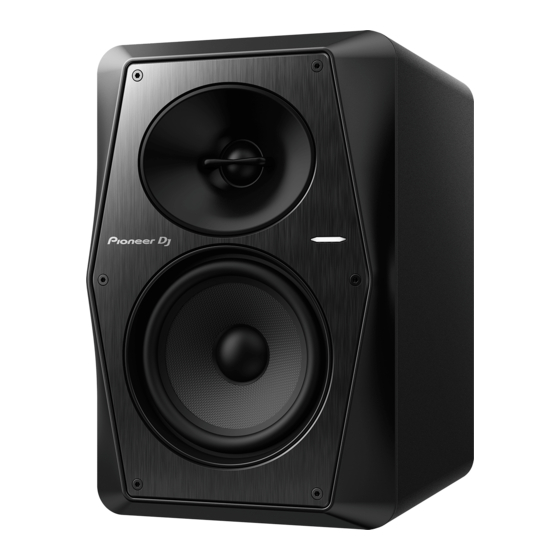
Introduction Main Features • “Vortex bass accelerator” structure to achieve a fast response rich bass sound. • Constant directivity Horn to achieve powerful medium and high range sound and broad uniform listening space. • Rigid aluminum front baffle to reduce unwanted vibrations. • Class D amplifier with 96 kHz sampling to enable wide bandwidth sound reproduction. • “DSP control” to enable 16-band adjustment in accordance with the use, room acoustic properties, and preferences. Confirm All Accessories • Power cord × 1 • Bottom cushion x 1 (4pcs/1 sheet) • Precautions for Use × 1 • Instruction Manual (this document) • Warranty (for some regions) * * Only products in Europe. The contents of the warranty for the United States and Canada are provided on the last pages of the instructions in English and French. Names and Functions of Parts Front Panel Facilities 1 Aluminum front baffle Reduces unwanted vibrations. -
Page 3: Rear Panel Facilities
Rear Panel Facilities 1 Bass-reflex duct “Vortex bass accelerator” structure of the bass-reflex duct to achieve high-speed deep bass reproduction. 2 Switch for switching HIGH EQ Use to switch between four types of EQ setting: ROOM 1, FLAT, ROOM 2, and BRIGHT TREBLE. For details see “DSP CONTROL” on page 4. 3 Switch for switching LOW EQ Use to switch between four types of EQ setting: ROOM 1, FLAT, ROOM 2, and CLUB BASS. For details see “DSP CONTROL” on page 4. 4 AUTO STANDBY switch Use to turn the auto standby function on or off. When the auto standby function is turned on, the speakers automatically enter standby mode if no input signal is received for a certain period of time (approximately 25 minutes) and power consumption can be reduced. When an input signal is received while the speakers are in standby mode, the speakers will automatically resume from standby mode. • The POWER indicator on the front panel is lit in red during standby mode. • When the input signal is weaker than a certain level, the speakers may not automatically resume from standby mode. In such cases, turn off the [AUTO STANDBY] switch... -
Page 4: Dsp Control
DSP CONTROL This unit has a function for adjusting the frequency characteristics in accordance with the installation location or environment. Carry out the adjustment using a combination of the two dials on the rear panel. At the time of shipment from the factory it is set so that flat properties can be obtained in an anechoic chamber, so perform the adjustment to suit the installation environment. LOW EQ HIGH EQ Use this for adjusting the bass, in accordance with the Use this for adjusting the treble, in accordance with the installation location and purpose of use. installation location and purpose of use. • L1: ROOM 1 • H1: ROOM 1 Tone quality with bass minimized. This is effective when Tone quality with treble minimized a certain amount. This is installed near walls, etc., and the volume of the bass is too effective when used in a room where the volume of the treble loud, or when you do not want the bass reverberating at night is too loud during a live event. time. • H2: FLAT • L2: FLAT Flat frequency characteristics that faithfully reproduces the Flat frequency characteristics that faithfully reproduces the input sound. input sound. • H3: ROOM 2 • L3: ROOM 2 Sound with high treble volume with the image of bright wide Tone quality with high bass volume. This is effective when spaces. This is effective when the treble is insufficient. the reverberation in a room is too small and the bass is • H4: BRIGHT TREBLE insufficient. -
Page 5: Additional Information
Connections • When making or changing connections, always turn off the • Use only the furnished accessory power cord. power and disconnect the power cord from its outlet. • Make sure to set the sound level at an appropriate level • Also, be sure to read the operating instructions for the other as the input signals to the XLR INPUT connector (or TRS components to which you are connecting these speakers. INPUT jack) and RCA INPUT jack will be mixed together, • Do not plug in the power cord until all other connections have affecting the sound level. been completed. Additional Information Troubleshooting • Check the following items when you think there is a problem. Also, check the equipment connected to the unit. If it is still not operating properly, contact your dealer. • On occasion, the unit may fail to operate properly due to static electricity or other external conditions. In this event, disconnect the power cord and wait for five minutes or more, then reconnect the power cord and check for proper operation. Symptom Items to Check Remedy No power Is power cord connected properly? Connect power cord to outlet. No sound from connected audio devices, or Has connected audio device been set properly? Set device’s external input and sound volume properly. sound is very small. Is connection cable connected properly? Connect cables properly. Are connectors or plugs dirty? Clean connectors and plugs before connecting. -
Page 6: Specifications
Specifications VM-50/VM-50-W VM-70 VM-80 Type Bi-amp 2-way active speaker Amplifier Amplifier type Class D with DSP LF amplifier 30 W 70 W 90 W HF amplifier 30 W 30 W 30 W Input connectors (balanced input) XLR/TRS combo × 1 Input connectors (unbalanced input) RCA × 1 Input impedance 10 kΩ Speaker Enclosure Bass reflex Enclosure material MDF vinyl laminate Woofer (LF driver) 5.25" (133 mm) cones 6.5" (165 mm) cones 8" (203 mm) cones Tweeter (HF driver) 1" (25 mm) soft dome Reproduction frequency band 40 Hz – 36 kHz 37 Hz – 36 kHz 34 Hz – 36 kHz Power unit/other Supported voltages AC 110 V – 240 V, 50 Hz/60 Hz... - Page 7 © 2020 AlphaTheta Corporation. All rights reserved. 6F, Yokohama i-Mark Place, 4-4-5 Minatomirai, Nishi-ku, Yokohama, Kanagawa 220-0012 JAPAN 〒220-0012 神奈川県横浜市西区みな とみ らい4丁目4番5号 横浜アイ マークプレイ ス6階 6F, Й а а i-Mark Place, 4-4-5 М а а , Н - , Й а а, Ка а а а 220-0012 ЯПОНИЯ Artemis Building, Odyssey Business Park, West End Road, South Ruislip, Middlesex, HA4 6QE, U.K.
Need help?
Do you have a question about the VM-50 and is the answer not in the manual?
Questions and answers