Table of Contents
Advertisement
Advertisement
Table of Contents

Related Manuals for Phonak Roger NeckLoop


Summary of Contents for Phonak Roger NeckLoop
- Page 1 Roger NeckLoop User Guide...
-
Page 2: Table Of Contents
Contents 1. Welcome 2. Getting to know your Roger NeckLoop 2.1 Compatibility 2.2 Device description 2.3 Accessories included 2.4 LED and display icons 3. Getting started 3.1 Charging 3.2 Wearing 3.3 Connecting to a Roger microphone 3.4 Adjusting the volume 4. - Page 3 7. Compliance information 8. Information and explanation of symbols 9. Important safety information 9.1 Hazard warnings 9.2 Product safety information 9.3 Other important information 10. Care and maintenance 11. Service and warranty 11.1 Local warranty 11.2 International warranty 11.3 Warranty limitation...
- Page 4 This user guide is valid for: Wireless models CE mark applied Roger NeckLoop (02) 2020 Roger NeckLoop (03) 2020...
-
Page 5: Welcome
Phonak. Roger NeckLoop is an easy-to-use and affordable Roger™ receiver suitable for use with any hearing aid or sound processor featuring a T-coil (from Phonak or any other manufacturer). Roger NeckLoop is compatible with Roger microphones from Phonak. Please read this User Guide carefully to make sure that you understand and get the best out of your device. -
Page 6: Getting To Know Your Roger Neckloop
Roger microphone. The Roger microphone transmits the talker’s voice wirelessly to your hearing aid/sound processor via the Roger NeckLoop. You only need to activate the T-coil in your hearing aid/sound processor to hear the talker’s voice loud and clear. - Page 7 Listener Talker Using hearing aids Using Roger microphone and Roger NeckLoop...
-
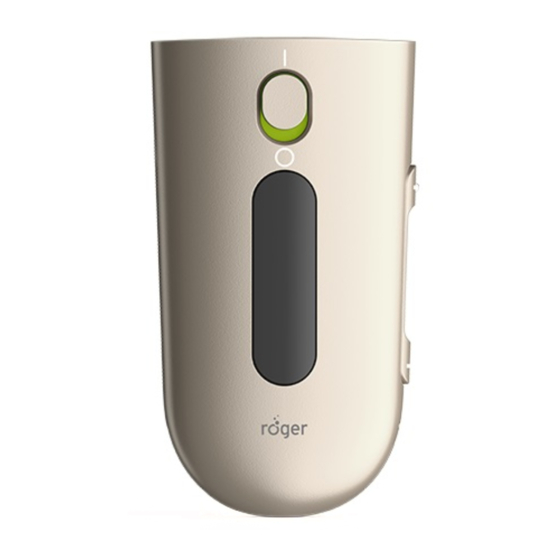
Page 8: Device Description
2.2 Device description 1 Display 2 Battery level indicator 3 Sockets for detachable neck loop 4 On/off button 5 Volume control buttons 6 Volume limiter button 7 Headphone socket 8 USB C socket... -
Page 9: Accessories Included
2.3 Accessories included Inductive neck loop (part no. 043-4002-1) USB cable External power supply (part no. 043-3093) (part no. 075-0020-xx) -
Page 10: Led And Display Icons
2.4 LED and display icons Operation Display and battery Roger NeckLoop has level indicator are lit been switched on and is for a few seconds. ready for use. Connect icon shows in Roger microphone is display. successfully connected to Roger NeckLoop. - Page 11 (filled bar) step by step up or down. The volume limiter is Volume cannot be active. increased beyond the horizontal line. USB port Note icon shows in Roger NeckLoop is the display. connected as an audio interface to a USB device.
- Page 12 Battery status 4 of 4 LED bars solid Battery capacity is green. 81-100%. 1 of 4 LED bars solid Battery capacity is green. 5-20%. 1 red LED bar blinking. Battery capacity is + crossed battery icon < 5%. Charge the blinking in display.
- Page 13 Charging Icon appears in display Roger NeckLoop is for 3 seconds, and connected to the then disappears. charger and is being charged. 1 LED bar blinking The battery is <20% green. charged. 2 LED bars solid green The battery is 56-80% charged.
-
Page 14: Getting Started
3. Getting started 3.1 Charging Fully charge Roger NeckLoop before using it the first time. Using the charger Plug the smaller end (USB C) of the charging cable into your Roger NeckLoop. Plug the larger end (USB A) of the charging cable into the external power supply. - Page 15 Charging via computer Plug the smaller end (USB C) of the charging cable into your Roger NeckLoop. Plug the larger end (USB A) of the charging cable into the USB port on your computer.
- Page 16 With the supplied charger, Roger NeckLoop is: • 80% charged after 1 hour • 100% charged after 3 hours • Once fully charged, Roger NeckLoop can be used for 10 hours or more.
-
Page 17: Wearing
3.2 Wearing Attach one end of the inductive neck loop in the socket on top of the Roger NeckLoop. Place the loop around your neck and attach the other end of the loop to the other socket. -
Page 18: Connecting To A Roger Microphone
3.3 Connecting to a Roger microphone Turn on your Roger microphone. Switch your hearing aid/sound processor to the T-coil program. It may be necessary to contact your hearing care professional to enable the T-coil program in your hearing aid/sound processor. - Page 19 Hold Roger NeckLoop within 10 cm / 4 inches of your Roger microphone. Press briefly the ‘Connect‘ button on the Roger microphone. See the user guide for your Roger microphone. Successful connection is indicated in the display. Max 10 cm /...
-
Page 20: Adjusting The Volume
3.4 Adjusting the volume Use the volume buttons to adjust the volume to a comfortable level. Volume up Volume down... -
Page 21: Using Usb For Audio
USB cable. A battery icon will appear for 3 seconds in the display. Turn Roger NeckLoop on. Roger NeckLoop will display a note icon. Select Roger NeckLoop as the audio device on the smart device or computer. - Page 22 Please refer to the user guide for the smart device or computer for correct settings and compatiblity information.
-
Page 23: Checking Receiver Functionality
(for hearing care professionals) 5.1 Connecting headphones Headphones can be used to monitor the audio. To benefit from maximum hearing comfort, use the official Roger NeckLoop headphones. Plug the headphones into the headphone socket. Turn Roger NeckLoop on. Put on the headphones. -
Page 24: Setting Maximum Volume
• The neck loop output is automatically switched off when the headphones are attached (to save battery power). • The volume will always start at a safe level. Use the volume control to increase or decrease the volume (see page 20) if needed. - Page 25 The volume can now not be increased beyond the vertical bar in the display. To remove the volume limit repeat step 2.
-
Page 26: Troubleshooting
Roger microphone. The volume is too low. The Roger microphone is muted. A crossed out ‘Connect‘ icon One or all Roger microphones are is visible in the display. switched off. Roger NeckLoop is out of range of the Roger microphone. - Page 27 Switch your hearing aids to the T-coil program. Connect Roger NeckLoop with your Roger microphone by pressing ‘Connect’ on your microphone. Note that Roger NeckLoop needs to be within 10 cm/4 inches of your Roger microphone. Press the ‘+‘ button on Roger NeckLoop to increase the volume.
- Page 28 Problem Causes The signal is interrupted Roger NeckLoop is too far away during audio streaming. from the Roger microphone. Roger NeckLoop is shielded by an obstacle (e.g. human body) The sound of Roger NeckLoop Electromagnetic fields from other is bad.
- Page 29 Solutions Move closer to the Roger microphone to be within its operating range. Adjust the device orientation and make sure you are in line of sight to the Roger microphone. Move away from electronic equipment until the hum stops. Make sure the Roger microphone is worn as indicated in its User Guide.
-
Page 30: Compliance Information
Medical Device Regulation 2017/745 as well as the Radio Equipment Directive 2014/53/EU. The full text of the EU Declaration of Conformity can be obtained from the manufacturer or the local Phonak representative whose address can be taken from the list on https://www.phonak.com/com/en/certificates.html (Phonak worldwide locations). - Page 31 FCC ID: KWCRX23 2262A-RX23 R 202-SMI050 In compliance with Regulation (EU) 2017/1354, authorization for frequency use requirements in the countries as shown on the pictogram below: Notice 1: This device complies with Part 15 of the FCC Rules and with RSS-210 of Industry Canada. Operation is subject to the following two conditions: 1) this device may not cause interference, and...
- Page 32 Notice 2: Changes or modifications made to this device not expressly approved by Sonova AG may void the FCC authorization to operate this device. Notice 3: The device has been tested and found to comply with the limits for a Class B digital device, pursuant to Part 15 of the FCC Rules and ICES-003 of Industry Canada.
- Page 33 – Reorient or relocate the receiving antenna. – Increase the separation between the device and receiver. – Connect the device into an outlet on a circuit different from that to which the receiver is connected. – Consult the dealer or an experienced radio/TV technician for help.
- Page 34 Any serious incident that has occurred in relation to the device should be reported to the manufacturer representative and the competent authority of the state of residence. The serious incident is described as any incident that directly or indirectly led, might have led or might lead to any of the following: the death of a patient, user or other person, the temporary or permanent serious deterioration of a...
- Page 35 For more information regarding features, benefits, setup, use and maintenance or repairs of your accessories – contact your hearing care professional or manufacturer representative. Additional information can be found in the Data Sheet of your product. For any information regarding the repair service of the hearing aid accessories please contact the hearing care professional.
- Page 36 Intended use: Neck loop receivers are intended to provide access to an external sound source. Indication: Neck loop receivers do not provide a therapeutic or diagnostic function. The therapeutic function is solely provided by the parent medical device (e.g. hearing aid or cochlea implant), which receives and further processes the inductive signal provided by the neck loop.
- Page 37 Technical specifications RF parameters Operating frequency <9 kHz 2.4 GHz Max. output power 120 dBuA/m at 10 m 2 mW Compliance with emission and immunity standards Emission standards Interference voltage EN 55011:2016 (CISPR11:2016/AMD1:2016) and radiated RF Group 1, Class B emissions Immunity standards Electrostatic...
- Page 38 Fast electric EN 61000-4-4:2012 (IEC 61000-4-4:2012) transients (Burst) (Test Levels: ±2 kV AC ports, ±1 kV Signal ports) Surges EN 61000-4-5:2014 (IEC 61000-4-5:2014) (Test Levels: ±1 kV L-N) Radio frequency EN 61000-4-6:2014 (IEC 61000-4-6:2013) common mode (Frequencies: 0.15-80 MHz; Test levels: 10 V, Modulation 1kHz, 80%AM) Magnetic fields EN 61000-4-8:2010 (IEC 61000-4-8:2009)
-
Page 39: Information And Explanation Of Symbols
Symbols not visable on the product can be accessed by pressing the volume down key for 5 sec. while starting Roger NeckLoop. Toggle through the information shown in the display by pressing the volume down button. With the CE symbol, Sonova AG confirms that this product –... - Page 40 This symbol indicates that the user guide contains important information and must be read before using the product. This symbol indicates that it is important for the user to pay attention to the relevant warning notices in this user guide. Important information for handling and product safety.
- Page 41 Humidity transport and storage: <85% (non-condensing). Humidity operation: <80% (non-condensing). Atmospheric pressure during transport, storage and operation: 700 hPa to 1060 hPa. Indicates the manufacturer’s serial number so that a specific medical device can be identified. Indicates date of manufacture. YYYY-MM-DD Packaging can be recycled.
- Page 42 This symbol on the product or its packaging means that it should not be disposed of with your other household waste. It is your responsibility to dispose of your waste equipment separately from the municipal waste stream. The correct disposal of your old appliance will help prevent potential negative consequences for the environment and human health.
-
Page 43: Important Safety Information
9. Important safety information Please read the information on the following pages before using your Phonak Roger NeckLoop. 9.1 Hazard warnings Persons with pacemakers or other medical devices should ALWAYS consult their physician, the manu-facturer of their device BEFORE using the neckloop receiver. - Page 44 Do not use your Roger NeckLoop in areas where electronic equipment is prohibited. Your device contain lithium-ion batteries with a Watt hour rating <20 Wh which have been tested according to UN 38.3 of the „UN Manual of Tests and Criteria“...
- Page 45 If such use is necessary, this equipment and the other equipment should be observed to verify that they are operating normally. Do not wear your Roger NeckLoop while it is charging. Do not transport the product outdoors without the IP22 carry bag.
-
Page 46: Product Safety Information
30 cm (12 inches) to any part of the Roger NeckLoop including cables specified by the manufacturer. Otherwise, degradation of the performance of this equipment could result. -
Page 47: Other Important Information
Roger NeckLoop‘s operating range. Roger NeckLoop collects and stores internal technical data. This data may be read by a hearing care professional in order to check the device, as well as to help you use your device correctly. -
Page 48: Care And Maintenance
10. Care and maintenance Cleaning of the device Using a dry lint-free cloth is the preferred method for cleaning. If necessary, the surface can be cleaned with mild soapy water. However, the cloth should be damp and not dripping wet to prevent moisture from entering the device. -
Page 49: Service And Warranty
11.2 International warranty Phonak offers a one year limited international warranty, valid as of the date of purchase. This limited warranty covers manufacturing and material defects. The warranty is valid only if proof of purchase is shown. -
Page 50: Warranty Limitation
11.3 Warranty limitation This warranty does not cover damage from improper handling or care, exposure to chemicals, immersion in water or undue stress. Damage caused by third parties or non-authorized service centers renders the warranty null and void. This warranty does not cover any services performed by a hearing care professional in his/her office. - Page 51 Notes...
- Page 52 Manufacturer: Sonova AG Laubisrütistrasse 28 CH-8712 Stäfa Switzerland www.phonak.com Sonova Deutschland GmbH Max-Eyth-Str. 20 70736 Fellbach-Oeffingen Germany...
Need help?
Do you have a question about the Roger NeckLoop and is the answer not in the manual?
Questions and answers