Advertisement
We value your feedback!
Your input helps to create even better
products and experiences.
Share the warmth and leave a review.
convectair.com/sharethewarmth
INSTALLATION AND USER'S GUIDE
To be read and kept by the user.
A BRAND OF GLEN DIMPLEX AMERICAS
7826
CALYPSO
Fan-forced
Wall Heater
7216610000R00
Advertisement
Table of Contents

Related Manuals for CONVECTAIR CALYPSO 7826


Summary of Contents for CONVECTAIR CALYPSO 7826
- Page 1 We value your feedback! Your input helps to create even better products and experiences. Share the warmth and leave a review. convectair.com/sharethewarmth INSTALLATION AND USER’S GUIDE To be read and kept by the user. A BRAND OF GLEN DIMPLEX AMERICAS...
-
Page 3: Table Of Contents
Electrical Connection ..........How to Use Your Convectair Heater....... . . -
Page 4: Quick Start
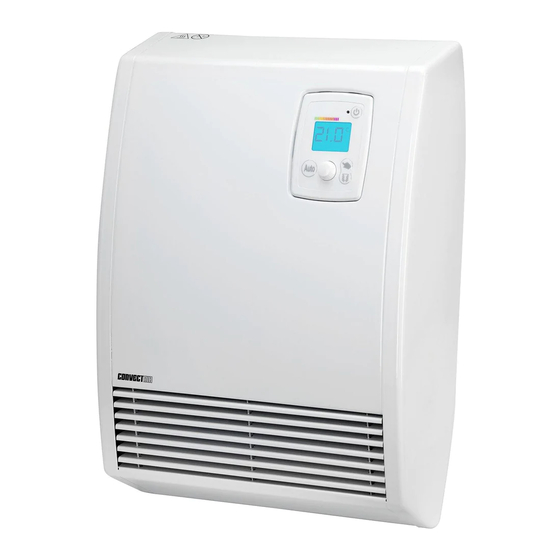
Quick Start Energy Consumption Power On/Standby Button Indicator Digital Display Screen Power On/Standby Indicator Auto Button Manual Button Auto Temperature Control Enable/Disable Dial / Heat Boost Open Window Detection Control Power On/Standby Button Press to start, or put into standby, the heating function of your device. Temperature Control Dial / Heat Boost Control Turn the dial to increase or decrease the set temperature. -
Page 5: Specifications
CALYPSO. - The installation must comply with the national and local standards in place and CONVECTAIR recommends that it be performed by a qualified electrician. - Your appliance must be installed in such manner that switches and other control devices cannot be touched by a person in the bathtub or in the shower. - Page 6 CAUTION : Do not insert anything into the unit. The first time the heater is turned on, there may be an odour. This phenomenon disappears after a few minutes of operation. CAUTION: DO NOT COVER There is a risk of overheating if the device is covered. Do not cover or block the air inlet or outlet grilles to reduce the risk of fire or damage to the device.
-
Page 7: Installation And Mounting
Installation and Mounting TOOLS REQUIRED #2 Phillips (4) 1½" Screws Stud Finder Screwdriver (Optional) (4) Wall anchors (if needed): Wire Strippers Utility Knife must be suitable for min. 50 lb / 22.7 kg Level Wire Connectors Tape Measure... - Page 8 Securing the Wall Bracket: 1 Remove the wall bracket from the appliance by releasing the two clips, using a screwdriver (see Fig. 2). Fig. 2 2 Position the wall bracket over the desired Fig. 3 location on the wall and mark the 4 fixing holes, following the dimensions in Fig.
-
Page 9: Electrical Connection
CONNECTION DIAGRAMS WITH the use of pilot wire WITHOUT the use of pilot wire B=BLACK R=RED G=GREEN P=PURPLE L1=LINE 1 L2=LINE 2 G=GROUND PW=PILOT WIRE The purple wire is only used if the device is connected to the CONVECTAIR Programmer. -
Page 10: How To Use Your Convectair Heater
How to Use Your Convectair Heater 4.1. TURNING ON THE HEATER Attention: When switching on for the first time (or after a fairly long power outage) 00:00 is displayed, the time must be set. Any time the controls are used, the time display will return after 5s of... - Page 11 Auto MANUEL 4.5. MANUAL OPERATION, “MANUAL” BUTTON Pressing the button overrides automatic operation of the device. The automatic functions are disabled (scheduled programs), and the device can be set in one of the following modes: Comfort mode (for adjusting the desired temperature) Eco mode (recommended for short-term absences) Frost Protection mode (recommended for absences greater than 24 hours)
- Page 12 4.6.4. HEAT BOOST MAINTENANCE “NETT” To ensure optimal operation of the Heat Boost, a maintenance message will be displayed on the LCD screen of the thermostat after 90 hours of operation to indicate that the device should be cleaned. Maintenance involves dusting the air inlets and outlets (refer to Maintenance section.) MANUEL 4.7.
- Page 13 The Power On/Standby function is accessible even when locked. The Heat Boost function remains accessible when the thermostat is Auto MANUEL in simple lock, but not accessible in code lock. 4.7.3. SIMPLE PARENTAL LOCK Press Auto simultaneously for 3 Auto MANUEL MANUEL seconds to lock or unlock the keypad.
- Page 14 To Unlock Con rm Con rm Con rm Con rm Con rm Con rm CORRECT INCORRECT Code Code 4.7.5. USAGE INDICATOR The usage indicator slider provides information on the power usage based on the setting MANUEL of the device. Slider toward green: more energy savings Slider toward red : less energy savings To optimize energy savings, it is advised not to exceed a temperature of 19 °C on average throughout the home.
- Page 15 4.7.6. CONFIGURATION OF ADDITIONAL FUNCTIONS This menu allows you to lock or unlock certain options and adjust certain settings. Auto Auto Auto MANUEL Press to put your device on standby. MANUEL MANUEL Auto Simultaneously press the buttons for 3 seconds. MANUEL Auto MANUEL...
- Page 16 4.8. SCHEDULED PROGRAMS Scheduled programs: programs are active, programs are not active 4.8.1. CLOCK SETUP To be able to use the programming, it is necessary to set the time and Auto day of the device (factory setting 00:00). In the event of a power outage that lasts longer than 12 hours, the time and day of the device must be reprogrammed.
- Page 17 4.8.2. PROGRAM SETUP This mode allows the automatic operation of your heater either at the Comfort setpoint or at the Eco setpoint. To assign a program to each day of the week press the buttons for 3 seconds Auto Auto MANUEL MANUEL Auto...
- Page 18 Predefined (P1 - P2 - P3) and customizable programs (P4 - P5 - P6) Monday to Friday Preset program Choice Meaning Monday to Friday 5:00 to 9:00 17:00 to 23:00 Monday to Friday 5:00 to 9:00 17:00 to 23:00 Program P1 sets the Comfort setpoint 5:00 to 9:00 17:00 to 23:00 temperature in the morning from 5:00...
- Page 19 4.8.3. CUSTOMIZABLE PROGRAMS P4-P5-P6 This mode allows the daily automatic operation of your heater either in Comfort or Eco setpoint. Auto To assign a program to each day of the week press the buttons for 3 seconds Auto Auto MANUEL MANUEL to enter the program menu.
- Page 20 Establishing a personalized program, example: P4 The example shown below is for Monday «LU: P4». The Comfort setpoint temperature is needed for three different time periods: in the morning from 6:00 to 9:00, at noon from 11:00 to 14:00 and in the evening from 18:00 to 22:00.
- Page 21 4.9. RETURN TO FACTORY SETTINGS A very long press (10 seconds) of the button will return the controller to the Auto MANUEL factory settings: Comfort 19°C 15.5°C Open Window Detection Enabled Lock (simple or with code) None Backlight 10 seconds Buzzer Enabled MANUEL...
- Page 22 MANUEL 4.10. CONVECTAIR PROGRAMMER COMMANDS This section is only applicable to installations where the a CONVECTAIR Programmer is linked to the heating system through the use of the pilot wire. MANUEL Command Meaning Setting Display Desired room temperature COMFORT (19.0°C shown) MANUEL 3.5 °...
-
Page 23: Troubleshooting
If after trying these procedures, your appliance still does not work or if the The heater problem repeats, call CONVECTAIR or the does nearest CONVECTAIR Service Center. not emit heat Ensure that the open window... -
Page 24: Overheat Protection
When switching on the CONVECTAIR for the first time, a slight smoke may emerge from it. This phenomenon is quite normal and will go away on its own after 2 or 3 minutes of operation of the device. -
Page 25: Identifying Your Device
Identifying Your Device IMPORTANT: PRODUCT INFORMATION APPEARS ON THE RATING LABEL. The rating label is placed on an internal side of the appliance near the supply grille, to allow for identification of the heater. It includes: - The complete model number (A), which must be included in any warranty claim. - Its power in Watts (B). -
Page 26: Warranty
Warranty 2 years against all defects / 5 years on the heating element. All CONVECTAIR devices have a dual warranty: two years against defects in materials and workmanship on all parts, and five years on the heating element itself. They are applicable from the date of purchase by the consumer and under the conditions specific to them. - Page 27 Your input helps to create even better products and experiences. Share the warmth and leave a review. convectair.com/sharethewarmth 1 800 463-6478 | www.convectair.ca In keeping with our policy of continuous product improvement, we reserve the right to make changes without notice.
Need help?
Do you have a question about the CALYPSO 7826 and is the answer not in the manual?
Questions and answers