Table of Contents
Advertisement
Quick Links
Advertisement
Table of Contents

Related Manuals for Ronix 8900


Summary of Contents for Ronix 8900
- Page 1 20V BRUSHLESS DRIVER HAMMER DRILL 8900 - 8900K...
-
Page 3: Technical Specifications
21+3 21+3 accessories No Battery "Lithium Battery 20V/2.0Ah: 2PCs and chargers Fast Charger 22V/2.2A: 1PCs" USABLE BATTERIES FOR 8900 Ronix Model No. Product 8990 20V battery pack, 2.0Ah Li-ion battery 8991 20V battery pack, 4.0Ah Li-ion battery USABLE CHARGERS FOR 8900 Ronix Model No. -
Page 4: Part List
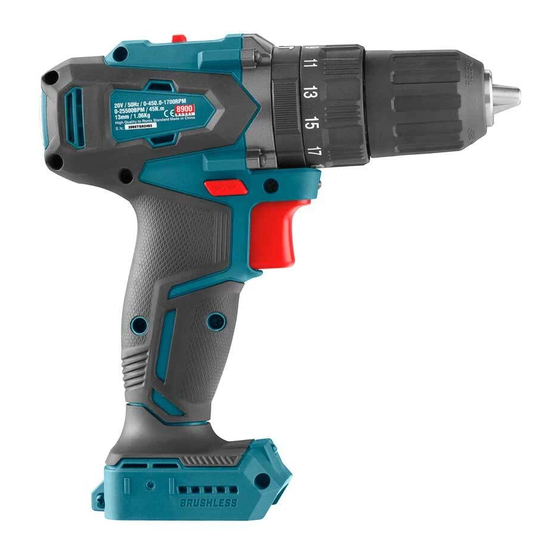
PART LIST Adjustable torque clutch Keyless chuck Direction button Work light Power trigger Battery GENERAL POWER TOOL SAFETY RULES WARNING! -Read all safety warnings and all instructions. Failure to follow the warnings and instructions may result in electric shock, fire and/or serious injury. -Save all warnings and instructions for future reference. -
Page 5: Electrical Safety
ELECTRICAL SAFETY -Power tool plugs must match the outlet. Never modify the plug in any way. Do not use any adapter plugs with earthed (grounded) power tools. Unmodified plugs and matching outlets will reduce risk of electric shock. -Avoid body contact with earthed or grounded surfaces such as pipes, radiators, ranges and refrigerators. - Page 6 long hair can be caught in moving parts. -If devices are provided for the connection of dust extraction and collection facilities, ensure these are connected and properly used. Use of dust collection can reduce dust-related hazards. POWER TOOL USE AND CARE -Do not force the power tool.
- Page 7 charger that is suitable for one type of battery pack may create a risk of fire when used with another battery pack. -Use power tools only with specifically designated battery packs. Use of any other battery packs may create a risk of injury and fire. -When battery pack is not in use, keep it away from other metal objects, like paper clips, coins, keys, nails, screws or other small metal objects that can make a connection from one terminal to another.
- Page 8 they may be extremely hot and could burn your skin. -Some material contains chemicals which may be toxic. Take caution to prevent dust inhalation and skin contact. Follow material supplier safety data. WARNING! Do not let comfort or familiarity with product (gained from repeated use) replace strict adherence to safety rules for the subject product.
-
Page 9: Tips For Maintaining Maximum Battery Life
-Do not use a damaged battery. TIPS FOR MAINTAINING MAXIMUM BATTERY LIFE -Charge the battery cartridge before completely discharged. Always stop tool operation and charge the battery cartridge when you notice less tool power. -Never recharge a fully charged battery cartridge. Overcharging shortens the battery service life. -
Page 10: Functional Description
rotation or from the Left side for counterclockwise rotation. When the reversing switch lever is in the neutral position, the switch trigger cannot be pulled. FUNCTIONAL DESCRIPTION CAUTION: Always be sure that the tool is switched off and the battery cartridge is removed before adjusting or checking function on the tool. -
Page 11: Speed Change
-Use the reversing switch only after the tool comes to a complete stop. Changing the direction of rotation before the tool stops may damage the tool. -When not operating the tool, always set the reversing switch lever to the neutral position. Switch trigger SPEED CHANGE To change the speed, first switch off the tool and then slide the speed... -
Page 12: Adjusting The Fastening Torque
ADJUSTING THE FASTENING TORQUE The fastening torque can be adjusted in 18 steps by turning the adjusting ring so that its graduations are aligned with the pointer on the tool body. The fastening torque is minimum when the number 1 is aligned with the pointer and maximum when the marking is aligned with the pointer. -
Page 13: Drilling Operation
NOTE: When driving wood screws, predrill pilot holes to make driving easier and to prevent splitting of the work piece. See the chart. Nomina diameter of wood Recommended size of scrrew(mm) pilot hole (mm) 2.0-2.2 2.2-2.5 2.5-2.8 2.9-3.2 3.1-3.4 3.3-3.6 3.7-3.9 4.0-4.2 4.2-4.4... -
Page 14: Screw Driving Operation
point of the bit in the indentation and start drilling. Use a cutting lubricant when drilling metals. The exceptions are iron and brass which should be drilled dry. CAUTION: Pressing excessively on the tool will not speed up the drilling. In fact, this excessive pressure will only serve to damage the tip of your bit, decrease the tool performance and shorten the service life of the tool. -
Page 15: Maintenance
-Never use gasoline, benzene, thinner, alcohol or the like. Discoloration, deformation or cracks may result. NOTE: To maintain product safety and reliability repairs, any other maintenance or adjustment should be performed by Authorized Service Ronix Service Centers, always using replacement parts. RONIX USER MANUAL...
Need help?
Do you have a question about the 8900 and is the answer not in the manual?
Questions and answers