Table of Contents
Advertisement
Quick Links
Advertisement
Table of Contents

Related Manuals for Ronix 8512


Summary of Contents for Ronix 8512
- Page 1 CORDLESS DRIVER DRILL 8512...
-
Page 2: Specifications
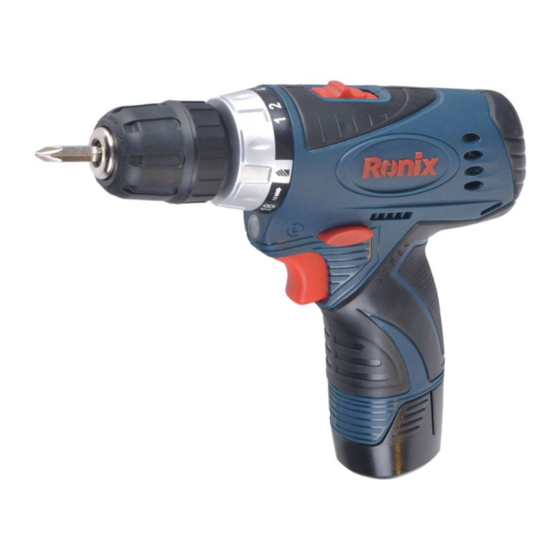
SPECIFICATIONS Model 8512 Battery type Lithium-lon Rated voltage 0-350 No-load speed 0-1350(rpm) Max clutch 10mm Max screw diameter (mm) Allowable temperature 5-40 Charger input 200-240 V Drill weight 1.04 kg PARTS LIST Torque Collar Mode Selector Switch Automatic Chuck LED Lamp... -
Page 3: General Safety Rules
GENERAL SAFETY RULES (FOR ALL BATTERY OPERATED TOOLS) WARNING: Read and understand all instructions. Failure to follow all instructions listed below, may result in electric shock, fire and/ or serious personal injury. WORK AREA 1. Keep your work area clean and well lit. cluttered benches and dark areas invite accidents. - Page 4 7. Dress properly. Do not wear loose clothing or jewelry, contain long hair. Keep your hair, clothing, and gloves away from moving parts. Loose clothes, jewelry, or long hair can be caught in moving parts. 8. Avoid accidental starting. Be sure switch is in the locked or off position before inserting battery pack.
-
Page 5: Specific Safety Rules
that can make a connection from one terminal to another. Shorting the battery terminals together may cause sparks, burns, or a fire. 18. Maintain tools with care. Keep cutting tools sharp and clean. Properly maintained tools with sharp cutting edge are less likely to bind and are easier to control. -
Page 6: Important Safety Instructions For Battery
Always be sure you have a firm footing. 4. Be sure no one is below when using the tool in high locations. 5. Hold the tool firmly. 6. Keep hands away from rotating parts. 7. Do not leave the tool running. Operate the tool only when hand-held. 8. -
Page 7: Important Safety Instructions For Charger
(2) Avoid storing battery cartridge in a container with other metal objects such as nails, coins, etc. (3) Do not expose battery cartridge to water or rain A battery short can cause a large current flow, over heating, possible bums and even a breakdown. -
Page 8: Tips For Maintaining Maximum Battery Life
immediately. 11. Do not operate or disassemble charger if it has received a sharp blow, been dropped, or otherwise damaged in any way, take it to a qualified serviceman. Incorrect use or reassembly may result in a risk of electric shock of fire. 12. -
Page 9: Installing Or Removing Battery Cartridge
INSTALLING OR REMOVING BATTERY CARTRIDGE - Always switch off the tool before insertion or removal of the battery cartridge. - To remove the battery cartridge, withdraw it from the tool while pressing the buttons on both sides of the cartridge. - To insert the battery cartridge, align the tongue on the battery cartridge with the groove in the housing and slip it into place. -
Page 10: Electric Brake
1.Switch Trigge 1.Reversing Switch Lever ELECTRIC BRAKE This tool is equipped with an electric brake. If the tool consistently fails to quickly stop after switch trigger release, have tool serviced at a Ronix service center. USER MANUAL... -
Page 11: Reversing Switch Action
REVERSING SWITCH ACTION This tool is equipped with an electric brake. If the tool consistently fails to quickly stop after switch trigger release, have tool serviced at a Ronix service center. REVERSING SWITCH ACTION This tool has a reversing switch to change the direction of rotation. -
Page 12: Adjusting The Fastening Torque
may be damaged. ADJUSTING THE FASTENING TORQUE The fastening torque can be adjusted in 19 steps by turning the adjusting ring so that its graduations are aligned with the poiner on the tool body. The fastening torque is minimum when the number 1 is aligned with the pointer, and maximum when the marking is aligned with the pointer. -
Page 13: Installing Or Removing Driver Bit Or Drill Bit
NOTE: - The adjusting ring does not lock when the pointer is positioned only halfway between the graduations. - Do not operate the tool with the adjusting ring set between the number 18 and the marking. The tool may be damaged. ASSEMBLY 1.Sleeve 2.Ring... -
Page 14: Screwdriving Operation
OPERATION SCREWDRIVING OPERATION Place the point of the driver bit in the screw head and apply pressure to the tool. start the tool slowly and then increase the speed gradually. Release the switch trigger as soon as the clutch cuts in. CAUTION: Make sure that the driver bit is inserted straight in the screw head, or the screw and/or bit may be damaged. - Page 15 OPERATION Recommended size of pilot hole Nominal diameter of wood screw (mm) (mm) 2.0 - 2.2 2.2 – 2.5 2.5 – 2.8 2.9 – 3.2 3.1 – 3.4 3.3 – 3.6 3.5 – 3.9 3.8 – 4.1 5.0 – 5.5 CORDLESS DRIVER DRILL...
- Page 16 Place the point of the bit in the indentation and start drilling. Use a cutting lubricant when drilling metals the exceptions are iron and brass which should be drilled dry. CATION: - Pressing excessively on the tool will not speed up the drilling. In fact, this excessive pressure will only serve to damage the tip of your bit, decrease the tool performance and shorten the service life of the tool.
-
Page 17: Important Charging Notes
IMPORTANT CHARGING NOTES 1. The charger was designed to fast charge the battery only when the battery temperature is between 32F (0C) and 113F (45C). If the battery pack is too hot or too cold, the charger will not fast charge the battery. (this may happen if the battery pack is hot from heavy use). -
Page 18: Maintenance
temperature is reached, at which time the charger will switch automatically to fast-charging. If the red indicator light is “BLINKING”, the battery pack cannot accept a charge or the contacts of the charger or battery pack are contaminated. Clean the contacts of the charger or battery pack only as directed in these operating instructions or those supplied with your tool or battery pack.
Need help?
Do you have a question about the 8512 and is the answer not in the manual?
Questions and answers