Table of Contents
Advertisement
Available languages
Available languages
Quick Links
Advertisement
Chapters
Table of Contents

Related Manuals for getAir easyFan


Summary of Contents for getAir easyFan
- Page 1 BEDIENUNGSANLEITUNG USER GUIDE DEEN 190128-01 EF 50007175...
- Page 2 © 2019 getAir GmbH Die in diesem Dokument enthaltenen Informationen sind Eigentum des Herstellers. Die Veröffentlichung, ganz oder in Teilen, bedarf der schriftlichen Zustimmung. Eine innerbetriebliche Vervielfältigung, die zur Evaluierung des Produktes oder zum sachgemäßen Einsatz bestimmt ist, ist erlaubt und nicht genehmigungspflichtig.
-
Page 3: Table Of Contents
Inhaltsverzeichnis 1 Symbolerklärung ....... . 4 1.1 Hinweise ........4 1.2 Sicherheitshinweise . -
Page 4: Symbolerklärung
1 Symbolerklärung • Über diese Anleitung hinaus müssen auch die entsprechenden Anleitungen Die folgende Auflistung zeigt die in diesem der bauseits vorhandenen oder vor- Dokument verwendeten Warn- und Infor- gesehenen Anlagen und Anlagenteile mationshinweise und definiert die Art und beachtet werden. Dies gilt insbeson- Schwere der Folgen, falls die Anweisungen dere für Lüftungsgeräte und andere nicht befolgt werden. -
Page 5: Funktion
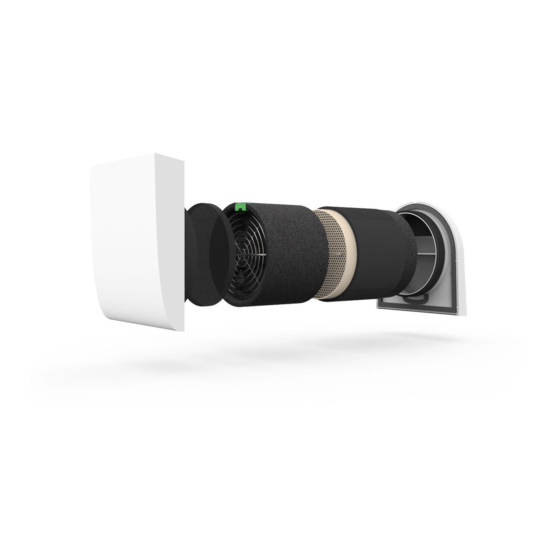
• Dieses Gerät kann von Kindern ab 8 2 Funktion Jahren und darüber sowie von Personen Das Gerät wird paarweise betrieben, so dass mit verringerten physischen, senso- ein Gerät im Zuluftbetrieb arbeitet während rischen oder mentalen Fähigkeiten das andere gleichzeitig im Abluftbetrieb oder Mangel an Erfahrung und Wissen läuft. -
Page 6: Planung
Details müssen während der Planung des Luftaustausch, z.B. durch Überströmöffnun- Systems mit dem Fachplaner oder zuständi- gen in Türen, Türspalte (> 10 mm) oder Luft- gen Fachbetrieben besprochen werden. durchlässe, sichergestellt sein. Die minimale Wandstärke bzw. Rohr- länge ist abhängig vom gewählten Fas- Bestimmungsgemäßer Gebrauch sadenabschluss oder der verwendeten Das Produkt ist zur kontrollierten Belüftung... -
Page 7: Betrieb
4 Betrieb • Integrierte Klappe nach unten klappen bis diese mit der Kontur abdichtet. VORSICHT • Innenblende mit Öffnung nach oben in das Montagerohr einschieben. Verschmutzung durch Staubeintrag! Lüftungsgerät nicht ohne eingesetzten Filter betreiben. Öffnen der Innenblende 4.1 Innenblende Die Innenblende kann im Ausnahmefall ver- schlossen werden, um den Eintritt von Au- ßenluft zu unterbinden, zum Beispiel wenn die Außenluft mit Rauch oder Staub belastet... -
Page 8: Wartung
5 Wartung GEFAHR Verletzung durch Stromschlag! • Vor Beginn der Wartung: Lüftungsgerät ausschalten. • Vor Beginn der Arbeiten am Lüfter oder Wärmetauscher: Lüftungsanlage allpolig abschalten und gegen unbeabsichtigtes Wiedereinschalten sichern. 5.1 Wartungsintervalle Bauteil Zeitintervall Maßnahme • Oberflächen mit einem feuchten Tuch reinigen. Innenblende Nach Bedarf Filter... -
Page 9: Wartungsbeschreibung
5.2 Wartungsbeschreibung Filterwechsel INFORMATION Filter für verschiedene Anwendungen sind als Zubehör erhältlich. • Innenblende aus Montagerohr ziehen [1]. • Filter aus der Halterung nehmen [2]. • Filter prüfen und ggf. reinigen oder ersetzen. • Filter wieder in die Halterung einsetzen [3]. - Page 10 Lüfter und Wärmetauscher reinigen • Ohne das Kabel zu beschädigen den • System an der Steuerung ausschalten. Wärmetauscher vorsichtig bis zum An- • Innenblende aus Montagerohr ziehen. schlag in das Montagerohr schieben. WARNUNG • Ohne das Kabel zu beschädigen den Lüfter vorsichtig in das Montagerohr Beschädigung des Kabels! einsetzen.
- Page 11 • Stecker am Lüfter ausstecken. Sonderlösung Laibung • Ohne das Kabel zu beschädigen den Lüfter und Wärmetauscher am Bügel herausziehen. • Kondensatablauf im Bogen kontrollieren und ggf. Kondensat entfernen. • Ohne das Kabel zu beschädigen den Wärmetauscher vorsichtig bis zum An- schlag in das Montagerohr schieben.
-
Page 12: Störungsbehebung
6 Störungsbehebung Störung Ursache Behebung Steuerung arbeitet im Modus • An der Bedieneinheit den Eco-Modus Durchlüften. (Wärmerückgewinnung) einstellen. Lüfter wechselt die • Lüfter austauschen lassen. Lüfter defekt. Drehrichtung nicht. • Steuerung bzw. Netzteil austauschen Steuerung oder Netzteil lassen. defekt. • Spannungsversorgung überprüfen Keine Spannungsversorgung. -
Page 13: Gewährleistung
8 Gewährleistung • Das Problem durch unsachgemäße, harte oder unachtsame Behandlung, Verwen- dung bzw. Wartung verursacht wurde. INFORMATION • Das Produkt mit Bau- oder Ersatzteilen, Außerhalb Deutschlands gelten die nationalen Gewährleistungsbestimmungen des Landes in die nicht vom Hersteller geliefert oder dem das System vertrieben wird. - Page 15 Contents 1 Explanation of symbols ......16 1.1 Instructions ....... . 16 1.2 Safety instructions .
-
Page 16: Explanation Of Symbols
1 Explanation of symbols particular to ventilation units and other components. The following is a list of the warning and • Only a specialist company may carry information notices used in this document, out installation and commissioning. and defines the type and severity of the con- Relevant engineering standards must be sequences of failing to follow instructions. -
Page 17: Function
is inserted into a mounting tube, which is DANGER bonded firmly to the wall. Risk of combustion gases escaping from com bustion equipment! 2.2 Use • Observe legal and normative requirements Prerequisites for trouble-free and safe prod- in any design involving combustion equip- uct operation are: correct transport and stor- ment. -
Page 18: Planning
extraction or for drying out structures, or for 3.1 Installation use in rooms containing corrosive and ag- The associated installation instructions gressive gases, or with extreme humidity or show the individual steps. These are includ- dust pollution. ed with each full and building shell set. The electrical installation depends on the 3 Planning selected control unit and is described ac-... - Page 19 Closing the inside cover Opening the inside cover • Remove the inside cover from the • Switch off ventilation unit at control mounting tube. unit. • Fold the built-in flap upwards and latch • Remove the inside cover from the into place.
-
Page 20: Maintenance
5 Maintenance DANGER Risk of electric shock! • Before starting maintenance: switch off the ventilation unit. • Before starting work on the fan or heat exchanger: disconnect the ventilation unit at all poles and secure against unintention- al reconnection. 5.1 Maintenance intervals Component Interval Action... -
Page 21: Maintenance Description
5.2 Maintenance description Filter replacement INFORMATION Filters for various applications are available as accessories. • Remove the inside cover from the mounting tube [1]. • Remove the filter from the retainer [2]. • Check the filter; clean or replace if necessary. - Page 22 Clean the fan and heat exchanger with water if necessary. • Switch off the system at the control unit. • Without damaging the cable, push • Remove the inside cover from the the heat exchanger carefully into the mounting tube. mounting tube as far as it will go.
- Page 23 • Remove the inside cover from the Special window reveal solution mounting tube. • Unplug the connector from the fan. • Without damaging the cable, pull out the fan and heat exchanger at the bracket. • Check the condensate drain in the bend; remove any condensate.
-
Page 24: Troubleshooting
6 Troubleshooting Fault Cause Solution Control unit operating in quick • Select eco mode (heat recovery) on the ventilation mode. programming unit. Fan not changing • Replace the fan. Fan faulty. rotation direction. • Replace the control unit or power supply Control unit or power supply unit. -
Page 25: Warranty
8 Warranty • You have made unauthorised changes or modifications to the product. INFORMATION • The issue was caused by fire or other natural disaster. Outside Germany, national warranty conditions of the country in which the system is operat- • The issue was caused by incorrect instal- ed shall apply. -
Page 26: Anhang / Attachment
10 Anhang / Attachment 10.1 Technische Daten / Technical data Allgemein General Wärmebereitstellungsgrad, η Heat recovery rate, η max. max. Wärmebereitstellungsgrad, η Heat recovery rate, η Ø, ERP Ø, ERP Stufe 1 Stufe 2 Stufe 3 Stufe 4 Level 1 Level 2 Level 3 Level 4... - Page 27 10.2 Energieeffizienzlabel / Energy efficiency label Zentrale Bedarfssteuerung / Central demand control Handsteuerung (keine Bedarfssteuerung) / Manual control (no DCV) easyFan ENERGIA · ЕНЕРГИЯ · ΕΝΕΡΓΕΙΑ · ENERGIJA · ENERGY · ENERGIE 2016 1254/2014...
- Page 28 The following product information follows the requirements of EU Regulations No. 1253/2014 imple- menting Directive 2009/125/EC and No. 1254/2014 complementary to Directive 2010/30/EU. Zentrale Bedarfssteuerung / Central demand control Lieferant getAir Supplier’s name Modell easyFan Model Kalt / Cold - 82,48 Spezifischer Energieverbrauch kWh/ Durchschnitt /...
- Page 29 Handsteuerung (keine Bedarfssteuerung) / Manual control (no DCV) Lieferant getAir Supplier’s name Modell easyFan Model Kalt / Cold - 79,98 Spezifischer Energieverbrauch kWh/ Durchschnitt / - 38,98 Specific energy consumption (m²a) Average Warm / Warm - 15,49 Angabe des Typs...
- Page 30 10.4 Notizen / Notes...
- Page 32 GmbH Krefelder Straße 670 | 41066 Mönchengladbach +49 2161 990 95 - 0 | +49 2161 990 95 - 99 service@getair.eu | www.getair.eu M A D E I N G E R M A N Y...
Need help?
Do you have a question about the easyFan and is the answer not in the manual?
Questions and answers