Advertisement
Available languages
Available languages
Quick Links
Advertisement

Related Manuals for Sanotechnik D50540


Summary of Contents for Sanotechnik D50540
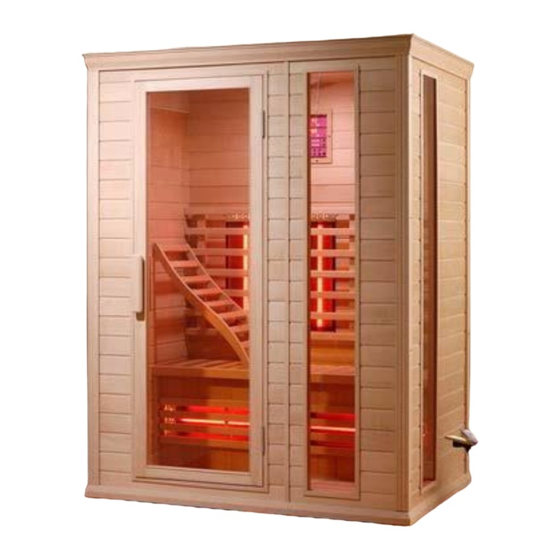
- Page 1 Deutsch Art.Nr.: D50540 11/2014...
- Page 2 Deutsch Benutzungs- und Sicherheitsanweisungen Lesen Sie alle Informationen für Sicherheit und Gesundheit durch. Falls Sie unschlüssig sind ob Sie die Infrarotkabine benutzen können oder nicht konsultieren Sie Ihren Arzt. Falls Sie sich während der Benutzung schwindlig oder überhitzt fühlen verlassen Sie die Infrarotkabine augenblicklich.
- Page 3 Deutsch vor/bei den Strahlern liegen, um einen Brand zu verhindern. 16) Um Brände und elektrische Schocks zu verhindern verwenden Sie keine Metallwerkzeuge bei den Heizelementen. 17) Falls die Glühbirne gewechselt werden muss, drehen Sie das Licht ab, schalten Sie die Kabine aus und warten bis die Glühbirne abgekühlt ist.
- Page 4 (Kassabeleg, ...) beim Kundendienst vorliegt. Die Garantie bezieht sich auf Reparaturen und Austausch von Bauteilen des Gerätes, die von der Firma SANOTECHNIK anerkannt werden müssen. Die Interventionsgebühr geht zu Lasten des Kunden, die direkt an den Kundendienst zu entrichten ist. Nicht jedoch auf Ein- und Ausbau-, sowie alle weiteren Folgekosten, diese sind ausgeschlossen.
- Page 5 Deutsch Strahler 230V 50Hz Rücken: 3x 400W 1.5 Watt 4.2 Watt 4 Watt 2400 Watt Boden : 1x 300W Front: 2x 300W Schaltplan:...
- Page 6 Deutsch Teileliste: 1. Dach (12-1) Griff Außenteil 2. Rückwand (12-2) Silikondichtung 2 Stk. 3. Schrauben 5x60 16Stk. (12-3) Glastür 4. linke Seitenwand (12-4) Holzbefestigung 5. Elektronikbox (12-5) Imbusschrauben 8x45 2Stk. 6. Schrauben für Elektronikbox 4x12 4Stk. (12-6) Schraubenabdeckungen 7. Bodenelement (12-7) Schrauben 4*35 2Stk. 8.
- Page 7 Deutsch Schraubenliste: 1.Für Griffe X2. 2. Für die Verschraubung zwischen Rückwand und Seitenwände 8 Stk., für Dachmontage 10 Stk. 3. Für die Dekor-Leisten 16 Stk., für die Griffe im Inneren 2 Stk. 4. Für die Kablelclips 10 Stk. Elektronikbox Montage 4 Stk. Für Fußstrahler Montage 4 Stk.
- Page 8 Deutsch 3 Schritt: Gehen Sie vor wie in Schritt 2 um die rechte Seitenwand und das Türelement zu montieren 4 Schritt: Montieren Sie die Elektronikbox an der Unterseite der Rückwand. (wie das Bild). Dann montieren Sie die Schutzeinrichtung wieder an der Wand. 5 Schritt: Montieren Sie den Fußstrahler auf die Sitzbankstütze und montieren Sie dann die ganze Sitzbank an der Wand (wie auf dem Bild 5)
- Page 9 Deutsch 6 Schritt: Verbinden Sie alle Kabelanschlüsse achten Sie auf die passenden Symbole) und montieren Sie dann die Sitzbank. 7 Schritt: Messen Sie 50cm vom Boden nach oben (in den Frontecken links und rechts) und markieren Sie die Stelle mit einem Stift (siehe Bild 7). Nehmen Sie den markierten Punkt als Startpunkt für die Montage der Frontstrahler.
- Page 10 Deutsch 9 Schritt: Öffnen Sie die Glastür und montieren Sie den Griff in den vorgesehenen Löchern.
- Page 11 Deutsch Taste Lautstärke - Temperatur + Power Ein/Aus Temperatur - Display Anzeige Zeit + Temperatur / Frequenz Zeit - Temperatur Indikator Leuchte MP3/USB Anschluss FM Indikator Leuchte Strahler Gruppe A FM / Radio Indikator Leuchte Strahler Gruppe B Lautstärke und Zeit Farblicht Lautstärke Indikator Leuchte Ventilator...
- Page 12 Deutsch 1. System/Kabine Ein bzw. Aus schalten Wenn Sie die Kabine an den Strom anschließen beginnt die Indikatorleuchte (Power) zu blinken, die Kabine befindet sich nun im Stand-by Modus. Drücken Sie die Ein/Aus Taste “ “ um das System Ein bzw. Aus zu schalten, die Indikatorleuchte leuchtet konstant.
- Page 13 Deutsch 6. Lautstärke Einstellung Wenn die Radio oder CD/MP3 Funktion aktiv ist, drücken Sie die Tasten „ & “ um die Lautstärke zu erhöhen bzw. zu verringern (Verstellbereich 1-12). Durch langes Drücken der Tasten „ & “ erhöht/verringert sich die Lautstärke schneller. 7.
- Page 14 Deutsch Technische Daten Nennspannung 220-230 VAC Bemessungsfrequenz 50HZ Gesamtleistung 2600W Leistungsverlust <0.25mA (Max) Wiederstand >50MΩ Spannungsfestigkeit 2000V Detaillierte Technische Daten Typen Nennspannung Frequenz Nennleistung Sonstiges Strahler 230VAC 50 HZ 250-300W 7 Stk. Licht 12VDC //////// 1.5W 1 Stk. Ventilator 12VDC //////// 1 Stk.
- Page 15 ENGLISH – ENGLISH – ENGLISH – ENGLISH – ENGLISH – ENGLISH – ENGLISH – ENGLISH Item No: D50540 Sanotechnik Handelsgesellschaft m.b.H. Industriestrasse 5 A-2752 Wöllersdorf Tel.: 0043/2622/421 93-0 Fax. 0043/2622/421 93-6 office@sanotechnik.at Email: www.sanotechnik.com 11/2014 1/14...
- Page 16 ENGLISH – ENGLISH – ENGLISH – ENGLISH – ENGLISH – ENGLISH – ENGLISH – ENGLISH Operating and safety instructions Read all the information for safety and health through. If you are uncertain whether you can use the infrared cabin or not, consult with your doctor. If you feel dizzy or overheated during use, leave the infrared cabin instantly.
- Page 17 ENGLISH – ENGLISH – ENGLISH – ENGLISH – ENGLISH – ENGLISH – ENGLISH – ENGLISH Reasons for which you should not use the cabin 1. If you have open wounds. 2. If you have eye disease. 3. If you have severe sunburn. 4.
-
Page 18: Warranty
The warranty applies to repairs and replacement of components of the device, which must be recognized by the company SANOTECHNIK. The intervention fee is charged to the customer, which is paid direct to the customer service. But not on installation and removal, and all other costs, these are excluded. - Page 19 ENGLISH – ENGLISH – ENGLISH – ENGLISH – ENGLISH – ENGLISH – ENGLISH – ENGLISH Technical parameter External Dimensions (mm) Length 1000 Width 1500 Height Height 1950 Length Width Voltage Power of Lampion Ventilation Speaker Total Power Heater 230V 3 x 400W 1.5 Watt 4.2 Watt 4 Watt...
- Page 20 ENGLISH – ENGLISH – ENGLISH – ENGLISH – ENGLISH – ENGLISH – ENGLISH – ENGLISH Part list 1. Ceiling (12-1. Outside of Handle. 2. Back wall (12-2. Silicon Cushion×2) 3. Sunk screw (5×60=16) (12-3. Glass door) 4. Left side wall (12-4.
- Page 21 ENGLISH – ENGLISH – ENGLISH – ENGLISH – ENGLISH – ENGLISH – ENGLISH – ENGLISH The list of the screw 1. For the handle installation X2 2. For the side wall and back wall installation X8, for the roof fixing X9 3.
- Page 22 ENGLISH – ENGLISH – ENGLISH – ENGLISH – ENGLISH – ENGLISH – ENGLISH – ENGLISH Step 1: Make sure to level the bottom board of the cabin. Install the back wall with the bottom board and adjust it. One of the installer right the back wall and mare sure it is vertically.
- Page 23 ENGLISH – ENGLISH – ENGLISH – ENGLISH – ENGLISH – ENGLISH – ENGLISH – ENGLISH Step 4: Install the electronic box to the bottom of the back wall as the picture. Then, install the back safety guard on the wall. Step 5: Install the leg heater on the bench frame in advance.
- Page 24 ENGLISH – ENGLISH – ENGLISH – ENGLISH – ENGLISH – ENGLISH – ENGLISH – ENGLISH Step 7: Please measure 500MM at the front corner of the cabin as the Start Point for installation of the heater by using the measuring tape. Notice: 1.
- Page 25 ENGLISH – ENGLISH – ENGLISH – ENGLISH – ENGLISH – ENGLISH – ENGLISH – ENGLISH Volume - Temperature + Power on/off Temperature - Display Area Time + Temperature/FM Time - Temperature indicator light MP3 USB input FM tune indicator light Infrared sauna group A Volume/time Infrared sauna groub B...
- Page 26 ENGLISH – ENGLISH – ENGLISH – ENGLISH – ENGLISH – ENGLISH – ENGLISH – ENGLISH 1. System Booting Power On/Off light indicates by flashing slowly when the electricity is on. The system is in stand-by status. Press the Power On/Off button to start the system and the Power On/Off indicators constant on.
- Page 27 ENGLISH – ENGLISH – ENGLISH – ENGLISH – ENGLISH – ENGLISH – ENGLISH – ENGLISH 6. Volume adjustment The default volume is 7 when the Radio or CD&MP3 is on working status. Adjust the volume by 1 when press button, keep on long press the button more than one second, it can adjust the volume quickly.
- Page 28 ENGLISH – ENGLISH – ENGLISH – ENGLISH – ENGLISH – ENGLISH – ENGLISH – ENGLISH Technical data Rated Voltage 220-230VAC Rated frequency 50HZ Total Power(Max) 2400W Power leakage <0.25mA Insulated resistance >50MΩ Dielectric strength 2000V Technical description of load configuration Load type Rated load Voltage Rated Load Rated Load...
Need help?
Do you have a question about the D50540 and is the answer not in the manual?
Questions and answers