Table of Contents
Advertisement
Quick Links
Advertisement
Table of Contents

Related Manuals for Colorlight X1


Summary of Contents for Colorlight X1
- Page 1 X1 Controller...
-
Page 2: Table Of Contents
Content Chapter 1 Overview ......................1 1.1 Overview ........................1 1.2 Features ........................1 1.3 Structure ........................2 Chapter 2 Functions ......................5 2.1 Video Processing ..................... 5 2.2 Sending ........................5 Chapter 3 Operations......................6 3.1 Signal Connection ....................6 3.2 Power On ......................... -
Page 3: Chapter 1 Overview
It supports arbitrary scaling and cropping of video sources. X1 adopts 2 Gigabit Ethernet outputs, and it supports LED displays of 4096 pixels in maximum width or 2560 pixels in maximum height. Meanwhile, X1 is equipped with a series of versatile functions which can provide flexible screen control and high-quality image displays. -
Page 4: Structure
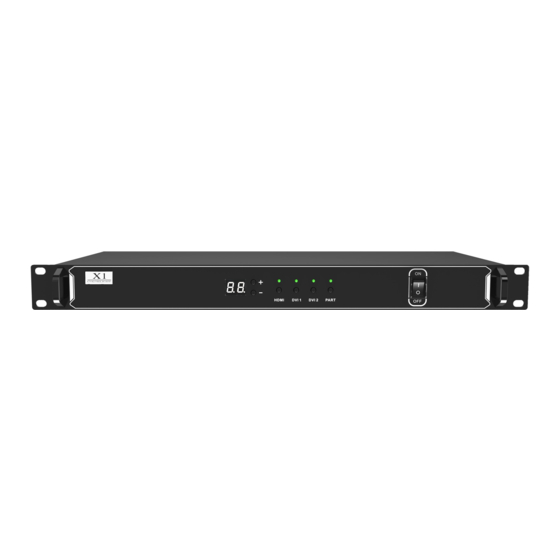
1.3 Structure ⚫ Dimensions: 1U standard box The following figure shows the dimensions of the X1 for reference: Main view (unit: mm) Rear view (unit: mm) Top view (unit: mm) - Page 5 Switch the picture signal to DVI1 signal, the button light is always on after selecting the signal. DVI2 button DVI2 Switch the picture signal to DVI2 signal, the button light is always on after selecting the signal. PART button PART Turn on/off the cropping function. Power button Switch the X1 on/off...
- Page 6 www.colorlightinside.com ⚫ The Back Panel: Interface type and specifications Input Interface HDMI HDMI 1.4 standard, receives HDMI signal format image from devices such as computer or HD player, maximum supports 1920×1200@60Hz DVI1/2 Receives DVI signal format image from devices such as computer or HD player, maximum supports 1920×1200@60Hz Output Interface Gigabit Ethernet...
-
Page 7: Chapter 2 Functions
www.colorlightinside.com Chapter 2 Functions 2.1 Video Processing ⚫ Scaling, cropping Supports scaling and cropping; maximum width is 4096 pixels, maximum height is 2560 pixels. ⚫ Better gray 2.2 Sending ⚫ 2 Gigabit Ethernet outputs, single network port loads up to 655360 pixels. ⚫... -
Page 8: Chapter 3 Operations
www.colorlightinside.com Chapter 3 Operations 3.1 Signal Connection... -
Page 9: Power On
3.2 Power On Press the power button on the front panel of the X1, it will be turned on and enter the self-test status, all the button lights will light up in sequence until booting successfully. The device will display the last saved settings, the new device will display the factory default settings. -
Page 10: Design
www.colorlightinside.com ⚫ Detect receiver cards Click “Detect Receiver Cards”, acquire the receiver cards information. 3.3.2 Design On this page, the function of sender can be set as followed: ⚫ Send/Read back the mapping of receiver... - Page 11 www.colorlightinside.com Choose the sender net ports that need cabinets to be added. Click “Add Cabinets” - “Custom”, add cabinets according to the actual size of the cabinets. After adding certain amount of cabinets, set up the mapping according to the connection of real situation. Click the button “...
- Page 12 www.colorlightinside.com Right click the sender which you want to set as backup. For example, set the sender 2 as the backup of sender 1. ⚫ Rename Right-click the sender that needs to be renamed, choose “Rename” on the menu, and directly input the name of the sender into the popped-up window (limited to 50 English characters).
- Page 13 www.colorlightinside.com ⚫ Mapping from sender Choose “Mapping From Sender”, the mapping of cabinets will apply the mapping stored in the sender. ⚫ Restore factory settings Choose the sender which needs to restore factory settings, select “Yes” on the popped-up window.
-
Page 14: Video Source Setting
www.colorlightinside.com 3.3.3 Video Source Setting On this page you can setup the followed function: ⚫ Main input display setting Choose video source - modify the start position of X, Y, width, height. Two operations: input values on the interface; drag the position and the size of the signal window in the view area. - Page 15 www.colorlightinside.com ⚫ Cropping and EDID setting Select signal source of the image that needs to be cropped, click the cropping icon to enter the cropping interface. In the cropping interface, check “Crop”, and set X, Y, width and height in “Cropping Information”, then the cropping setting is auto saved. As shown in the figure, click the EDID setting icon after the corresponding signal, the EDID setting window will pop up.
- Page 16 www.colorlightinside.com ⚫ Save and recall preset Click “Save Preset”, select one of preset serial number, modify the saved name of preset, finally click “OK” and finish the setting. Click “Recall Preset”, and select the corresponding preset.
-
Page 17: Control
www.colorlightinside.com 3.3.4 Control This interface can set the function as followed: ⚫ Brightness adjustment of senders It supports setting the sender’s brightness value and setting “Better Gray” of the sender. We can turn “Better Gray” on to optimize the displaying results of the screen under low brightness. - Page 18 We can view the display of the screen through “Test Patterns”, and to detect and diagnose the screen. The X1 supports “Freeze” and “Black”. Click on “Freeze”, the picture on the screen will freeze; Click on “Black”, the screen will become black and display nothing.
- Page 19 www.colorlightinside.com...
Need help?
Do you have a question about the X1 and is the answer not in the manual?
Questions and answers