BT Versatility Installation And Maintenance Manual
British telecommunications bt versatility installation and maintenance manual
Hide thumbs
Also See for BT Versatility:
- Manual (126 pages) ,
- Installation and maintenance manual (58 pages) ,
- Get started (35 pages)

Subscribe to Our Youtube Channel
Related Manuals for BT BT Versatility


Summary of Contents for BT BT Versatility
- Page 1 BT Versatility Communications without the complications Installation and Maintenance Manual...
-
Page 2: Table Of Contents
Commissioning Programming Internet Module Programming Installation Wizard Recommendations for customer training Troubleshooting Technical specification INDEX BT Versatility Installation and maintenance Manual Connecting the extensions CCU connections Door Intercom Doorstrike Connecting a MOHI unit 36 Connecting a PA 37 (public Address) amplifier... -
Page 3: Introduction
General overview • The BT Versatility is a new converged PBX and Data product, which can be connected to Analogue , ISDN and LAN networks. • The BT Versatility is a hybrid PABX/key-system, which may be equipped with Featurephones (V8 or V16) or standard two wire DTMF telephones. -
Page 4: Safety Precautions During Installation And System Upgrades
Electrostatic precaution (ESP) The BT Versatility contains electrostatic components. To ensure long-term reliability of the system, electrostatic precautions should be taken when handling any of the system PCBs that are not enclosed in plastic. An ESP pillar is located on the CCU MDF. - Page 5 BT Vers Pro Plus 6+24 Digital VDS BT Vers Pro Plus 8+32 Digital VDS BT Versatility Advanced Digital (System, 8 Port VM Pro , 4V8 and V16 with the 12/32 ) BT Vers Adv 2+8 Dig VDS BT Vers Adv 6+16 Dig VDS...
- Page 6 BT Versatility CCU MDF Card MTC BT Versatility V.24 Cable - incl DTYPE MTC BT Versatility 2m RJ45 Cable ISDN & Interet Mod WAN MTC BT Versatility CCU Housing screw 1/4 turn 4pk MTC BT Versatility BBU Blanking Plate MTC BT Versatility Expansn Backplane Bracket &...
-
Page 7: Installation Checklist
BT Versatility Installation and maintenance Manual BT Versatility Options MDF MTC BT Versatility Mod Retentn Long 1/4 turn Screw MTC BT Versatility V16 Console to V16 Connection Cable MTC BT Versatility V16 PSU MTC BT Versatility PSTN Module MTC BT Versatility ISDN2 Module MTC... -
Page 8: Installing The Central Control Unit
BT Versatility Installation and Maintenance Manual Installing the Central Control Unit CCU Location(CCU) The CCU is intended for installation in a residential or office-type environment. It needs to be mounted at a convenient working height on a dry, flat wall. The normal height is 1.5 m from the floor to the bottom of the CCU case. -
Page 9: Ccu Mounting Bracket Clearances
BT Versatility Installation and maintenance Manual CCU Mounting bracket clearances The main unit is mounted on a wall using the bracket supplied and should have top and side clearance as shown below. CCU Mounting Bracket 300mm If the system is to be equipped with a Ports, Options or Internet module then two mounting brackets need to be installed. -
Page 10: Mounting The Ccu
To remove the CCU depress the lock located on the left-hand side of the wall bracket. Slide the CCU to the left to remove it from the bracket. Installation and Maintenance Manual 300mm min Flanges BT Versatility... -
Page 11: Modules Located In The Ccu
BT Versatility Installation and maintenance Manual Modules located in the CCU There are a number of modules that can be installed in the CCU. • Analogue Line Module (Coloured Black). This provides 2 Analogue exchange lines. Up to two of these modules can be installed in the CCU to provide two or four Analogue lines. -
Page 12: System Expansion
BT Versatility Installation and Maintenance Manual System Expansion To equip the switch with more than 8 extensions or to add an Internet or Options module, a backplane, mounted on a second wall bracket, is needed. The power must be disconnected to install the backplane or expansion modules. -
Page 13: Mounting The Backplane
BT Versatility Installation and maintenance Manual Mounting the Backplane Slide the backplane on from the right hand side. Ensure the connector is fully mated with the CCU. Securing the backplane to the wall bracket A mounting screw is used to securely locate the backplane on the wall bracket. This provides additional rigidity to ensure the backplane and CCU connectors do not move. -
Page 14: Expansion Modules
The Ports MDF is also equipped with two connectors for the Analogue and /or the ISDN Basic Rate modules. The power must be disconnected when installing the Backplane or expansion modules Module with MDF Module and MDF separated BT Versatility Installation and Maintenance Manual... -
Page 15: Installing An Expansion Module
BT Versatility Installation and maintenance Manual Installing an Expansion module Install the Backplane as described on page 12. Install the MDF in the first free left-hand slot on the backplane. Lock the MDF in place by pushing the lock bar upward using a screwdriver. -
Page 16: Analogue Line Module
Remove the cover of the CCU. Insert the Analogue module in the Network slot or slots in the CCU. The left -hand slot is the first module position Remove the cover. Installation and Maintenance Manual Locate the Module BT Versatility First network module... - Page 17 BT Versatility Installation and maintenance Manual To Locate the Analogue Module in the Ports Module: Remove the Ports Module by firstly opening the Ports MDF cover Open the Ports module and remove it from the MDF Insert the Analogue Module (or modules) on the MDF connectors...
-
Page 18: Basic Rate Isdn Expansion Module
BT Versatility Installation and Maintenance Manual Basic Rate ISDN expansion module The ISDN Basic Rate Module provides one Basic Rate ISDN circuit (2B+D). The module is coloured RED, and can be installed in the CCU and also in the Ports MDF. - Page 19 BT Versatility Installation and maintenance Manual To Locate the Digital Line Module (ISDN 2) in the PORTS module Remove the Ports Module by firstly opening the Ports MDF cover Open the Ports module and remove it from the MDF Insert the Digital Line Module (or modules) on the MDF connectors The upper slot is the first module position The top connector is for the first module that connects to the Network only.
-
Page 20: System Isdn Settings
ON. interface termination An ISDN S-bus must be terminated twice, once at the start and once at the end of the bus. The BT Versatility S interface emulates the Network Terminating Equipment (NTE) and consequently is always terminated with 100 ohm resistance. -
Page 21: Voicemail Module
BT Versatility Installation and maintenance Manual Voicemail module The Voice module is coloured BLUE It is located in the Voice Module slot in the CCU. There are two versions. Two Port with 2 hours capacity, 4 port with 4 hour capacity and 8 port with 20 hours capacity. -
Page 22: Primary Rate Interface (Availability Tbc)
BT Versatility Installation and Maintenance Manual Primary Rate Interface (Availability TBC) The Primary rate ISDN Module (30B+D) is coloured Yellow It is located in the Primary rate ISDN Slot in the CCU... -
Page 23: Connecting The Battery Backup Unit To The System
BT Versatility Installation and maintenance Manual Connecting the battery backup unit to the system The Battery back up provides operation of an 8 + 32 system with 8 external calls and 3 internal calls running for approximately 40 minutes in the event of a power failure. The battery will support 11 erlangs of voice traffic for 40 minutes. -
Page 24: Connecting The Battery
• ORANGE indicates the unit is running off the Battery • RED indicates that the battery is discharged • Flashing RED indicates the battery is disconnected and the switch is running from the mains BT Versatility Installation and Maintenance Manual... -
Page 25: Featurephone V16
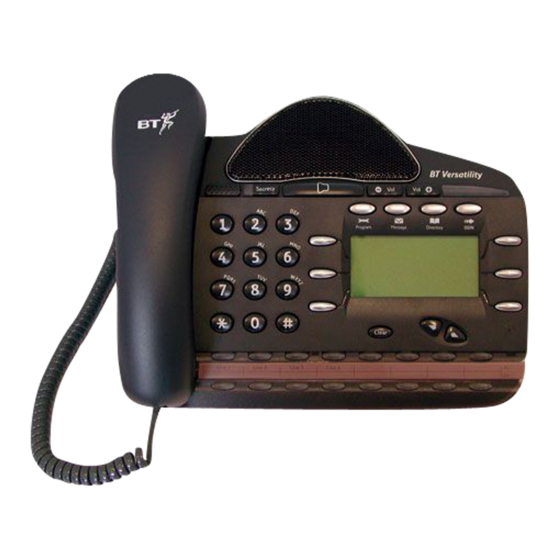
BT Versatility Installation and maintenance Manual Featurephone V16 Handset Numeric Keypad V16 Featurephone connections (underside of phone) All V16 Featurephones are supplied with a 5v DC Power transformer V16 Console socket DC Adapter connector Hands-free and light Volume Keys Secrecy Key... -
Page 26: Featurephone V8
V8 Featurephone connections (underside of phone) DC Adapter connector Hands-free and light Volume Keys 4 Function Keys: Programming Clear Key Scroll / Edit keys BT Versatility Installation and Maintenance Manual Messages Directories ISDN Message waiting/ Ringing indicator 6 Display Keys 8 Programmable keys. -
Page 27: Attaching The Featurephone Desk Plinth (V8 And V16)
BT Versatility Installation and maintenance Manual Attaching the Featurephone desk plinth (V8 and V16) Wall mount Plinth position Plinth position 35° Plinth position 20 ° Position at 35 degrees Position at 20 degrees... -
Page 28: V16 Expansion Console
BT Versatility Installation and Maintenance Manual V16 expansion console The V16 featurephone can be equipped with a 32 key module. This provides 32 additional programmable keys. Up to eight V16 featurephones can be equipped with this module. From the system programming menus you program which extensions are equipped with this module. -
Page 29: Clip, Plinth And Installation Of The V16 Expansion Console
BT Versatility Installation and maintenance Manual Clip, Plinth and installation of the V16 expansion console NOTE: For the 20 degrees position or the 35 degrees position relate to page Cord Rail 15 cm cord (RJ11 connector) -
Page 30: Wall-Mounting A Featurephone
BT Versatility Installation and Maintenance Manual Wall-mounting a Featurephone The phone plinth is inverted on the base to wall mount the phone. Locate, drill and plug the 2 screw locations as shown below. The holes should be deep enough to accept a 2.5 cm screw. -
Page 31: Door Intercom
Mounting screw Connect the single pair from the door intercom to the AB connections on extension 23. The system must be programmed to recognise the Door intercom. Refer to the BT Versatility Owner's manual for programming details. Door intercom bracket... -
Page 32: Cabling The Unit
• 67 Ohms, or 400 metres, for system Featurephones. • 336 Ohms, or 2 kilometres, for a standard telephone • 336 Ohms, or 2 kilometres, for a standard telephone connected to the external extension on the Options Module The Extension cables must be of twisted-pair construction, using insulated tinned copper wires of nominal 0.5 mm... - Page 33 BT Versatility Installation and maintenance Manual Four wires per Extension are connected at the Main Equipment. Spare wires must be neatly laid back away from the connectors. To prevent cross talk or interference, cable pairs should not be split or the spare wire of cable pairs used.
-
Page 34: Ccu Connections
The MOH Module may be used with 40 extension Hotel Software Build 473 (or later) • The MOH Module may be used with 32 extension System Software Build 474 (or later) BT Versatility Installation and Maintenance Manual network connections and one... -
Page 35: Connecting A Pa (Public Address) Amplifier
BT Versatility Installation and maintenance Manual • The MOH Module may be used with all Systems provided they are running above software versions or later The MOH Module provides an isolation barrier between the Extension Port and the Music Source and it... -
Page 36: Internet Module Mdf Connections
The Internet Module has 4 RJ 45 connectors providing 4 10/100Base T Ports for an Internal LAN and a connection for the ADSL modem via a 10 Base T WAN RJ45 connector. See page 49 for basic router programming. BT Versatility Installation and Maintenance Manual... -
Page 37: Options Module Mdf Connections
BT Versatility Installation and maintenance Manual Options Module MDF Connections The options module is equipped with a stereo jack for an ‘external Music on hold’ input. Krone IDC connectors are provided for the Central Bell and the External extension. The Central bell and the external extension are cabled with extension cabling. They are connected with a single pair a,b. -
Page 38: Expanding An Existing System
BT Versatility Installation and Maintenance Manual Expanding an Existing system Modules may be removed and re-inserted in a system without disconnecting the power. See page 38. However if additional modules are being installed in a working system it is necessary to power the system down before installing an MDF or Backplane. -
Page 39: Maintenance Procedures
BT Versatility Installation and maintenance Manual Maintenance procedures Faults can be rectified on site by replacing faulty modules or PCBs Hot Swapping faulty modules The Network modules can be replaced without powering the system down. If a Network module is replaced by the same type of module e.g. Analogue by Analogue, the switch will return to normal operation when the new module is inserted If a Network Module is to be replaced by a different type of Network Module (e.g. -
Page 40: Replacing A Faulty Module Mdf
BT Versatility Installation and Maintenance Manual Replacing a faulty Module MDF To replace a faulty MDF of a Ports, Internet or Options module the procedure is as follows: 1. Remove the cabling from the MDF ensuring the cables are correctly tagged so they can be readily reinstalled. -
Page 41: Replacing Faulty Pcbs
BT Versatility Installation and maintenance Manual Replacing Faulty PCBs Replacing the 008 extension board If a fault occurs on the first eight extensions the 008 extension PCB must be replaced. This PCB is NOT hot swappable. The System must be powered down to change this board ESD precautions must be taken when replacing this board. -
Page 42: Replacing The Ccu Control Pcb
BT Versatility Installation and Maintenance Manual Replacing the CCU Control PCB This PCB is NOT hot swappable. The System must be powered down to change this board ESD precautions must be made when replacing this board. Connect to the ESD... -
Page 43: Power Supply Unit Spare Fuse
BT Versatility Installation and maintenance Manual Power supply unit spare fuse A spare mains fuse is located in the Power supply unit. It is in a holder directly below the installed fuse (3.15A T). If there is no power being supplied to the unit check if the fuse is blown 1. -
Page 44: Replacing The Power Supply Unit
BT Versatility Installation and Maintenance Manual Replacing the Power Supply Unit The procedure to be used when replacing the Power Supply unit is :- 1. Power the system down by unplugging it at the mains. 2. If a battery is installed turn off the BBU switch to disconnect the battery. -
Page 45: Replacing The Ccu Mdf
BT Versatility Installation and maintenance Manual Replacing the CCU MDF This PCB is NOT hot swappable. The System must be powered down to change this board ESD precautions must be made when replacing this board. Connect to the ESD pillar on the CCU MDF before removing the CCU cover The procedure to be used when replacing the CCU MDF unit is: 1. -
Page 46: Power Fail
ISDN NTE or an external S bus, and work independently of the system. Installation and Maintenance Manual Power-fail extension Extn 26 Extn 27 Extn 34 Extn 35 Extn 42 Extn 43 Extn 50 Extn 51 BT Versatility... -
Page 47: Power Up And Test
BT Versatility Installation and maintenance Manual Power up and test • Ensure the mains plug is fitted with a 3A fuse. Switch on • Power up the system by inserting the mains plug. • Wait approximately 30 seconds for the system power up routine to be complete. -
Page 48: Programming
Programming Essential programming is carried out either from a Featurephone connected to extension 20 or via the BT Versatility wizard, the programming PC application. Ensure that the following programming is done. Equipped exchange lines The system assumes that all line cards have lines connected to them. If lines are not connected, it is vital to unequip these lines in system programming, as follows: •... - Page 49 Class 6 is the additional restriction codes in the Restricted Table in Class Codes programming. These can be combined with Classes 1,2 and 3. Note: As the BT Versatility can support both ISDN and Analogue, it may be necessary to enable features for ISDN and Analogue options on the same system.
-
Page 50: Internet Module Programming
Internet Module Programming The Internet Module can only be programmed from the BT Versatility wizard programming package running on a PC connected to the serial interface. When the BT Versatility wizard is running select the Internet Module programming. Installation Wizard The installation wizard allows you to quickly and easily set up an Internet connection. -
Page 51: Adsl
BT Versatility Installation and maintenance Manual • The following screen is displayed • If an ADSL line is connected to the Internet module, select ADSL • If ISDN is to be used, select ISDN ADSL ADSL provides a high-speed "always on" service whereby the Internet module is permanently connected to the Internet using a standard telephone line. -
Page 52: Isdn
• Enter the Password This will be provided by the ISP. • Enter the telephone number that the Internet module dials to access the Internet. This will be provided by your ISP. • Profile active This must be set to Yes. -
Page 53: Recommendations For Customer Training
• Connecting modems, fax machines, EPOS machines, etc. • Use of Voice module features. The features should be explained by using the BT Versatility Quick Reference User Guide and the Getting Started User Guide. Ensure the customer has a Quick Reference User Guide for each extension, one copy of the... -
Page 54: Troubleshooting
• System reset Reset: To do a warm reset of the BT Versatility press the reset button on the CCU MDF. You may also choose programming mode and choose system, reset options, and reset. Reset to default: To do a cold reset of the BT Versatility, enter programming mode and choose system, reset options, and reset to default. -
Page 55: Technical Specification
BT Versatility Installation and maintenance Manual Technical specification Type of system ISDN 2 line Analogue lines Terminals Extension capacity Featurephone capacity Standard 2-wire apparatus capacity Extension loop resistance System REN Extension REN Central bell Central Bell REN Extension cabling Central control unit (CCU) 008... - Page 56 Width 73 mm Depth 38 mm Charcoal ref: Pantone 432C 4 x 10/100 Base-Tx ports ADSL 10 Base-T output for an external ADSL modem BT Versatility ° ° C to 40 5% to 95% ° ° C to +85 °...
- Page 57 Optional software Check in / Check out Call billing Programmable call charges Room Status Guest / Administration extensions Message waiting Alarm Calls Full remote support from a BT Maintenance Centre Remote Diagnostics Remote Programming Automatic fault reporting can be provided...
-
Page 58: Index 28
, 28, 29 , 25 , 26 Voice module, 39 Voice module 2 or 4 port, 11 Voicemail card , 21 wall bracket , 12, 13 Wiring , 32 Wizard , 50 Your Internet Service Provider (ISP), 50 BT Versatility... - Page 59 The CE Marking on this equipment indicates Compliance with the following This device conforms to Directive 1999/5/EC on Radio Equipment and Telecommunications Terminal Equipment as adopted by the European Parliament And Of The Council Offices Worldwide The telecommunications services described in this publication are subject to availability and may be modified from time to time.
Need help?
Do you have a question about the BT Versatility and is the answer not in the manual?
Questions and answers