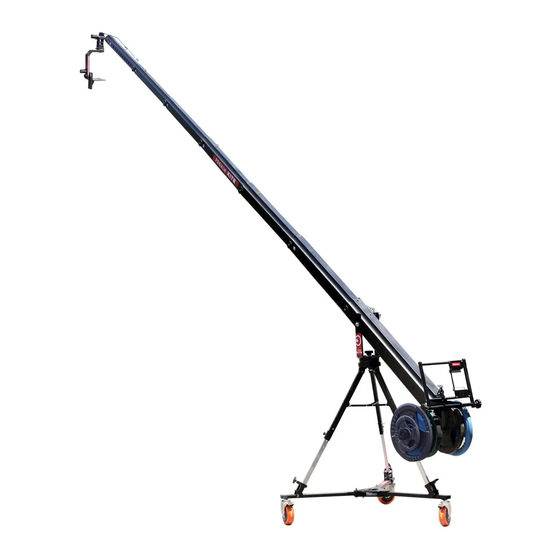
PROAIM Kite-22 Ultimate Package Instruction Manual
Hide thumbs
Also See for Kite-22 Ultimate Package:
- Assembly manual (37 pages) ,
- Instruction manual (21 pages) ,
- Setup and operational manual (16 pages)
Advertisement
Quick Links
Advertisement

Related Manuals for PROAIM Kite-22 Ultimate Package


Summary of Contents for PROAIM Kite-22 Ultimate Package
- Page 1 Kite-22 Ultimate Package (KITE-22-ULTIMATE) Instruction Manual...
- Page 2 At Proaim, our goal is to ensure 100% Customer Satisfaction in all that we do. We back our sales with a 1 year warranty from the date of purchase and work hard to resolve any problems in the unlikely event one should arise.
- Page 3 On behalf of all the people that work so hard to provide you with the most up-to-date, flexible and cost-efficient production gear, we would like to welcome you into the Proaim family. By purchasing your kite-22 camera crane Ultimate package, you have just joined a host of designers, engineers, machinists, assembly, customer service and office staff that take great pride in all that they do.
- Page 4 Proaim Spin-3 (3-Axis) Motorized Dutch Roll Pan Tilt Head (PT-SPIN-3) Proaim Zoom Control (P-ZC-3DV) Proaim Customized Storage cases for Camera Jib Arm , Jib Stand & Accessories Complimentary Tools and Tool Pouch/Wrap First Box includes Jib Sections ...
- Page 5 Packaging Material of Box 1 & 2: 7 x Jib Sections Packaging Material of Box 3: Accessories of jib crane Head Platform with bolt, shaft collars, washers and nut Hub Mounting Levelling Cable Joystick controller bracket Turnbuckle 6 x locking Pins 6 x hank for joining arms...
- Page 6 Packaging Material of Box 5: Dolly Ultimate Gravity D-33 Pro Camera Dolly Stand Bowl Tripod holder Gravity stand Packaging Material of Box 6: Proaim Spin-3 (3-Axis) Motorized Pan Tilt Head (PT-SPIN-3) Joystick Controller with 15mtr Control Cable Spin-3 Pan-tilt head 3mtr Adapter Cable Universal Adapter...
- Page 7 Safety Hints ATTENTION: PLEASE READ THIS BEFORE USING TO PREVENT SERIOUS DAMAGE TO THE GEAR! The crane may not be assembled or operated under influence of alcohol, drugs or any other intoxicating substances. Lack of attention while connecting the components together can cause substantial damage to equipment/operator.
- Page 8 Assembling Now take out the Tripod Stand from its case, and stretch its legs on floor as per the requirement. Loosen the knob at the bottom of jib stand. Stretch its legs on floor and set the height of stand, as per the requirement.
- Page 9 For Dolly NOTE : This dolly has various holes for flexible mounting of Tripod. To open the legs of Dolly remove the bolts & fully spread it on floor. Then insert the bolts with their washer and tighten the bolts properly. NOTE: To keep the dolly in static position, lock the wheels by pushing down the lever.
- Page 10 Remove the allen bolts from the Tripod holder. Match the hole of Tripod holder with the dolly to insert the long bolt & tighten it with the help of allen key. Place the jib stand onto dolly.
- Page 11 Firstly, place Ultimate Gravity Stand Bowl top of the Stand. Then tighten the provided knob. HUB SECTION ASSEMBLY NOTE: The Hub Assembly has several mounting holes. You can mount LCD Monitor or Joystick box to this assembly if you want. ...
- Page 12 NOTE: This is the Pan Friction Knob. Never pan the Jib with this knob tightened. If this knob turns while panning, it is too tight. Only tighten while parking the jib ! Insert the provided washer & knob to secure the jib properly. INSTALLING THE JIB SECTIONS ...
- Page 13 NOTE: We have provided double locking precautions on Jib, Knob is the first and primary pin is the secondary locking so first lock the knob to avoid slipping of sections. After alignment of holes (Jib arms) insert hank lock pin & tighten it from another side with hank threaded cap.
- Page 14 Attach the provided bolt, shaft collars, washers and nut. Tighten all the bolt, shaft collars, washers and nut to secure properly as shown in the image. Connect the one end of Head Platform Levelling cable with the head platform by hooking the turnbuckle ends.
- Page 15 INSTALLING THE REAR FRAME To mount the Rear section, of jib section and insert the bolt with washers through one end of the section to the other. Slide the bolt through and hand tighten. INSTALLING THE PAN TILT HEAD ...
- Page 16 Install the 12 volt DC power (4 pin XLR) in rear of joystick box. Note: Any 12 volt battery may operate the PROAIM™ GOLD PAN TILT HEAD as long as the connector mates and is #1 pin Negative and #4 pin Positive.
- Page 17 Note : The Dutch roll arm can be detached from the head in order to use the head as normal pan and tilt head. After detaching the Dutch roll from the head, the H plate can be attached to install the camera.
- Page 18 Note: Remember practice makes perfect and always watch the cables for binding. The PROAIM™ GOLD PAN TILT HEAD circuitry is built entirely into the joystick box. The only other requirement is the AC power pack (provided) or battery power. The power pack can handle 90-240 volts.
- Page 19 All joysticks are linear, meaning that each degree of movement of the stick correlates to the output. On the 12 volt PROAIM PAN TILT HEAD half deflection of the joystick means approximately 6 volts sent to the motors. But with the advent of Digital we can now control the taper of the joystick, making in Logarithmic as well.
- Page 20 BALANCING TIPS : Its sections collapse into each other 1. 24.5’ Jib Weights required for balancing only Jib (without camera & Pan Tilt) is: 55Kg (121.5 lbs) If the camera weight is 1kg, the jib is balanced with 55+5kg=60kg If the camera weight is 2kg the jib is balanced with 55+10kg=65kg 2.
- Page 21 You can also try this with up and down shots or diagonal shots. Just remember to move your hands the same direction as you pan/tilt the camera. YOUR PROAIM KITE-22 CAMERA CRANE ULTIMATE PACKAGE ALL DRESSED UP AND READY TO GO!
- Page 22 WARRANTY We offer a one year warranty for our products from the date of purchase. We will repair or replace your product, free of charge, in the event of a defect in materials or craftsmanship obtained during normal use or handling based on the user manual. Please note that we will not cover any shipping costs for returning the product to us.
Need help?
Do you have a question about the Kite-22 Ultimate Package and is the answer not in the manual?
Questions and answers